4 steps to get started in Loom
Loom is a video communication tool for all teams that need to communicate clearly without adding more work. With Loom’s AI-powered recording, editing, and sharing, you can turn recordings into polished, searchable knowledge that keeps everyone aligned and moving faster.
In this guide, you’ll learn how to get started with Loom in four steps: choosing and downloading a Loom recording platform, how to record Loom videos and meetings, how to edit Loom videos, and how to share Loom videos with your team.
Ready to get started? Sign up for free to follow the steps below and see features in action.
Step 1: Choose & download a Loom recording platform
Loom gives you the flexibility to record and share videos from wherever you work best. Our Loom recording platforms—the desktop app, Chrome extension, and mobile apps—make it easy to get started whether you’re on a laptop, in your browser, or on the go. In this step, you’ll learn how to download Loom on the devices that fit your workflow, so you can start recording in minutes.
How to download Loom
Select the platform that best suits your workflow and needs, or learn more about each platform below. To download Loom on your preferred device:
- Choose a Loom recording platform
- Follow the install prompts from your browser, app store or operating system.
- Open Loom and sign in so you’re ready to record your first video.
Loom Chrome Extension
The Loom Chrome Extension is best for recording videos directly from your Chrome browser. With the Chrome Extension, you can record quick, easy videos directly in your browser with a two-click install. You can also choose between Full Screen, Window, Current Tab, and Camera Only modes, enabling you to record your full desktop screen, your browser window, just your current tab, or your camera.
Loom Desktop App
The Loom Desktop App is best for high-definition recording with your camera bubble across any browser or application on Mac and Windows. You can use the desktop app if you want to record your camera bubble when recording a different application other than the Chrome browser, or PDF documents within Chrome.
Depending on your plan, the Desktop App lets you create custom-sized recordings to capture a specific screen area, use the drawing tool to highlight screen sections temporarily, add mouse-click highlights to emphasize step-by-step processes, or use AI-powered meeting notes for collaborative meeting notes.
Loom for iOS (Mobile)
The Loom iOS app enables you to record your screen, camera, or audio on the go and share directly to Slack, Gmail, Messenger, and more, directly from your iPhone or iPad.
Loom for Android (Mobile)
The Loom for Android app allows you to record with Loom on the go. You can choose to record screen only, camera only, screen and camera, or audio only, and share to Slack, Gmail, Messenger, and more, directly from your Android device (8.0 and above).
Not sure which platform works best with your workflows? Visit our support resources to learn more about app compatibility.
Step 2: Record
Now that you’ve chosen and downloaded your Loom recorder – whether that’s the desktop app, Chrome extension, or iOS or Android mobile app – you’re ready to start recording. In this step, you’ll learn how to record a Loom video and how to capture your meetings with Loom, so you can turn long conversations into quick, shareable videos and recaps.
How to record a Loom video
In this section, we’ll guide you through how to record a Loom video from start to finish using our most popular recorder: the Loom desktop app. The same basics apply if you’re using the Chrome extension or mobile app.
Watch a quick tutorial to learn how to record your first Loom video, or follow the steps below.
Choose what you want to capture
Start by opening the Loom Desktop App (or clicking the Loom Chrome extension). From the recorder, decide how you want to show up:
- Screen and Camera (recommended): Show both your content and your camera bubble so viewers can see you and your work at the same time.
- Screen only: Focus entirely on what’s on your screen—great for demos or walkthroughs.
- Camera only: Record just yourself for quick announcements, intros, or updates.
If you’re using the desktop app, you can also control how much of your screen you capture by choosing your full screen, a specific window, or a custom-sized area for extra control.
Check your camera and microphone settings
Before you hit record, quickly confirm your setup so your video looks and sounds clear:
- Make sure the correct camera is selected and that your preview looks good.
- Pick your preferred microphone from the dropdown and say a few words to confirm the audio meter is moving—this means Loom is picking up your sound.
If something doesn’t look or sound right, you can switch devices directly from the dropdowns before you start.
Tailor your recording experience
You can fine-tune your recording so it looks and feels the way you want.
- Open Settings in the recorder.
- Choose your default video quality (for example, HD) based on your device and network.
- Turn on mouse-click highlights so viewers can easily follow your cursor.
- Set up keyboard shortcuts to start, pause, or stop a recording without needing to click on the controls.
These settings are remembered for future recordings, so you only need to set them once.
Make your video more engaging
Use Loom’s visual effects to keep your viewers focused on what matters:
- Use Effects to blur your background or add a Background or Canvas behind you.
- Apply Filters and Frames to customize how your camera bubble appears on screen.
You can reposition your camera bubble so it doesn’t block key content—or adjust it at any time while you’re recording.
3..2..1..Start recording
When you’re ready, click Start recording. For inspiration, try introducing yourself to a new colleague or share context before a meeting. As you record, you’ll see controls on the side or bottom of your screen that let you:
- Pause to take a moment, switch windows, or gather your thoughts.
- Restart if you want a clean take without closing Loom.
- Cancel if you decide not to keep the recording.
- Use the drawing tool to temporarily highlight areas of your screen.
- Click confetti to celebrate a milestone or win.
- Turn your camera bubble on or off as you go.
Finish your recording and get ready to share
When you’re done, click Stop recording. Loom will automatically open your video’s Share Page in your browser, where you can:
- Rename your video so viewers understand what it’s about.
- Update your video thumbnail so it looks polished wherever it’s shared.
- Turn on captions or stylized captions to make your video more accessible.
- Adjust viewing preferences like recommended playback speed, comments, and emoji reactions.
- Quickly trim any false starts or long pauses from the beginning or end.
From here, your video is ready to share in just a few clicks. You don’t need editing skills and no need to export to share your video. If you want to polish it before sharing, read on to learn how to edit and share your video.
Want AI to handle quick polishes before sharing?
Sign up for the Loom Business + AI plan to get auto-filler word and silence removal, waveform editing, and automatic titles, summaries, and chapters on your videos.
How to record a meeting
Loom makes it simple to capture your meetings—on Zoom, Google Meet, Microsoft Teams, or in person—so key conversations, decisions, and action items are never lost. Instead of relying on memory or scattered notes, you can share a meeting recording and recap that teammates can watch or skim at 2x speed on their own time.
In the steps below, we’ll guide you through setting up meeting recordings and preferences. These settings ensure that Loom captures the meetings that matter most, so you can record and transcribe your meetings in 50+ languages, without extra effort.
Why record your meetings with Loom?
- Make it easy to catch up and collaborate asynchronously, with comments and reactions directly on the video.
- Keep distributed teams aligned across time zones with recorded context they can revisit anytime.
- Capture decisions and next steps so nothing slips through the cracks, even if someone couldn’t attend live or was out of office.
- Reduce follow-up work by sharing a clear summary instead of scheduling another meeting.
- Stay focused and engaged in meetings instead of worrying about taking notes.
Ready to start recording your meetings? Follow the steps below as we guide you through setting up meeting recordings and preferences.
Set up meeting recordings
Start recording your meetings with Loom in a few simple steps. You can set Loom up once so it automatically records the meetings that matter most, with the right defaults in place.
To get started, head over to your Settings tab, Connect your calendar (Google or Outlook) and follow the prompts to log in to your workspace.
Choose your Auto-record preferences
Set default rules to match how you work with auto-record preferences.
- Auto-Record all meetings: Automatically record all meetings where you are the host on your calendar.
- Internal meetings only: Only record meetings where all invitees are in your Loom workspace or share your email domain
- Manually select: Choose which meetings to record manually.
Once this is set up, Loom will take care of recording and uploading your meetings for you. No need to remember to hit record every time. You can toggle recordings on or off as needed for your upcoming meetings.
Control who can view your meeting recordings
You can set default privacy rules so the right people have access to your meeting recordings. Here’s an overview of your options:
- Public: Everyone with the link can view the recording.
- Workspace: Only those who are in your workspace or share your email domain.
- Private: Only you.
Need help? Visit our support resources to learn more about recording meetings with Loom AI for Meetings.
Turn meetings into searchable documentation
Once your meetings are being recorded, Loom can:
- Record and transcribe your meetings in 50+ languages
- Generate summaries, key topics, and action items
- Make discussions searchable, so teammates can quickly jump to what matters
Instead of repeating yourself or re-explaining decisions, you can share a single meeting recap that your team can watch, skim, or search.
Ready to record your meetings?
Sign up for free to start recording, try automated meeting recaps with chaptered summaries and action items, or learn more about Loom’s AI meeting recorder and note-taker.
Step 3: How to edit a Loom video
Editing your videos gives you control over what your viewers see, helps you maximize engagement, and communicate your message effectively. In the steps below, we’ll walk you through the basics of how to edit a Loom video, from trimming mistakes to adjusting viewer settings so you can create polished, impactful videos that drive alignment and action.
Prefer following along with a video? Watch a quick tutorial on how to edit your videos below.
After you’ve recorded your Loom video, you’ll be taken straight to the video share page. Here, you can make quick edits to help your video look and sound its best, without any video editing experience.
Read on for a quick overview of what you can do to add polish to your video.
Rename your video
Click the video title at the top of the page to give your video a clear, descriptive name, so viewers know what to expect.
Trim your video
If you made a mistake at the beginning or end, use the Trim tool to cut out those sections. Here, you can drag the handles on the video timeline to select the parts you want to remove and save your changes. This helps keep your video focused and polished.
Adjust your settings
You can use your video settings to choose how your viewers interact with your video. Video settings enable you to set a playback speed, enable or disable comments and emoji reactions, and the visibility of your video transcript.
- Playback speed: Viewers can choose to watch your video at a faster or slower speed, but you can also set a default speed for them, so you don’t need to worry about how quickly you speak while recording.
- Comments and emoji reactions: Viewers can leave comments and emoji reactions at specific timestamps in your video. You can choose to disable this feature, allowing you to control how viewers interact with your video, especially when sharing it publicly, such as on your website or social media.
- Transcript: Loom automatically generates a transcript for your video, making it easier for you and viewers to follow along or review key points. You can disable the transcript if you don’t want viewers to view the transcript.
Edit faster with Loom AI
Let Loom’s AI editing features do the heavy lifting so you can spend less time on manual edits and more time getting your message across. Automatically remove filler words, silences, and rambles. Add emphasis with engaging text, arrow, and shape overlays.
Sign up for a free trial today or learn more about Loom’s AI editing features.
Step 4: Share
Once you’ve recorded and edited your video, it’s time to share your message. In this step, you’ll learn how to share a Loom video using links, email, Spaces, social platforms, and embeds, so you can reach your audience wherever they work—whether you’re sending a quick update to a teammate, distributing training across your organization, or embedding video content in your favorite tools.
Watch a quick tutorial to learn how to share your Loom video, or learn more about sharing options below.
Once your Loom video is ready, copy a link of your video to your clipboard and share your video instantly, or click Share to view more options.
Copy the link and share anywhere
The quickest way to share your Loom is by copying the video link. Simply click the Copy Link button at the top right of your video page, then paste it into email, chat, documents, or wherever your team communicates. This method works just like sharing a YouTube or news article link—anyone with access can click and watch instantly.
Control who can view
As you’re choosing how to share, you can control who can view your video and further manage your video’s privacy and discoverability. You can decide whether your Loom is available to anyone with the link, only people in your workspace, or specific people you name.
- Anyone with the link: Make your video accessible to anyone who has the link.
- Workspace members only: Restrict viewing to people in your Loom workspace. Members will be required to log in to view your video.
- Specific people: Limit access to select individuals by adding their email addresses. Recipients will receive an email notification with a video thumbnail and your personalized message.
For advanced privacy, click More options where you can fine-tune access permissions.
- Set a password: Add an extra layer of security (available on Business, Business+ AI, and Enterprise plans).
- Enable search engine indexing: Make your video discoverable via search engines if you want to reach a broader audience.
Additional sharing methods
- Share via email: Send your Loom directly to specific email addresses.
- Share to a Space: Make your video discoverable to groups or all workspace members.
- Share on social: Use the Social tab to post directly to LinkedIn, X (Twitter), Facebook, or Gmail.
- Embed: Generate a responsive or fixed-size embed code to add your video to websites, blogs, or wikis.
- Share at a specific timestamp: Direct viewers to a particular moment in your video by scrubbing to the desired timestamp, clicking Share, and selecting the option to share starting at that time.
- Salesforce: If you’re on an Enterprise plan, you can also share your Loom videos directly using Loom’s Salesforce integration, making it easy to connect video insights with your CRM workflows.
With Loom, sharing your video is as easy as recording it. Choose the method that fits you and your audience, set the right permissions, and get your message out. Learn more on how to share your Loom videos.
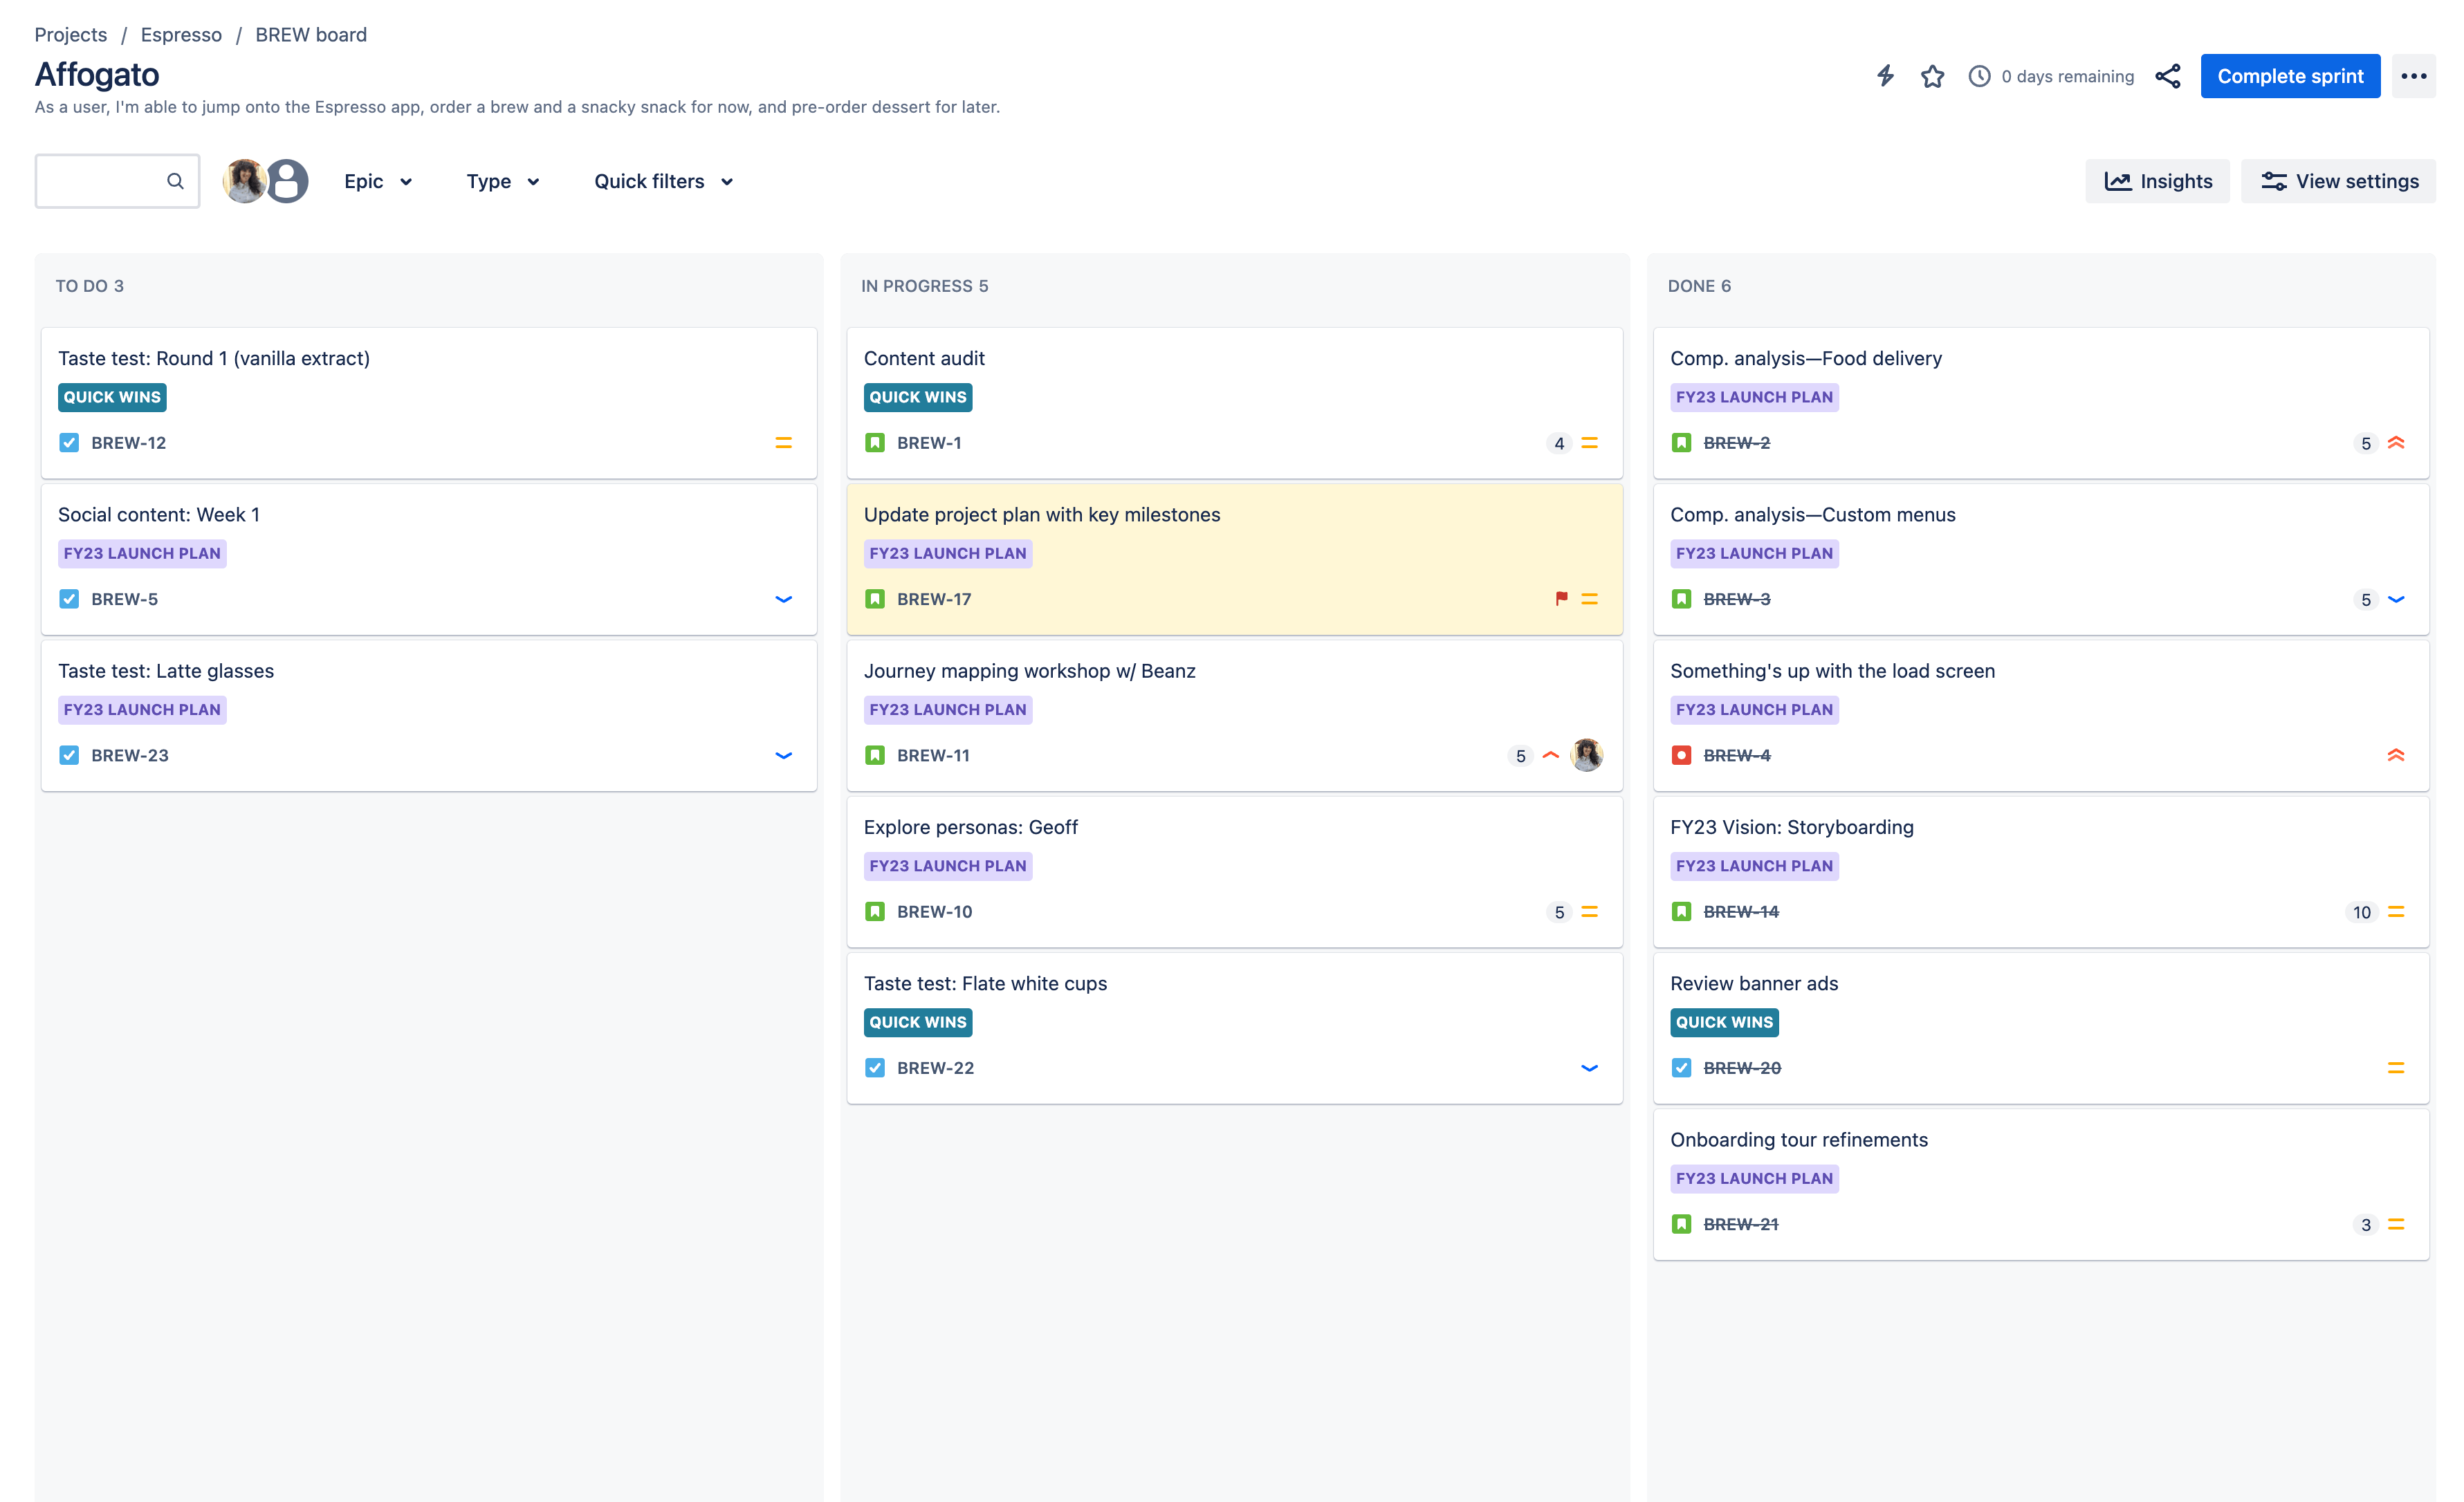
FAQs: Getting started with Loom
| Open the Loom desktop app or Chrome extension, choose whether to record your screen, camera, or both, check your microphone and camera, then click Start recording. When you’re finished, click Stop, and Loom will open the Share page where you can rename, edit, and share your video. |
| After recording, go to your video’s Share page and use the Trim tool to cut mistakes, adjust playback and interaction settings, and update the title and thumbnail. On Business + AI plans, you can also use AI editing to remove filler words and silences automatically. |
| From the Share page, click Copy link to share your Loom anywhere, or click Share to control who can view, send email invites, post to social channels, or generate an embed code for your website or wiki. |
| If you have download permissions for your plan and role, open the video, click the three-dot menu above the player, and select Download to save the Loom as an MP4 file. |
Scrum board
The scrum framework enables software teams to manage complex projects by creating a culture of collaboration. The Jira scrum board is the tool that unites teams around a single goal and promotes iterative, incremental delivery.
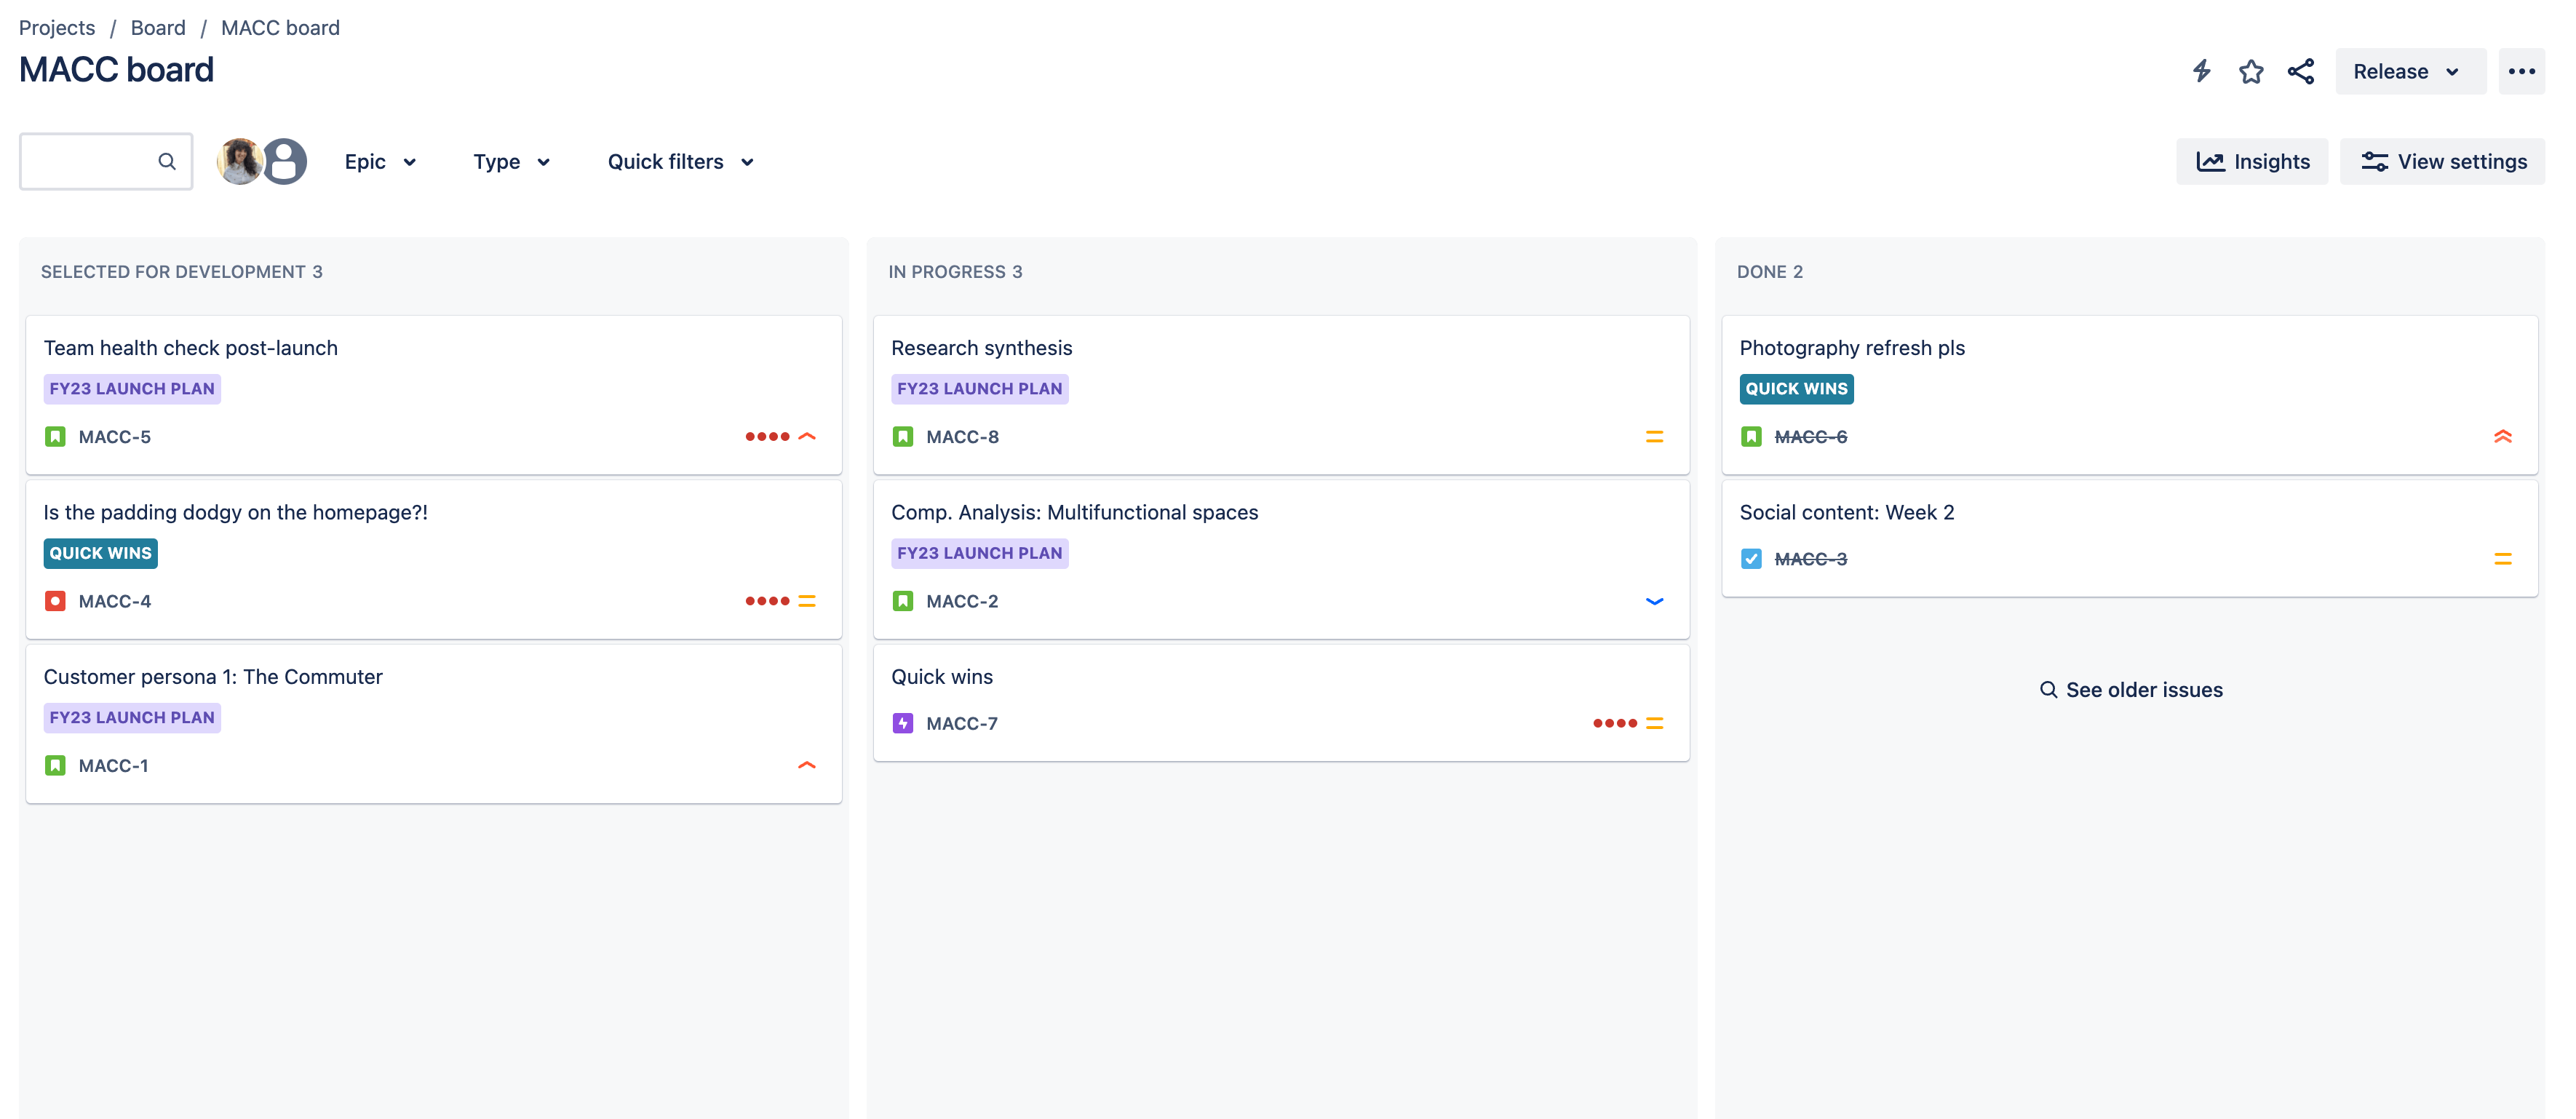
Kanban board
Kanban is a common framework for agile and DevOps software development that provides transparency of work and team capacity. Kanban boards in Jira help teams visualize their workflow, limit work-in-progress, and maximize efficiency.
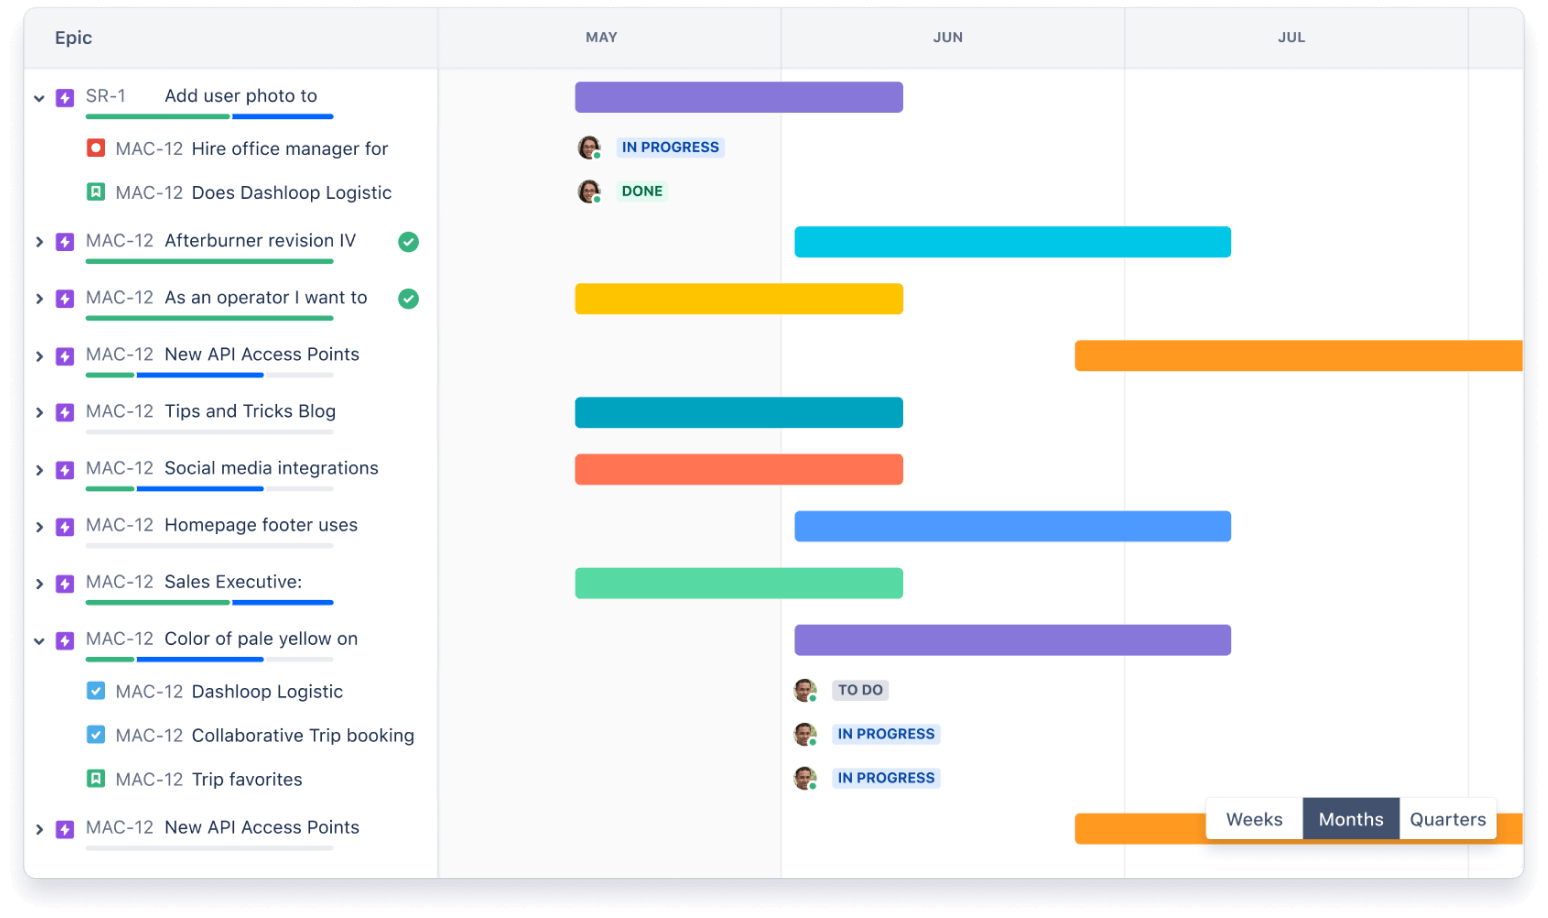
Timeline
The timeline view in Jira is useful for planning large pieces of work several months in advance within a single project. Simple planning and dependency management features help your teams visualize and manage work better together.
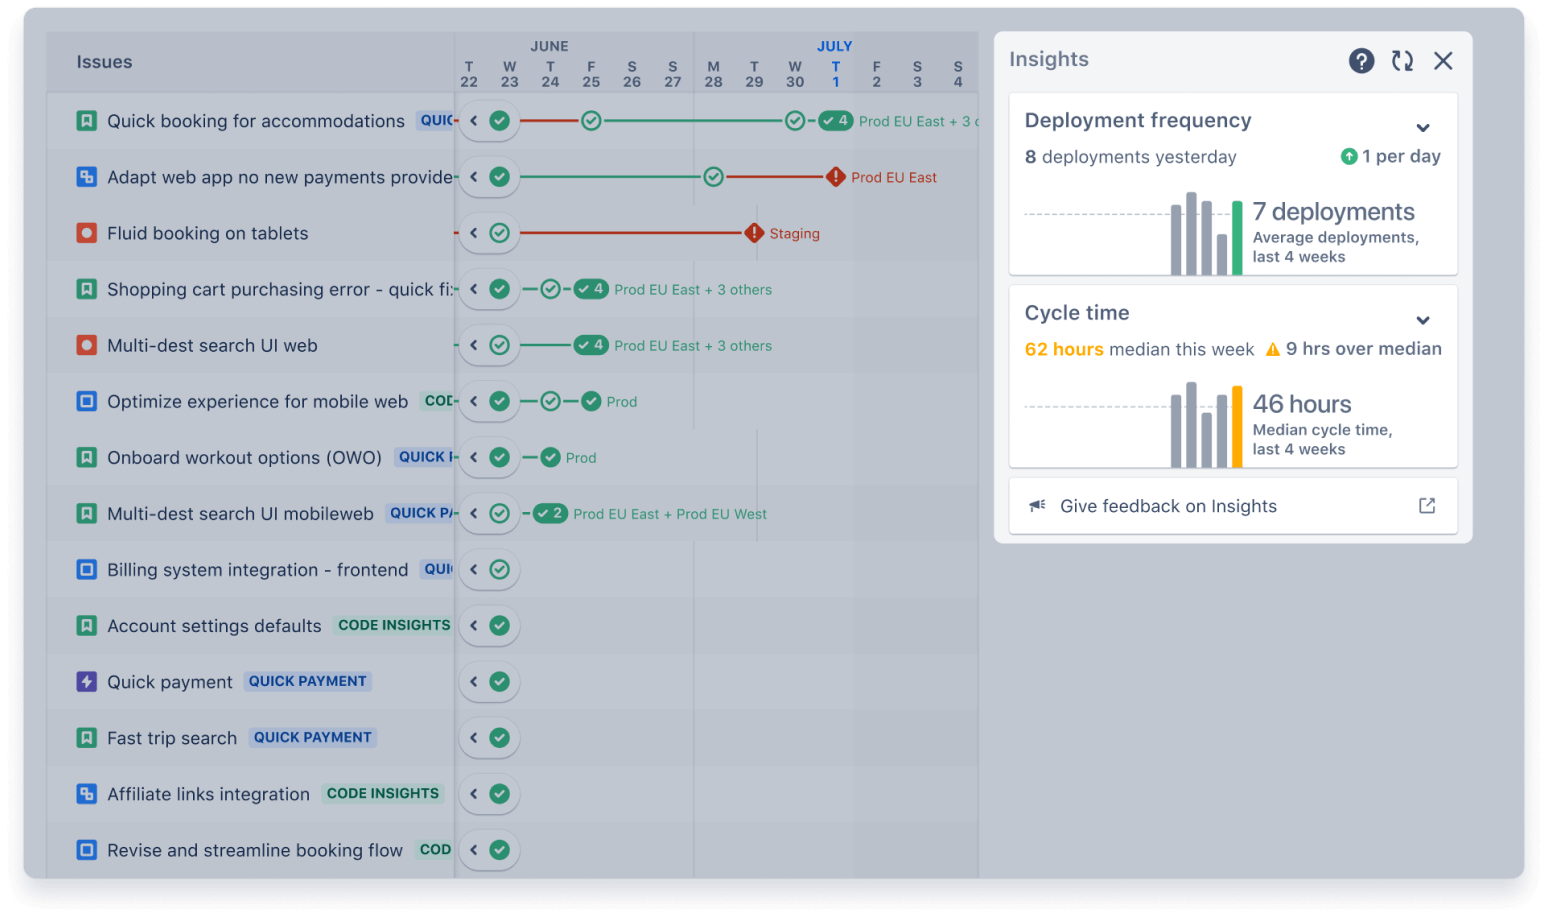
Insights
In Jira, insights helps the team make data-driven decisions without leaving their current context. Insights source data from your Jira boards and projects to present aggregated views of your team’s historical progress. Insights are currently available for scrum metrics in both company-managed and team-managed projects.
Integrations
In Jira, an app (sometimes called an add-on or plugin) is an installable component that supplements or enhances the functionality of your instance. You and your teams can spend less time managing work and more time building great software with over 3,000 Jira apps that can be custom-tailored to fit any and every use case.