Articles
Tutorials
Interactive Guides
Integrating Concourse-ci and Atlassian Open DevOps
Many teams roll their own tools to handle their needs or have legacy tools they’ve used for years. These tools are essential to the development process a team follows but don’t have off-the-shelf integrations with Jira. Luckily, it’s straightforward to build a custom integration using the Atlassian REST APIs found on Cloud developer documentation - Atlassian Developer . Concourse-ci is a CI/CD product that, at the time of writing this article, does not have an integration in the Atlassian Marketplace. This article demonstrates how to build a basic integration between Jira and Concourse-ci using the Atlassian REST APIs.
Prerequisites
Use the necessary documentation to setup Docker, docker-compose, and Concourse-ci. Concourse-ci runs on Docker and provides a docker-compose script to simplify getting started.
Read about Atlassian’s ImageLabeller demo application here. This article demonstrates how to use Concourse-ci to deploy the SubmitImage component of ImageLabeller to AWS.
Docker
Setup Docker and docker-compose by following the associated documentation:
Docker: https://docs.docker.com/get-docker/
docker-compose: https://docs.docker.com/compose/install/
Concourse-ci
Once Docker and docker-compose are installed you can start Concourse-ci by using the provided docker-compose.yml file.
Follow the Concourse-ci quick start guide to get started with https://concourse-ci.org/quick-start.html#docker-compose-concourse. This guide requires passing credentials to Concourse-ci securely. The guide uses the Concourse-ci AWS Secrets Manager integration for this purpose.
Concourse-ci integration with AWS Secrets Manager
Here is the documentation on how to integrate Concourse-ci with AWS Secrets Manager. Follow the instructions in the documentation to enable the integration and get started.
The docker-compose.yml file that is used to start Concourse-ci needs to be modified slightly for the integration to work. Take the default docker-compose.yml file supplied by Concourse-ci and add
CONCOURSE_AWS_SECRETSMANAGER_ACCESS_KEY, CONCOURSE_AWS_SECRETSMANAGER_SECRET_KEY, and CONCOURSE_AWS_SECRETSMANAGER_REGION.
version: '3'
services:
concourse-db:
image: postgres
environment:
POSTGRES_DB: concourse
POSTGRES_PASSWORD: concourse_pass
POSTGRES_USER: concourse_user
PGDATA: /database
concourse:
image: concourse/concourse
command: quickstart
privileged: true
depends_on: [concourse-db]
ports: ["8080:8080"]
environment:
CONCOURSE_POSTGRES_HOST: concourse-db
CONCOURSE_POSTGRES_USER: concourse_user
CONCOURSE_POSTGRES_PASSWORD: concourse_pass
CONCOURSE_POSTGRES_DATABASE: concourse
CONCOURSE_EXTERNAL_URL: http://localhost:8080
CONCOURSE_ADD_LOCAL_USER: test:test
CONCOURSE_MAIN_TEAM_LOCAL_USER: test
# instead of relying on the default "detect"
CONCOURSE_WORKER_BAGGAGECLAIM_DRIVER: overlay
CONCOURSE_CLIENT_SECRET: Y29uY291cnNlLXdlYgo=
CONCOURSE_TSA_CLIENT_SECRET: Y29uY291cnNlLXdvcmtlcgo=
CONCOURSE_X_FRAME_OPTIONS: allow
CONCOURSE_CONTENT_SECURITY_POLICY: "*"
CONCOURSE_CLUSTER_NAME: tutorial
CONCOURSE_WORKER_CONTAINERD_DNS_SERVER: "8.8.8.8"
CONCOURSE_WORKER_RUNTIME: "containerd"
CONCOURSE_ENABLE_ACROSS_STEP: "true"
CONCOURSE_ENABLE_PIPELINE_INSTANCES: "true"
CONCOURSE_AWS_SECRETSMANAGER_ACCESS_KEY: <add access key>
CONCOURSE_AWS_SECRETSMANAGER_SECRET_KEY: <add secret key>
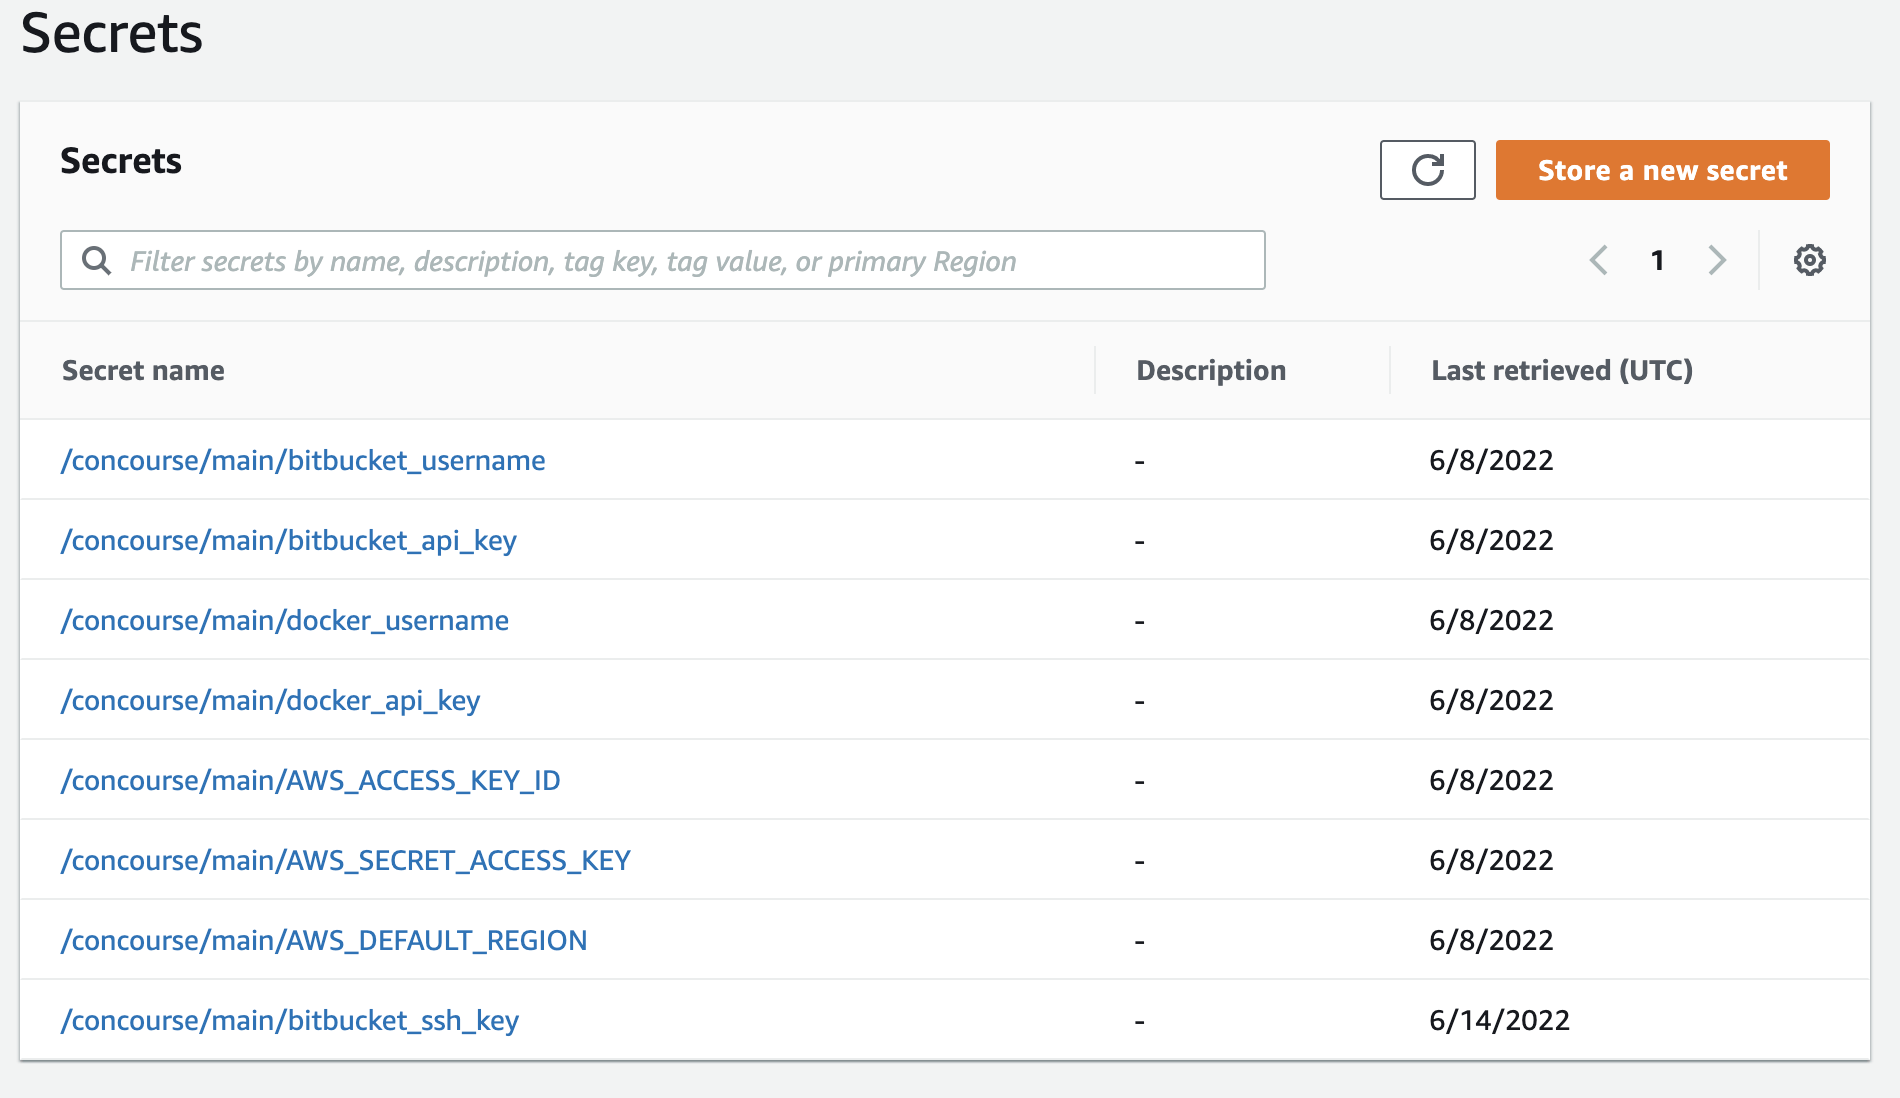
CONCOURSE_AWS_SECRETSMANAGER_REGION: <add a region>Once the integration is setup, and Concourse-ci is running with the integration enabled add the following secrets to AWS Secrets Manager.
/concourse/main/bitbucket_username
/concourse/main/bitbucket_api_key
/concourse/main/bitbucket_ssh_key
/concourse/main/docker_username
/concourse/main/docker_api_key
/concourse/main/AWS_ACCESS_KEY_ID
/concourse/main/AWS_SECRET_ACCESS_KEY
/concourse/main/AWS_DEFAULT_REGION
The Bitbucket and Docker secrets may need to be replaced if the reader is not using Bitbucket for their code, and JFrog as their Docker repository. Adjusting this to fit the reader’s individual tooling is left as an exercise.
Working with Concourse-ci
Run docker ps -a before, and after running docker-compose up -d to see that Concourse-ci has started correctly.
docker ps -a
CONTAINER ID   IMAGE     COMMAND   CREATED   STATUS    PORTS     NAMES

docker-compose up -d
Creating network "restapiproject_default" with the default driver
Creating restapiproject_concourse-db_1 ... done
Creating restapiproject_concourse_1    ... done

docker ps -a
CONTAINER ID   IMAGE                 COMMAND                  CREATED         STATUS         PORTS                    NAMES
bd2b5afd0ac7   concourse/concourse   "dumb-init /usr/loca…"   3 seconds ago   Up 2 seconds   0.0.0.0:8080->8080/tcp   restapiproject_concourse_1
bd9005b45636   postgres              "docker-entrypoint.s…"   3 seconds ago   Up 2 seconds   5432/tcp                 restapiproject_concourse-db_1
Go to http://localhost:8080/ after running fly -t tutorial login -c http://localhost:8080 -u test -p test
fly -t tutorial login -c http://localhost:8080 -u test -p test
logging in to team 'main'
target saved
There are no pipelines define at this time.
A hello world pipeline
Setup a hello world pipeline by following this Concourse-ci documentation: https://concourse-ci.org/tutorial-hello-world.html. This is necessary to introduce the Fly cli, and get used to working with Concourse-ci from the command line.
The next section demonstrates how to deploy an AWS Lambda written in Golang to a single AWS region with Concourse-ci and how to write an update to a Jira issue as part of the process.
Deploy SubmitImage with Concourse-ci
There are three steps to deploy the SubmitImage Lambda with Concourse-ci. The first step is to write a simple bash script that uses the Jira Cloud REST API to write a comment in a Jira issue. This is the simplest integration we can create. The second step is to create a Docker image with the necessary tools to build, and deploy a Golang AWS Lambda. The final step is to write a pair of Concourse-ci configuration files. The first configuration file, parent.yml, monitors the SubmitImage repository for new branches, and spools up new pipelines to deploy commits from those branches. The second configuration file, child.yml, defines the necessary set of steps to deploy a change.
Step 1 - Update Jira issues via REST API
This update script uses The Jira Cloud platform REST API to write a comment to a specific Jira issue. There are five required parameters that must be set every time the script is run. The jiraUsername, jiraApiToken, and workspace are typically the same for each run of a particular pipeline. The issueKey will depend on the branch name of the particular branch that is being deployed. It is Jira best practice to put the Jira issue ID in branch names, and commit messages when working on a particular issue. This article assumes that best practice is being followed, and that branch names are equivalent to the Jira issue ID.
How to find the parameters
Jira username
Jira username is the email address used to login to Jira.
Jira API token
Go to Account Settings
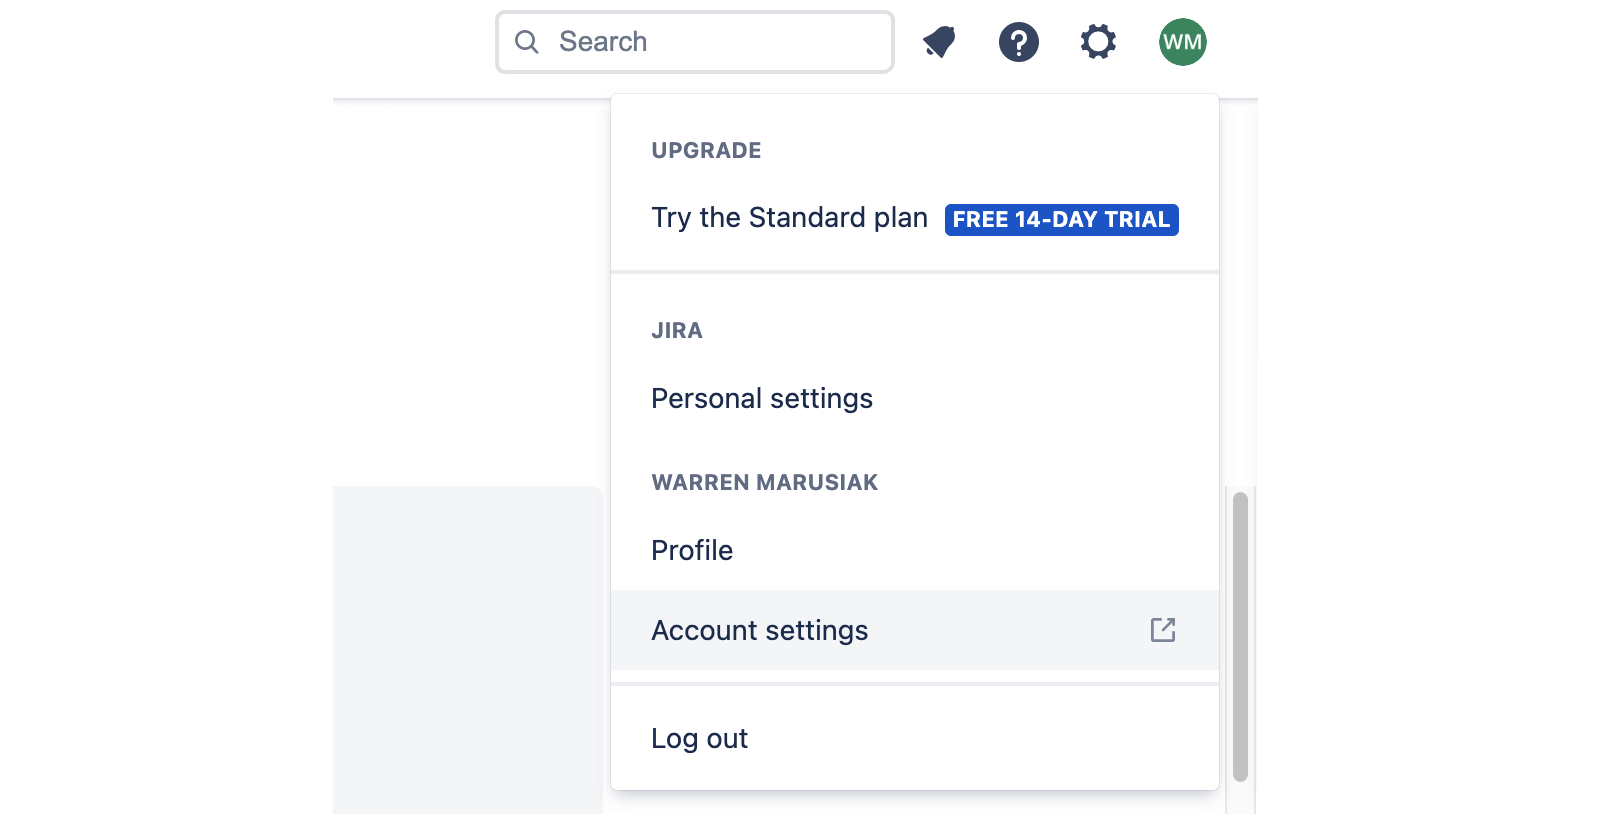
Click Security
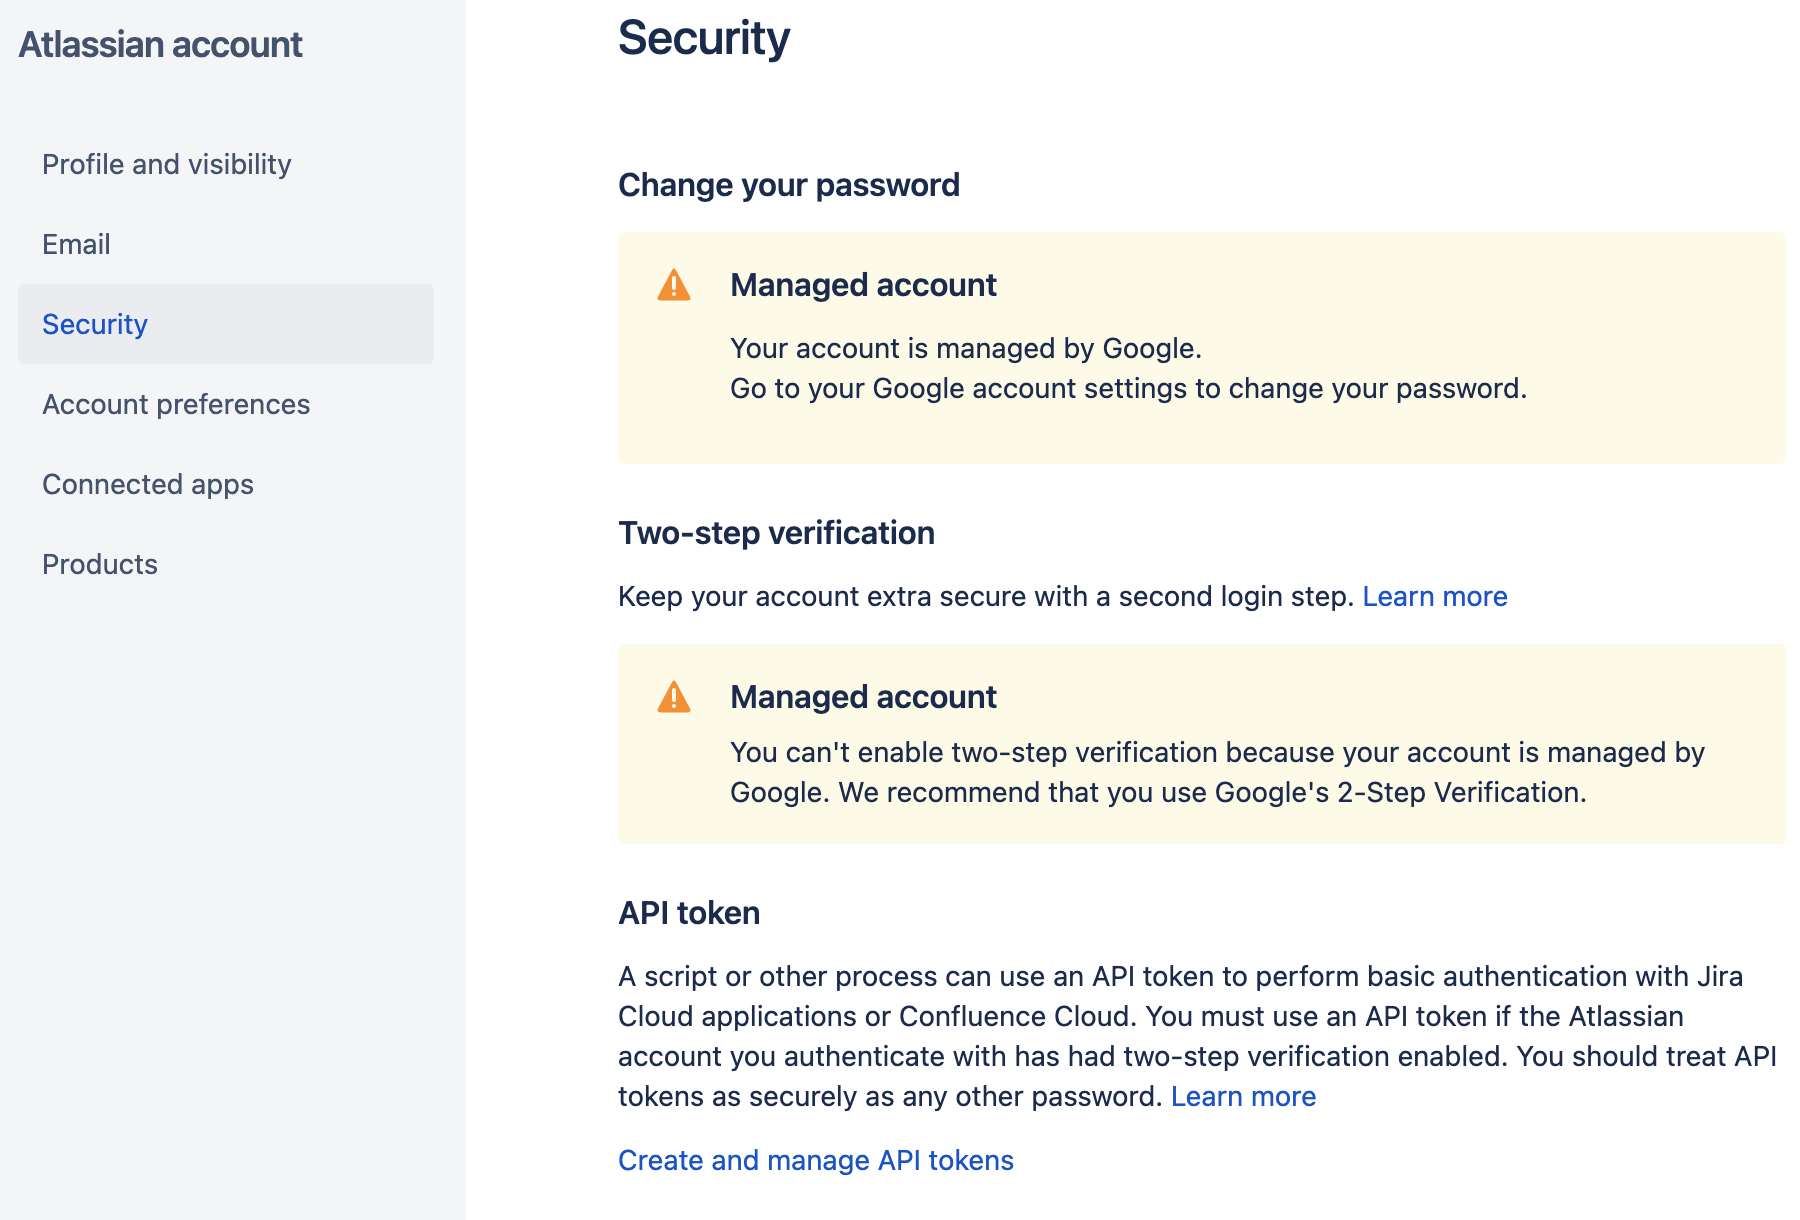
Click Create and manage API tokens
Workspace
Given a Jira instance url like https://pmmquickstartguides01.atlassian.net/jira/software/projects/IM/boards/1?selectedIssue=IM-203 the workspace is pmmquickstartguide01.
Issue key
Given a Jira issue URL like https://pmmquickstartguides01.atlassian.net/jira/software/projects/IM/boards/1?selectedIssue=IM-203 the Jira issue key is IM-203. Put the Jira issue ID in commit messages and branch names so the integration can write updates to the correct location.
Comment
The comment can be anything.
The Update script
The update script is a simple bash shell script that uses the Jira issue comment REST API endpoint. Here is the documentation for this API call. The script can be modified to provide a deeper integration by following the provided pattern to make additional API calls. Copy this script into a file called concourse-ci-integration.sh and put it in a Bitbucket or a GitHub repo named updateScript.
#!/usr/bin/env bash

addCommentToIssue() {
  printf "addCommentToIssue\n"

  local jiraUsername=$1
  shift
  local jiraApiToken=$1
  shift
  local workspace=$1
  shift
  local issueKey=$1
  shift
  local comment=$1
  shift

  curl -s --request POST \
  --url 'https://'"${workspace}"'.atlassian.net/rest/api/3/issue/'"${issueKey}"'/comment' \
  --user "${jiraUsername}"':'"${jiraApiToken}" \
  --header 'Accept: application/json' \
  --header 'Content-Type: application/json' \
  --data '{
    "body": {
      "type": "doc",
      "version": 1,
      "content": [{
        "type": "paragraph",
        "content": [{
          "text": "'"${comment}"'",
          "type": "text"
        }]
      }]
    }
  }' | jq
}

main() {
  printf "main\n"

  while getopts ":c:k:o:u:t:w:" opt; do
    case $opt in
    c)
      local comment=$OPTARG
      ;;
    k)
      local issueKey=$OPTARG
      ;;
    o)
      local op=$OPTARG
      ;;
    u)
      local jiraUsername=$OPTARG
      ;;
    t)
      local jiraApiToken=$OPTARG
      ;;
    w)
      local workspace=$OPTARG
      ;;
    *)
      printf "invalid option: -${OPTARG}\n" >&2
      exit 1
      ;;
    esac
  done

  case $op in
    ac)
      addCommentToIssue ${jiraUsername} ${jiraApiToken} ${workspace} ${issueKey} "${comment}"
      ;;
    *)
      printf "invalid op: ${op}\n" >&2
      exit 1
      ;;
  esac
}

main "$@"
Step 2 - Custom Dockerfile
Create a custom Dockerfile with the tools needed to build and deploy an AWS Lambda written in Golang. The Dockerfile installs some utilities then adds AWS SAM, and Golang. The image Git clones the update script created in Step 1 from a Bitbucket repository. You need to replace this Bitbucket repository with whatever repository you created to hold the update script. Docker build this Dockerfile and push it to a Docker repository.
Dockerfile
# syntax = docker/dockerfile:1.3
FROM ubuntu:20.04

MAINTAINER wmarusiak@atlassian.com

WORKDIR /workspace

RUN apt-get update \
&& apt-get -y upgrade \
&& apt-get -y install curl unzip tar openssh-client git jq

RUN curl https://github.com/aws/aws-sam-cli/releases/latest/download/aws-sam-cli-linux-x86_64.zip -L -o aws-sam-cli.zip \
&& mkdir sam-installation \
&& unzip aws-sam-cli.zip -d sam-installation \
&& ./sam-installation/install \
&& sam --version

RUN curl https://go.dev/dl/go1.18.2.linux-amd64.tar.gz -L -o go.tar.gz \
&& rm -rf /usr/local/go \
&& tar -C /usr/local -xzf go.tar.gz

RUN mkdir -p -m 0700 ~/.ssh && ssh-keyscan bitbucket.org >> ~/.ssh/known_hosts

RUN --mount=type=ssh git clone git@bitbucket.org:pmmquickstartguides01/updatescript.git

ENV PATH $PATH:/usr/local/go/bin
Step 3 - Concourse-ci deployment pipeline yaml files
Create a new repository called concourse and put two files in it. Parent.yml creates a pipeline that monitors a repository for new branches that match a regex. The branch_regex is IM-* that matches all branches starting with IM-. Parent.yml will create a new pipeline using the configuration in child.yml when a new branch that matches regex IM-* gets created. You should update this file to point to your own version of the SubmitImage repo. SubmitImage code can be found here. Copy this repository’s code into a repository with write permissions.
parent.yml
resource_types:
- name: git-branches
  type: registry-image
  source:
    repository: aoldershaw/git-branches-resource

resources:
- name: feature-branches
  type: git-branches
  source:
    uri: git@bitbucket.org:pmmquickstartguides01/submitimage.git
    branch_regex: IM-*
    private_key: ((bitbucket_ssh_key))

- name: examples
  type: git
  source:
    uri: git@bitbucket.org:pmmquickstartguides01/concourse.git
    private_key: ((bitbucket_ssh_key))

jobs:
- name: set-feature-pipelines
  plan:
  - in_parallel:
    - get: feature-branches
      trigger: true
    - get: examples
  - load_var: branches
    file: feature-branches/branches.json
  - across:
    - var: branch
      values: ((.:branches))
    set_pipeline: dev
    file: examples/child.yml
    vars: {branch: ((.:branch.name))}
Child.yml defines a pipeline with four steps. First, it runs sam validate to verify that the AWS CloudFormation template.yml file is valid. Then it runs sam build to build the package SubmitImage into a deployable artifact. Third, it runs sam deploy to deploy the updated SubmitImage code to AWS. Finally, the pipeline invokes the update script authored in step 1 to write a comment back to the matching Jira issue.
child.yml
resources:
- name: repo
  type: git
  source:
    uri: git@bitbucket.org:pmmquickstartguides01/submitimage.git
    branch: ((branch))
    private_key: ((bitbucket_ssh_key))

jobs:
- name: deploy-submit-image
  plan:
  - get: repo
    trigger: true
  - task: run-sam-validate
    config:
      platform: linux
      image_resource:
        type: registry-image
        source:
          repository: docker.atl-paas.net/wmarusiak/ubuntuawssam
          username: ((docker_username))
          password: ((docker_api_key))
      inputs: # add the get step as an input to this task
      - name: repo
      run:
        path: sam
        args: ["validate", "-t", "repo/template.yml"]
      params:
        AWS_ACCESS_KEY_ID: ((AWS_ACCESS_KEY_ID))
        AWS_SECRET_ACCESS_KEY: ((AWS_SECRET_ACCESS_KEY))
        AWS_DEFAULT_REGION: ((AWS_DEFAULT_REGION))
  - task: run-sam-build
    config:
      platform: linux
      image_resource:
        type: registry-image
        source:
          repository: docker.atl-paas.net/wmarusiak/ubuntuawssam
          username: ((docker_username))
          password: ((docker_api_key))
      inputs: # add the get step as an input to this task
      - name: repo
      run:
        path: sam
        args: ["build", "-t", "repo/template.yml"]
      params:
        AWS_ACCESS_KEY_ID: ((AWS_ACCESS_KEY_ID))
        AWS_SECRET_ACCESS_KEY: ((AWS_SECRET_ACCESS_KEY))
        AWS_DEFAULT_REGION: ((AWS_DEFAULT_REGION))
  - task: run-sam-deploy
    config:
      platform: linux
      image_resource:
        type: registry-image
        source:
          repository: docker.atl-paas.net/wmarusiak/ubuntuawssam
          username: ((docker_username))
          password: ((docker_api_key))
      inputs: # add the get step as an input to this task
      - name: repo
      run:
        path: sam
        args: ["deploy", "-t", "repo/template.yml", "--stack-name", "OpenDevOpsSubmitImage", "--s3-bucket", "open-devops-code-us-west-1-756685045356", "--capabilities", "CAPABILITY_IAM", "CAPABILITY_NAMED_IAM"]
      params:
        AWS_ACCESS_KEY_ID: ((AWS_ACCESS_KEY_ID))
        AWS_SECRET_ACCESS_KEY: ((AWS_SECRET_ACCESS_KEY))
        AWS_DEFAULT_REGION: ((AWS_DEFAULT_REGION))
  - task: run-update-script
    config:
      platform: linux
      image_resource:
        type: registry-image
        source:
          repository: docker.atl-paas.net/wmarusiak/ubuntuawssam
          username: ((docker_username))
          password: ((docker_api_key))
      input:
      -name: repo
      run:
        path: /workspace/updatescript/concourse-ci-integration.sh
        args: ["-c", "successfully deployed submitImage via concourse-ci", "-k", "((branch))", "-o", "ac", "-u", "((bitbucket_username))", "-t", "((bitbucket_api_key))", "-w", "pmmquickstartguides01"]
How to start the parent pipeline
Run the following three commands from the directory with parent.yml. The first command logs into the locally running Concourse-ci instance. The second command creates a pipeline called wm based on the configuration in parent.yml. The third command unpauses the wm pipeline.
fly -t tutorial login -c http://localhost:8080 -u test -p test
fly -t tutorial set-pipeline -p wm -c parent.yml
fly -t tutorial unpause-pipeline -p wm
Go to the Concourse-ci web client after running these three commands to see that the wm pipeline is up and running.

After running fly set-pipeline with parent.yml there is a wm pipeline. This pipeline monitors SubmitImage for any new feature branches, and creates a pipeline for each feature branch matching the regex in parent.yml.
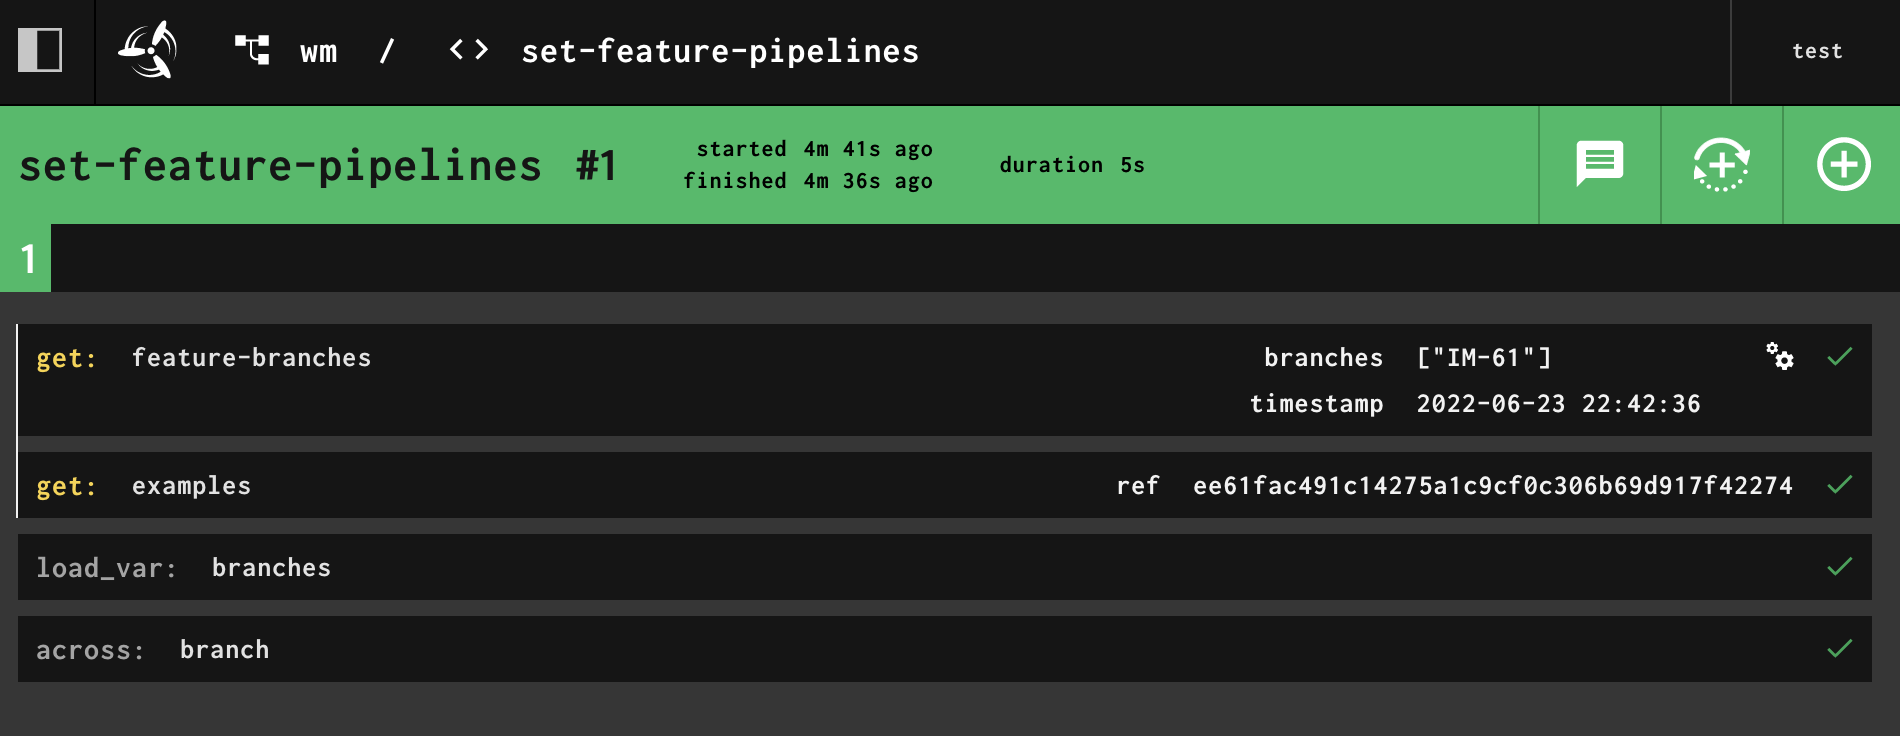
Click on the wm pipeline to see the steps that run. Notice the feature-branches step lists an IM-61 branch. This is the only branch that exists in SubmitImage currently that matches regex in parent.yml. Click on the dev pipeline that was started automatically to see the steps that it runs.
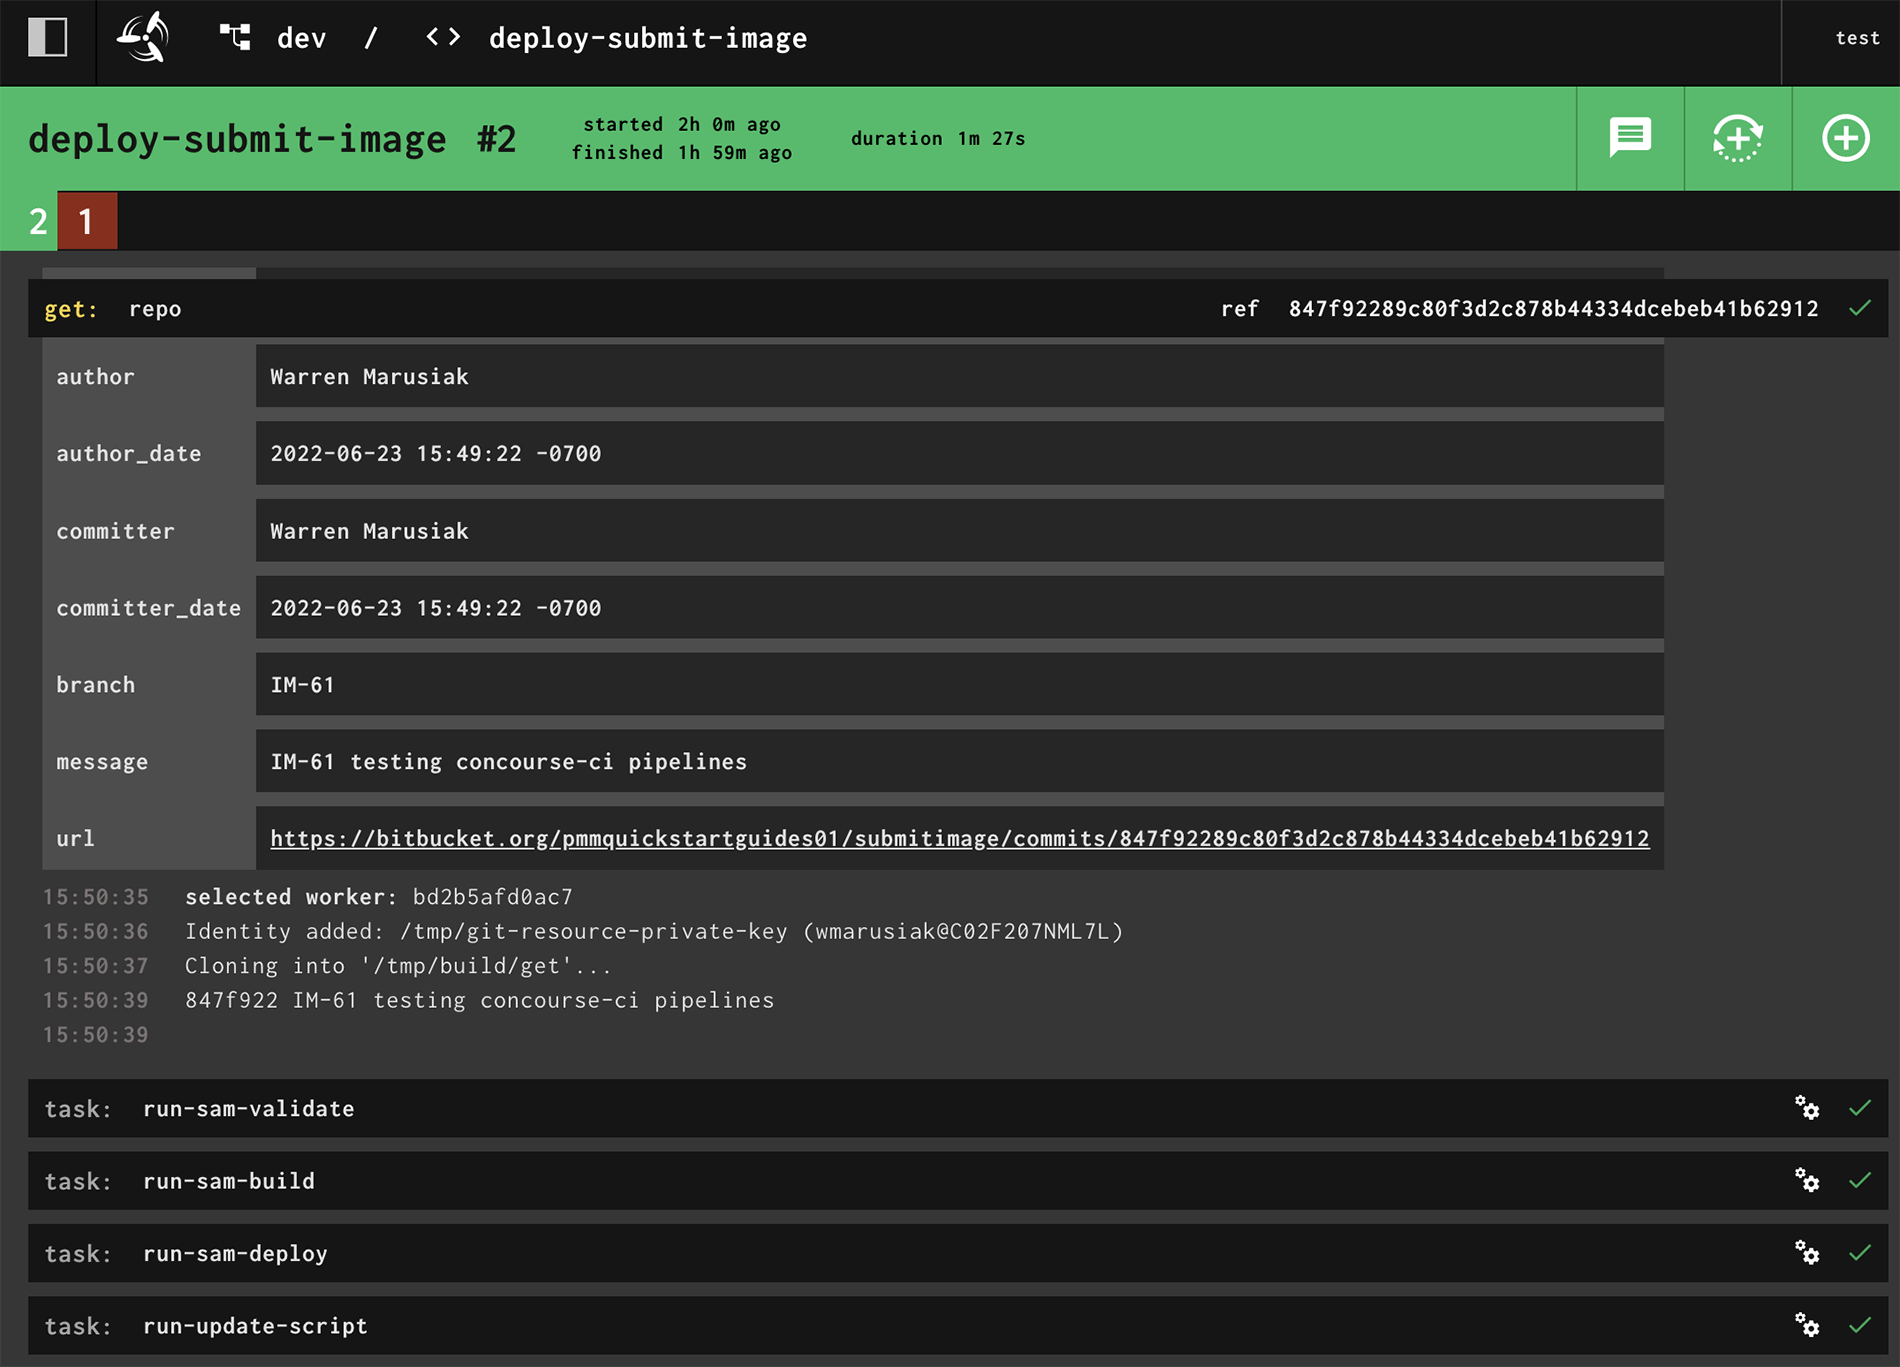
Notice that there is a step to get the SubmitImage repo and that the branch is IM-61. Also notice that there is run-sam-validate, run-sam-build, run-sam-deploy, and run-update-script steps.
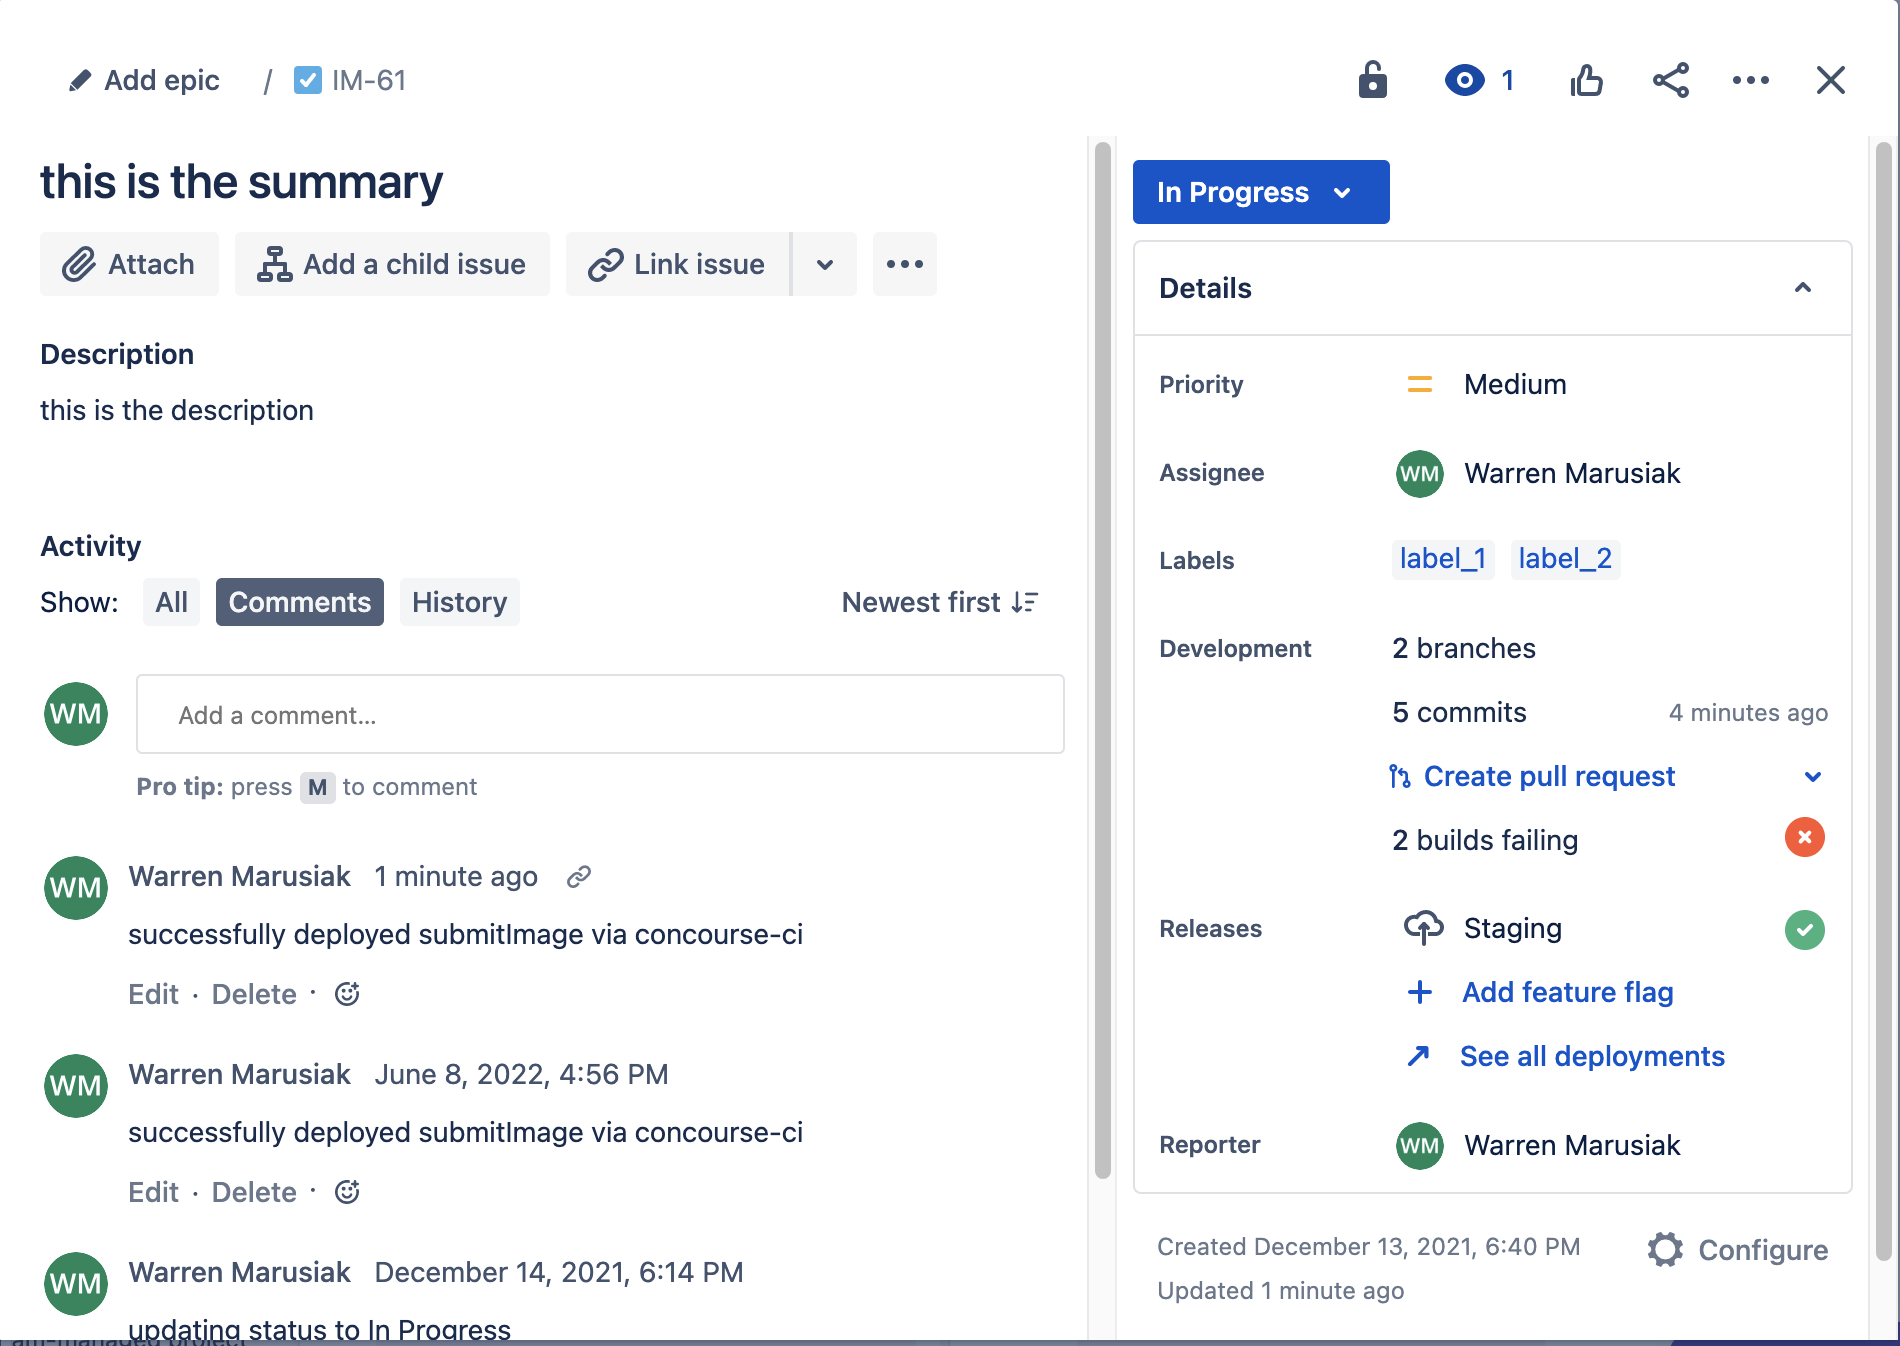
After the dev pipeline finishes running, go back to the IM-61 Jira issue and notice that there is a new comment logged one minute ago that matches the comment string from child.yml
In conclusion…
This guide demonstrates how to setup a pipeline to automatically deploy a Golang AWS Lambda to a single AWS region using Concourse-ci. This guide also demonstrates how to use a bash shell script to write a simple integration with Jira. The integration script can be vastly expanded by diving deeper into the Atlassian REST API documentation available here.

Share this article
Next topic
Recommended reading
Bookmark these resources to learn about types of DevOps teams, or for ongoing updates about DevOps at Atlassian.

DevOps community

DevOps learning path