Artificial Intelligence in Jira Service Management
AI-powered support
Whether your goal is to enhance automated support, streamline onboarding, or provide knowledge at your customers' fingertips, Jira Service Management’s AI-powered support workflows are designed to ensure employees receive the assistance they need while simultaneously increasing the productivity of front-line agents.
In this section, we'll walk through how you can use AI in Jira Service Management to:
- Deliver great self-service support experiences
- Accelerate agent & admin productivity
Delivering great self-service support experiences
Jira Service Management offers several ways to put critical knowledge at your employees' fingertips and help deliver always-on self service support. Below we'll walk you through how to automate Tier-1 support interactions with virtual service agents, as well as how to use AI to enhance your knowledge base and make it easier than ever for employees to get their questions answered.
Virtual service agent
The virtual service agent streamlines support interactions across various customer channels, including the Jira Service Management help center, Slack, Microsoft Teams, email, and embeddable widget. This ensures that help-seekers can receive the assistance they need quickly, regardless of their preferred platform.
There are two primary ways to configure the Jira Service Management virtual service agent, depending on the type and complexity of requests you’re looking to automate: intent flows and AI answers. You can use one or both of these to help deflect tickets and deliver fast support to your customers.
Virtual service agent intent flows
Virtual service agent intents represent a specific problem, question, or request that your virtual service agent can help resolve for your customers. Each intent includes a set of training phrases to help the virtual service agent recognize a help-seeker’s request, and a conversational flow that helps guide the help-seeker through their work item based on their responses to the virtual service agent. Intents are great for questions that:
- Require guided work/troubleshooting
- Require information collection and triaging
- Require an automated action via web request
Examples: Software access requests, reporting an incident, new hardware, procurement requests, onboarding workflows
Intents can be easily configured with out-of-the-box templates and a low code/no code editor. The virtual service agent also uses generative AI to suggest relevant intents based on your team’s historical ticket data and actually populate some of the basic settings like a description and training phrases.
Intents allow you to automate support tasks and take action immediately. For example, you could use it to check the operating system of a help-seeker and then actually update the version in real time, or do things like automate password resets and granting software access. This can be done by running an Atlassian Automation rule in your intent flow, sending a web request, or triggering actions through third party tools like Workato and Workday.

AI answers in the virtual service agent
AI answers uses AI to search across your linked knowledge base spaces and answer your customer questions. This feature is great for getting started quickly with the virtual service agent, as there is minimal setup involved, and is particularly powerful in deflecting help requests that:
-
Can be resolved by providing information or instructions
-
Are covered in (or can be easily added to) your existing knowledge base articles
-
Don’t usually need to be escalated to a human agent
Basic IT instructions like BYOD setup, VPN resets, and connecting to office WiFi
Sharing company policies like benefits, expenses, holidays, and more.

Set up AI answers
To set up AI answers, you’ll first need to configure your virtual service agent intake channels. You can learn more about how to do this in our virtual service agent product guide.
Connect your self-service knowledge base
Once your intake channels are ready to go, you’ll need to ensure that you have a knowledge base linked to your project, either through Confluence or Jira Service Management’s native knowledge base. Maintaining an up-to-date and comprehensive knowledge base is essential for enhancing your AI experience. You can build out your knowledge base directly from Jira Service Management, or integrate existing FAQs and docs you already have in Confluence. (Hint: read below for some AI capabilities that can help you build out and maintain your knowledge base)
Pro tip: Double check your knowledge base permissions settings
Your linked knowledge base space needs to be set to All logged-in users under Who can view.
Activate AI answers
Once your knowledge base is ready to go, it’s time to activate AI answers in the virtual service agent settings:
From your service project, select Project settings, then in the left-hand panel find Channels & self-service and select Virtual service agent from the drop-down. Select AI answers, and then turn the toggle on next to AI answers, and select Activate. AI answers will start working immediately in all of your connected channels.
If you are using the virtual service agent in Slack, you can activate AI answers for specific Slack request channels. Navigate to Request channels in Settings. Turn the toggle on under AI answers next to the request channel you want to activate it for, and then select Activate.

Pro Tip: When structuring knowledge base articles for virtual service agent consumption, please note that AI answers does not currently extract information from images, and typically does best with copy that is not part of a table in Confluence.
AI for knowledge management
AI in Jira Service Management streamlines knowledge management by automatically curating relevant articles, suggesting topics, and quickly surfacing accurate information. These AI capabilities help teams overcome fragmented data and manual processes, making knowledge bases more efficient and effective for support.
AI editing for knowledge base articles
AI empowers agents to create knowledge base articles directly from a Jira Service Management issue. Easily brainstorm content for a new article, ensure your spelling and grammar are correct, and make your article sound professional and empathetic for your customers in just a few simple steps.
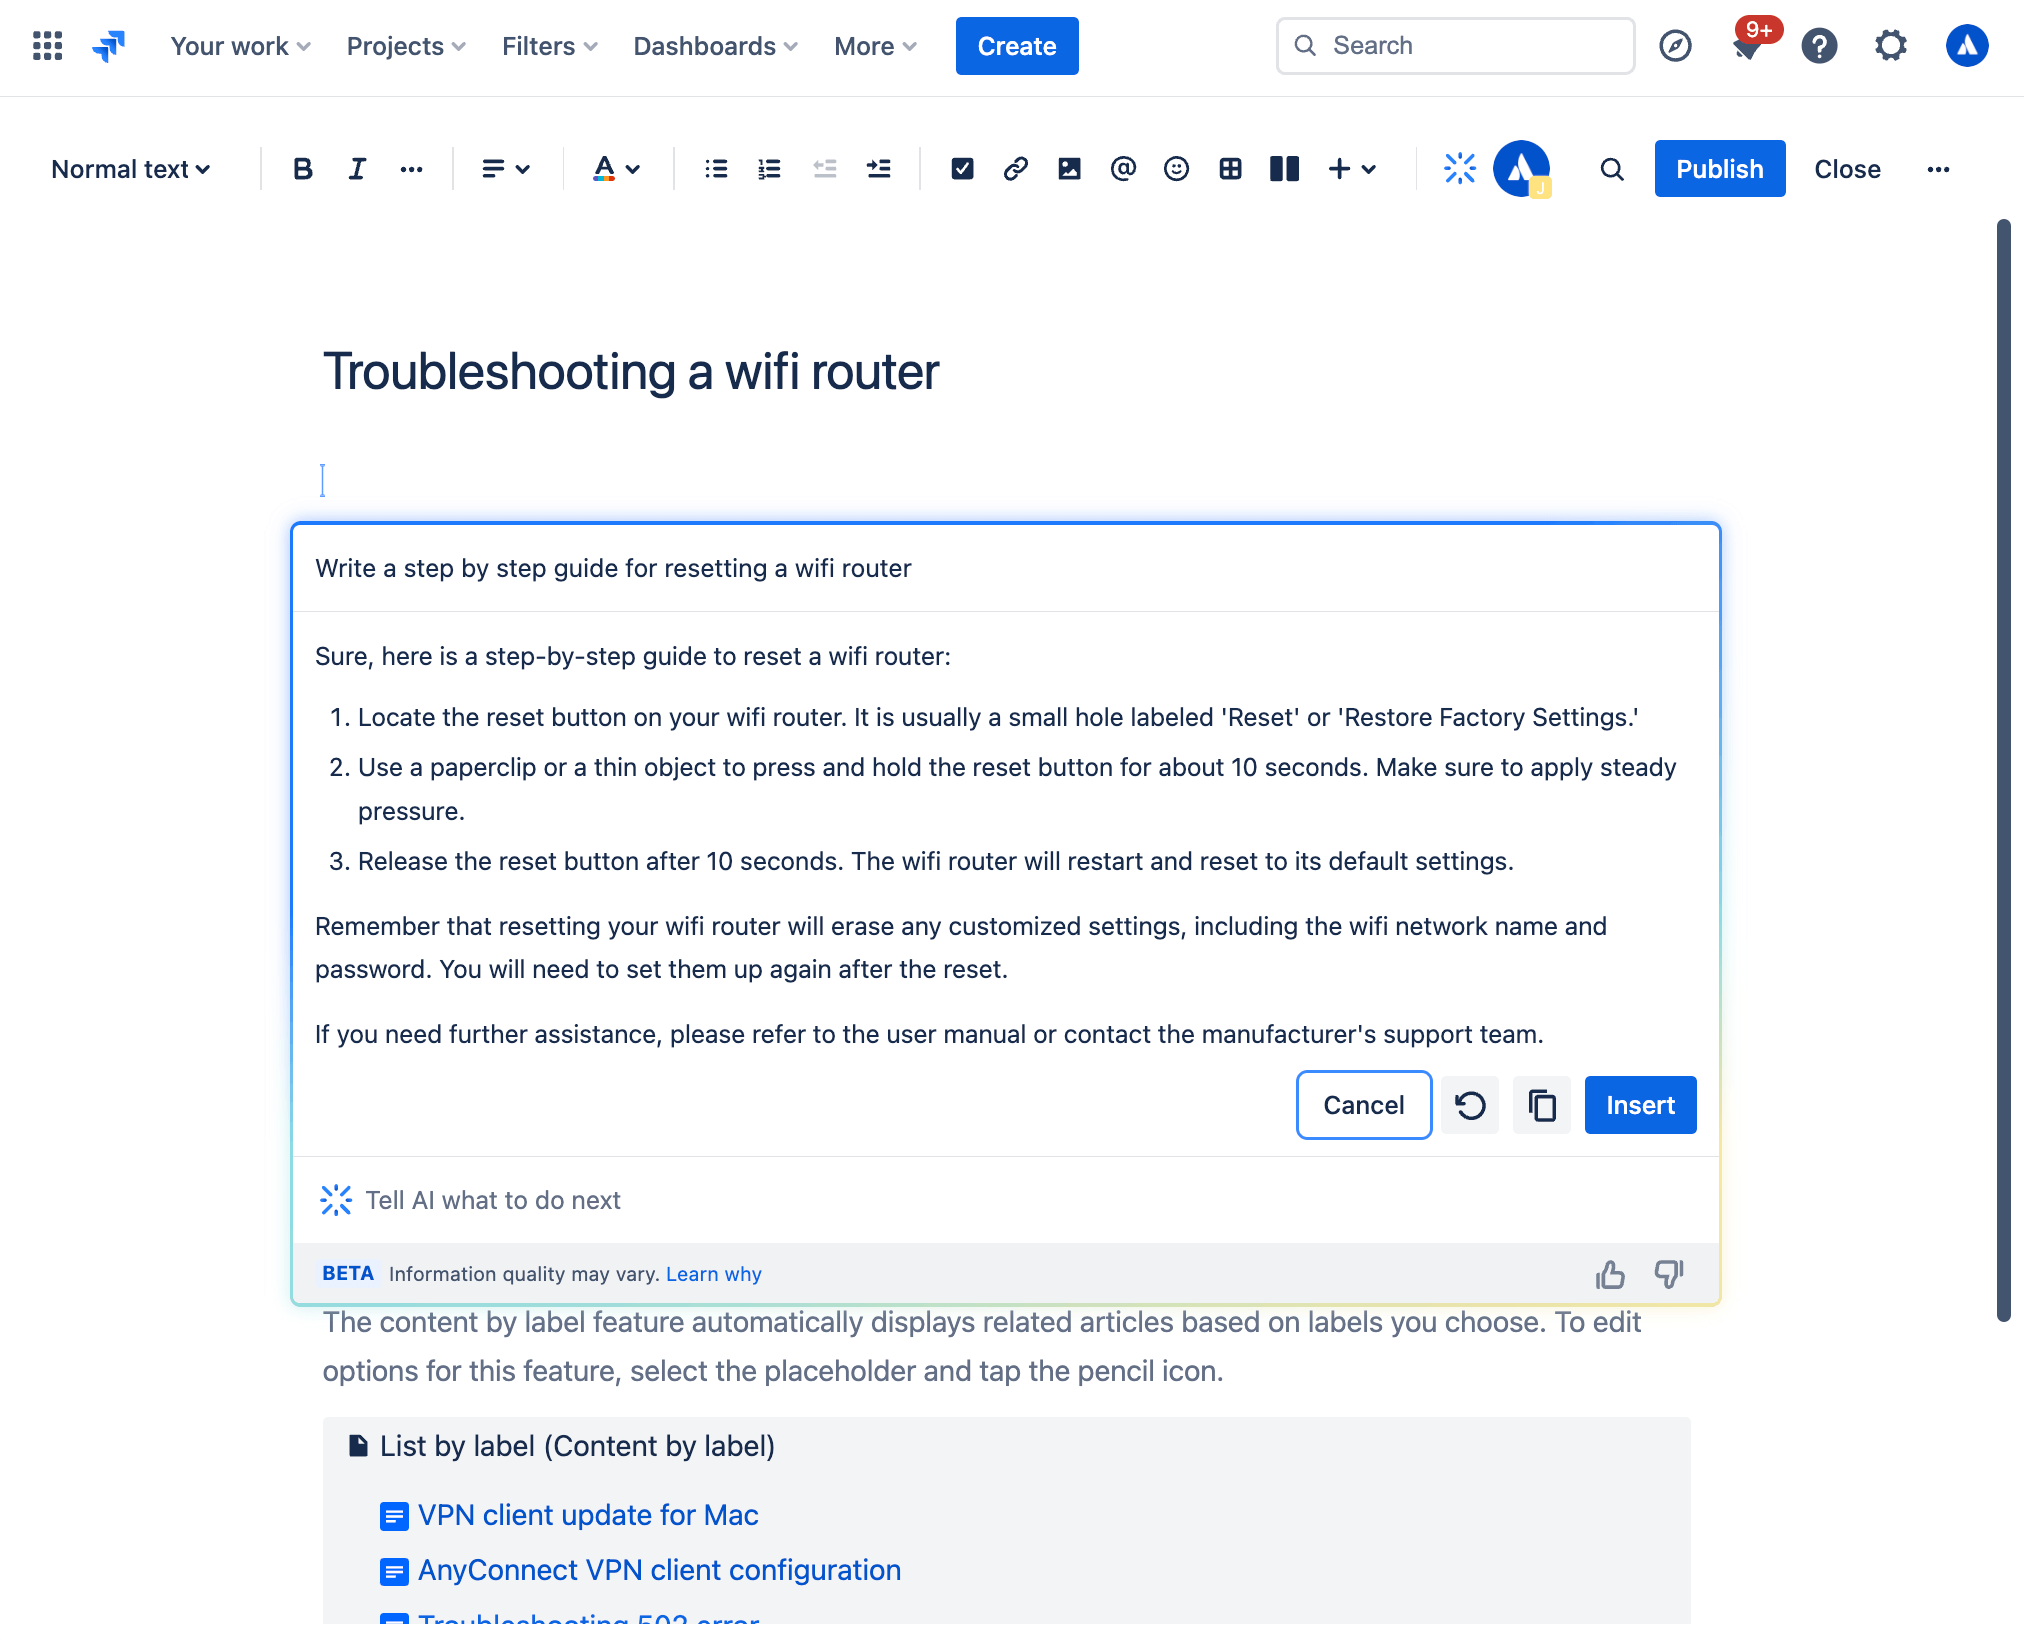
How to create a knowledge base article using generative AI
From the Jira Service Management work item view:
- From your project sidebar navigation, select Knowledge base.
- Select Create article.
- Select the knowledge base space you want to create your article in and select Next.
- Bring up AI via the toolbar or by typing /ai in the editor.
- Write your desired prompt.
- AI provides a draft that you can use as a starting point.
AI Drafts
Grow your knowledge base and deflect more tickets with AI drafts topics. Suggested topics enable you to proactively identify gaps in your knowledge base based on recent customer requests, and creates draft articles for you to review and publish. By creating more relevant knowledge articles, you can ensure a delightful self-service experience for help seekers and improve support team productivity through increased ticket deflection.
How to view suggested AI drafts:
- From your service project, go to Knowledge base.
-
Select suggested topics.
-
In the topics column, you can find the submitted request topics that currently lack corresponding articles in your knowledge base. The related requests column indicates the number of requests associated with each specific topic.
-
Next to each topic, select Create article under the Actions column to write an article.
Accelerate agent & admin productivity
Enhance agent productivity by equipping your team with the AI tools they need to deliver great service, fast. Use Rovo agents and embedded AI features in Jira Service Management to prioritize, respond to, and resolve requests.
Ticket triage and prioritization
Jira Service Management offers several AI powered capabilities to help you organize your queue and prioritize the tickets that matter:
1. AI triage
Quickly clean up queues by taking bulk action to intelligently assign work items to the correct request type. By using AI to streamline the triage process, support teams can significantly reduce the time spent on manual sorting, enabling them to resolve high-priority issues more efficiently.
AI triage analyzes tickets in your queue and makes recommendations for appropriate request types and associated fields. This feature can be particularly useful when you receive requests by email and end up with a lot of work items with the “Emailed request” request type.
To use AI to triage work items:
- Select work items in your queue.
- Select Triage.
- Review the suggestions and update request types if necessary.
- Select the work items you want to update.
- Select Apply.
If the suggestions don't match what you need, you can always manually select a request type from the list and continue the bulk update with your own selected request types.
2. Customer sentiment analysis
Get to know your customers better with AI sentiment analysis, which analyzes and interprets the emotional tone of customer comments to help you understand how customers are feeling. Using ticket context like the title, description, and comments, AI assesses the customer sentiment – whether it's positive, neutral, or negative – and displays it directly on the work item view, updating in real-time as new comments come in. By spotting frustrations early, you can provide top-notch service, keeping customer happiness as a top priority.
3. Rovo Agent: Service Triage Assistant
If you want to really supercharge your triaging process, try the Service Triage Assistant, one of our out-of-the-box Rovo Agents. It helps you triage incoming requests by analyzing their content, sentiment, and other details to determine the request type, urgency, and priority. The agent is designed to be used within an automation rule so it can instantly rewrite ticket titles and descriptions, update the priority, or assign request types as work items appear in your queue. It can also determine whether a request should be escalated based on SLAs, customer interactions, urgency, etc.
There are a two different ways you can engage with Service Triage Assistant.
-
Ask questions in the Rovo Chat window: Open the Rovo Chat window in the top right corner of your screen, browse Rovo agents using the Agents menu option on the left side, and select Service Triage. From there you can chat with Service Triage Assistant with prompts like “Suggest a priority” or “Suggest a request type.”
-
Set up an automation rule: Navigate to the automation rule builder and use our pre-built templates to have Service Triage Assistant take automated actions like suggesting priority, suggesting request type, or summarizing the work item.
Pro tip: Try automation mode
When engaging with Service Triage Assistant through the Rovo chat window, try adding “automation mode” at the beginning of your prompt – this allows you to use the agent’s response directly within the automation rule.
Responding to and resolving tickets
Once you’ve sorted your queue and know which tickets to tackle first, use AI to pull critical context into your workflows, helping you respond promptly and take the right steps to get to resolution.
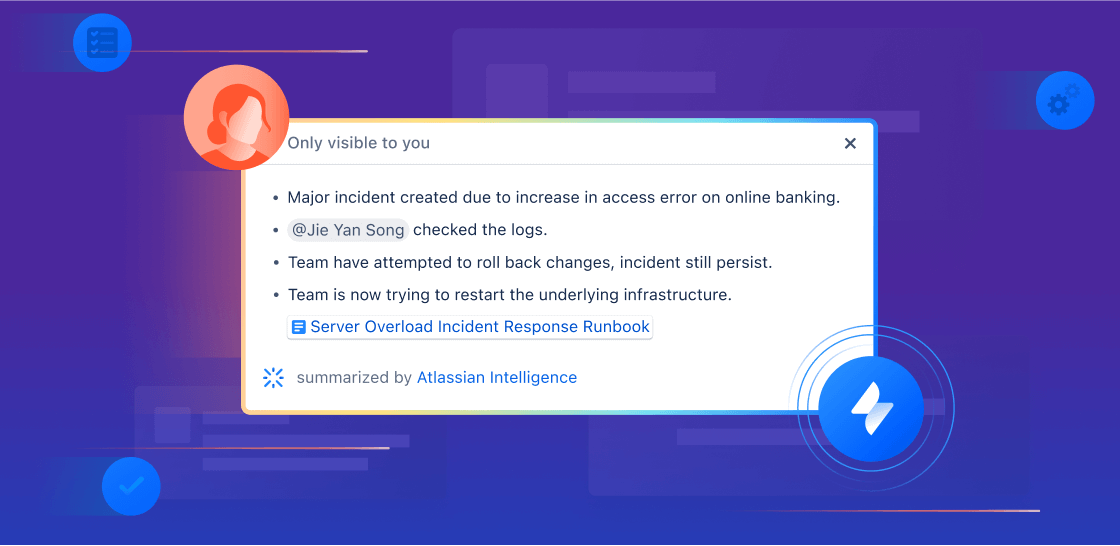
Get up to speed with AI summaries
Rather than reading through numerous comments on a Jira Service Management work item, AI can quickly summarize ticket activity so you can get up to speed, easily loop in new stakeholders or transition tickets to a new agent, and take action.

To use AI summaries:
- From your Jira Service Management project, navigate to your desired work item.
- Scroll down to the Activity section.
-
Select Comments, and then Summarize.
-
The AI-generated summary will only be visible to you, and will disappear when you navigate away from the ticket. You can summarize an issue’s details as many times as you like.
-
Pro Tip: The AI summaries feature works great alongside the virtual service agent. For complex intent flows where the virtual service agent asks multiple questions to gather information from the help seeker before opening a ticket, AI summaries can help the assigned agent quickly digest any issue context the virtual service agent has captured.
Use AI to craft the perfect help-seeker response
AI can help agents quickly draft and edit their response to help-seekers, ensuring clear and thoughtful communication. There are a couple different ways to do this:
1. Draft Replies
This feature uses AI to draft a recommend response to your customers. It allows agents to respond to tickets smartly and efficiently with the appropriate troubleshooting tips or follow-up questions based on comments added by agents while resolving similar requests.
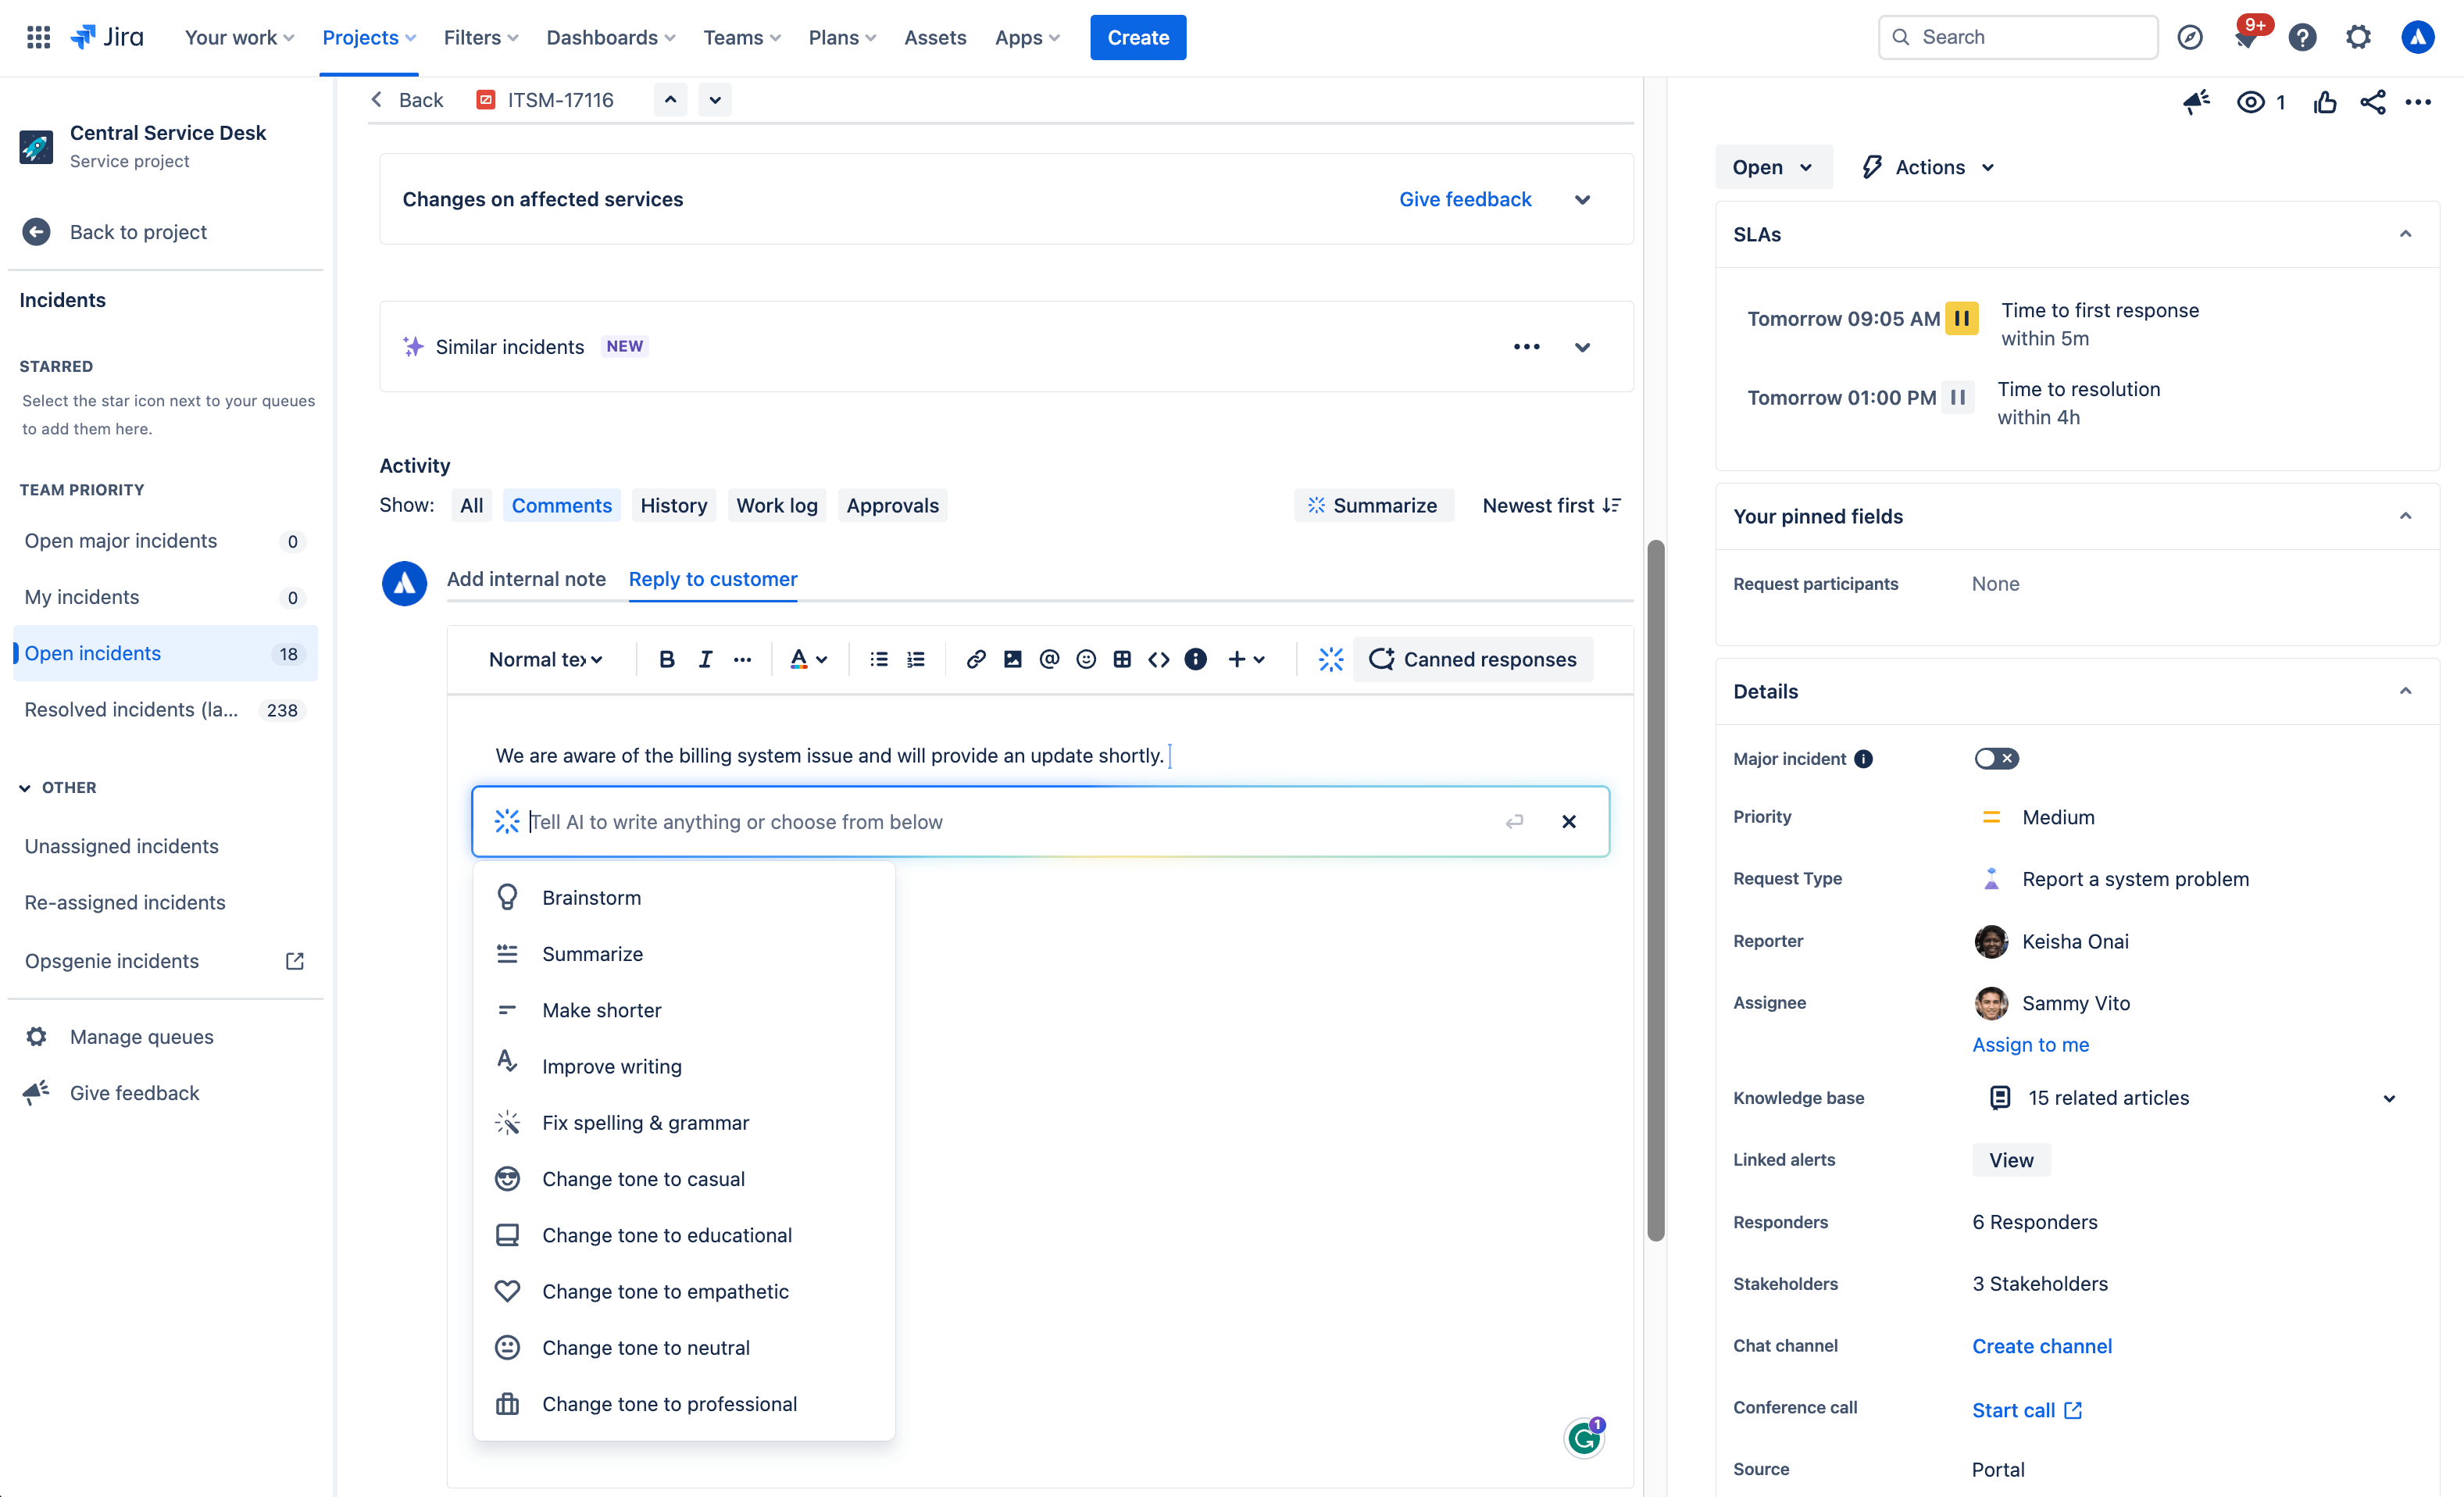
To use AI to draft a reply:
- Open a work item.
- Select Add internal note or Reply to customer.
- Click the Draft a Reply button, select Draft reply from the AI dropdown menu, or simply use /draftreply.
- AI will generate a reply based on responses added by agents while resolving similar work items in the past. You can then insert the comment or refine it.
2. AI editing
Use the AI slash command or the drop down AI menu in the editor to fine tune your customer response, including shortening it, adjusting the tone, and more.
Use cases for generative AI:


Brainstorm
Not sure how to start a customer response? With the brainstorm feature, Atlassian’s Rovo AI analyzes user inputs and generates suggestions for customer responses to inspire and speed up issue resolution.

Make shorter
With the make shorter feature, AI allows you to generate concise summaries of longer responses to customers. This can be useful when you need customers to quickly understand the key points or main ideas.

Summarize
The summarize feature helps agents condense lengthy content into a concise summary, making it easier to understand and digest. AI analyzes the input text and identifies the most relevant and important points. It takes into account factors such as the frequency of certain words or phrases, their context within the text, and any associated sentiment or importance.

Improve writing
The improve writing feature helps agents enhance their writing skills by providing suggestions, including grammar corrections, word choice recommendations, formatting, and more. Alongside the suggested improvements, AI offers explanations and reasoning behind each suggestion as well.

Fix spelling & grammar
The fix spelling and grammar feature in Atlassian’s Rovo AI helps you identify and correct spelling and grammar mistakes in your customer responses. These suggestions are based on common grammatical rules and contextual analysis of the surrounding text. You have the option to accept a suggestion by clicking on it, or you can manually make changes as needed.

Change tone
The change tone feature in allows you to modify the tone of your customer response, enabling agents to adjust the style or mood of the text according to their needs. Available tones include casual, educational, empathetic, neutral, and professional to meet the needs of a variety of customer situations.
Surface critical context and next steps for resolution
AI suggestions
The suggestions panel, located on the right side of any work item view, uses AI to efficiently summarize requests and recommend assignees, pertinent requester details, escalation paths, troubleshooting steps, and more. It also enables you to directly take action from the panel, like updating the priority level.

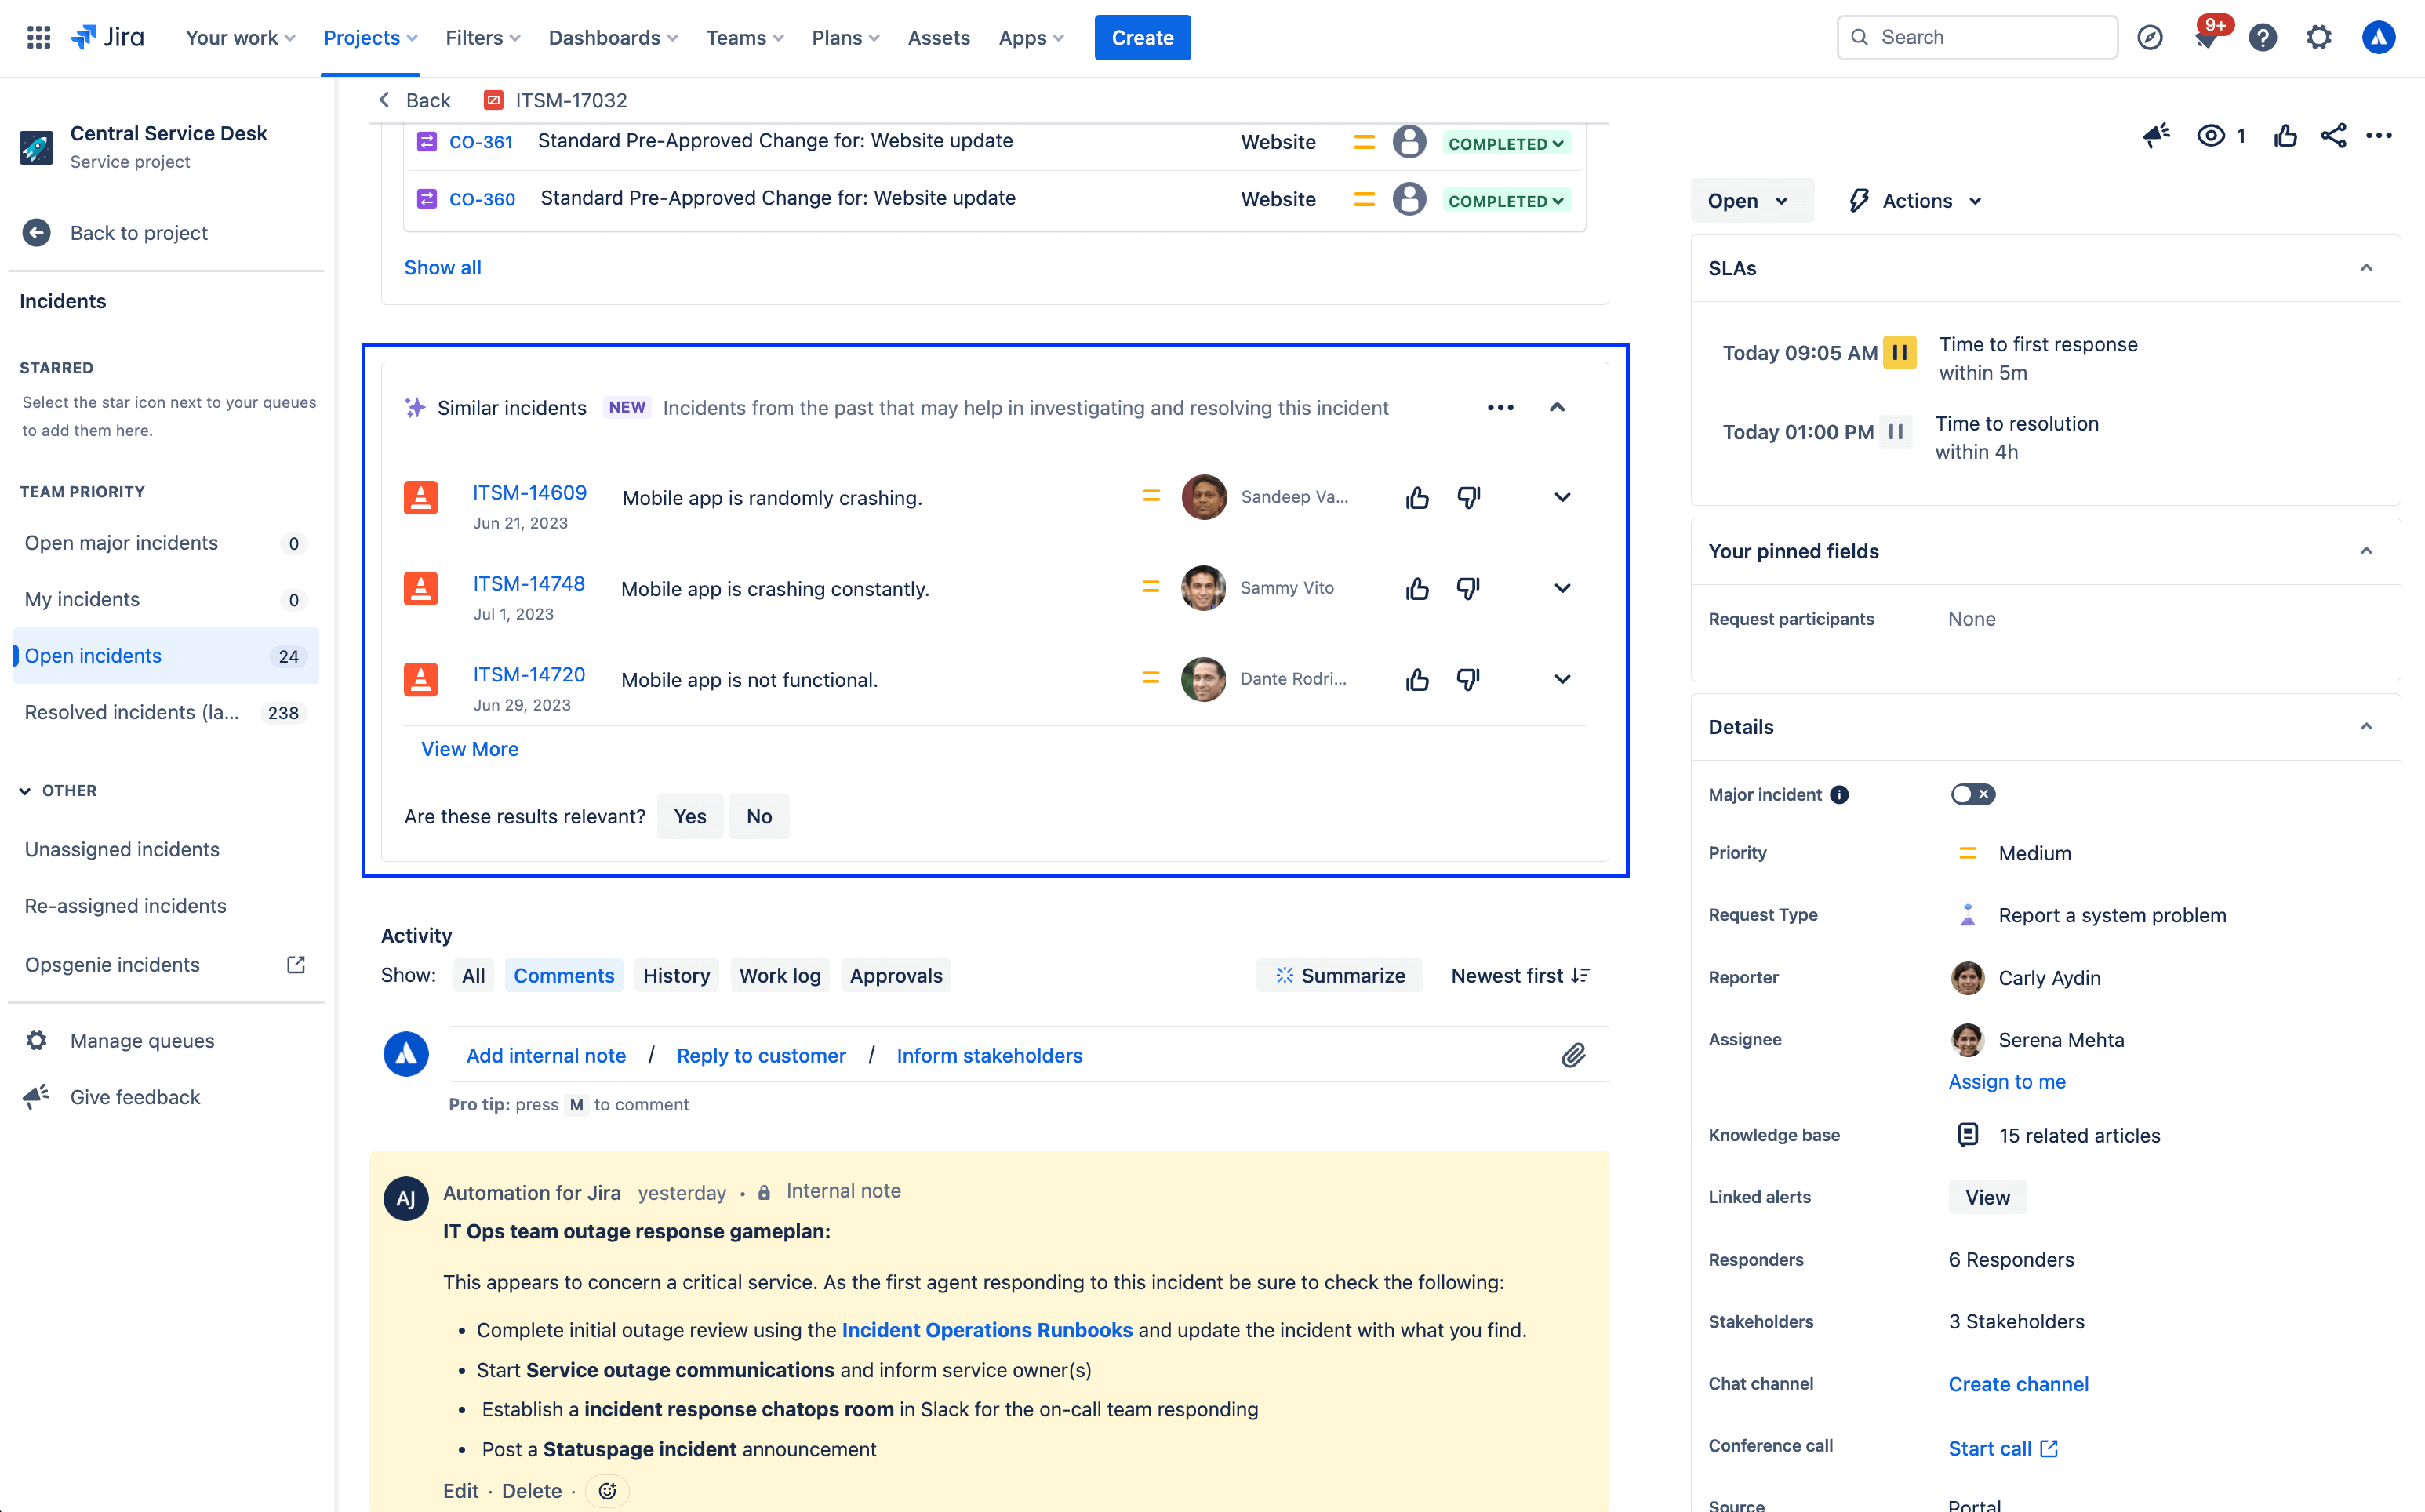
Similar Requests
Make finding similar requests a breeze by using AI similar requests to find and identify recent requests with similar titles to the one you’re currently viewing in a service project. This feature uses Natural Language Processing (NLP) to provide a list of recent requests with similar titles to the one you’re currently viewing. This AI-automated process of finding related requests reduces the manual effort required to search for similar issues.

How to use AI Similar Requests:
- First make sure you, Enable similar requests panel, start from your service project, select Project settings, then Features.
- Under the Issue view, turn on the Similar requests panel toggle.
- Next, to view similar service requests, problems, changes, and post-incident reviews. Go to the issue you want to find related requests for.
- Select Similar requests or Similar incidents.
- Select Open or Resolved to filter similar requests by status.
3. Rovo agent: Service Request Helper
Another out-of-the-box Rovo Agent, Service Request Helper, provides your team with the insights needed to streamline request management and accelerate resolution times. Designed to use both Atlassian apps and connected third-party apps as knowledge sources, Service Request Helper can gather relevant information and offer guidance on how to resolve requests with speed and precision. Human agents can use Service Request Helper to identify SMEs, compose responses using insights from previous requests, summarize ticket activity, and even recommend next steps.

Like other Rovo Agents, Service Request Helper can be accessed through the Rovo Chat window in the top right corner of your navigation, near your profile icon or avatar. Navigate to any request in your queue, then open Rovo Chat, select Agents, and search for Service Request Helper.
From there you can chat with the Agent, asking it things like:
- What steps should I take next?
- Help me draft a reply to send to the customer.
- Find people who worked on similar requests before.
Empowering admins to get started quickly
AI automations
Use AI to generate automation rules by simply describing the rule you want to create in natural language. This feature can be found in the automation rule builder in your project’s settings. Make sure whatever you input includes a trigger and an action.

Request type and field suggestions
Request type suggestions can help take the guesswork out of creating your service desk by intelligently suggesting request types based on how you describe the kind of work your team manages. AI can suggest request types across a range of use cases, from IT and HR to dog grooming and catering, and then add them to your service desk with just a few clicks.

How to use request type suggestions:
- Navigate to Project settings > Request types.
- Select Suggest.
- Describe the type of work your team manages.
- Select a request type from the list of AI suggestions and then select Create.
- Confirm the request type’s name, description, icon, and issue type.
- Select Next and add the request type to a portal group.
- Select Create.
Once a request type has been created using AI, it can suggest relevant existing and custom fields you can add.

AI for IT Operations (AIOps)
Ops Guide agent
The Ops Guide Agent effectively cuts through the clutter by intelligently grouping related alerts and highlighting the most critical ones. Powered by Rovo, the Ops Guide is designed to enhance your management of alerts and incidents, providing historical context and recommending actions to streamline your on-call responsibilities.
By leveraging both Atlassian applications and connected third-party (3P) apps as knowledge sources, it gathers relevant information to offer guidance that helps mitigate the impact of incidents. This approach aims to reduce the time required to detect, respond to, and recover from incidents. With the Ops Guide, you can:
- Run queries for alerts and alert data
- Gather context to resolve incidents more quickly
- Create Post-Incident Reviews (PIR)

AI alert grouping
Accelerate incident detection with AI-powered alert grouping. Separating the signal from the noise is crucial for prioritizing the most significant issues but typically requires a manual effort from on-call teams. We leverage AI to identify patterns among incoming alerts from monitoring and observability solutions so responders can focus on the highest-priority alerts and proactively detect incidents. We also leverage AI to examine past responders or similar past alerts to bring additional context to the surface and suggest next best action.

AI incident creation
Move quickly from alert to incident by leveraging AI to extract information from an alert group and automatically populate an incident record. This includes linking relevant alerts, crafting a concise summary, setting the priority level, and additional information.

AI incident summary and timeline in Slack
Keep incident responders up-to-date with the latest developments directly in Slack. Teams can quickly onboard new responders, minimize time spent looking for details on incident progress, and summarize key actions or decisions made during the incident to accelerate response and help with post-incident reviews.
Teams can also create a comprehensive timeline of an incident by seamlessly integrating key chat messages from Slack channels and updates from Jira Service Management. This provides a chronological record of all critical actions and decisions made during an incident, helping teams trace actions and understand the flow of events towards resolution. Agents can modify which actions appear on the timeline, publish in the associated channel, or as internal comments on the incident record in Jira Service Management.

AI suggestions panel
Incident responders can significantly enhance their resolution speed with access to vital information, including potential root causes (coming soon), recommended responders, and options for actions such as escalation or severity updates. An AI-powered suggestions panel located on the right side of the issue view provides a summary of requests, details about the reporter, priority suggestions, and facilitates direct actions from the panel.

AI PIR Generation
Use AI to populate a post-incident review (PIR) with details from the incident record, alerts, and other sources to save IT Operations teams time after an outage is resolved. PIRs are a core part of the incident management process, helping incident responders and managers learn from recent incidents and pass along insights to prevent similar problems in the future. However, these can be time-consuming and tedious to compile and are often deprioritized, causing organizations to miss out on crucial learnings.
Leveraging AI to draft PIRs saves time finding, summarizing, and publishing key details to help teams grow and learn from every incident.

Similar requests and incidents
With the similar requests panel enabled, you can easily find issues in your service project that are similar to the issues you’re currently working on. The similar requests panel can surface similar requests, incidents, problems, changes, and even post-incident reviews, empowering agents to determine whether there are duplicate issues they can close, previous tickets that will help them resolve issues faster, or similar incidents that warrant a major incident escalation.
The similar requests panel uses Natural Language Processing (NLP) to provide a list of recent requests that have similar titles or descriptions to the one you are currently viewing.
For similar incidents, the results are also AI-powered. To help improve results, you can give feedback by reacting 👍 or 👎 to a result.
To enable or disable the similar request panel:
- From your service project, go to Project settings.
- Select Features.
- Turn on/off the Similar requests panel toggle.
Other intelligent experiences in Jira Service Management
Smarts-enabled help center search
The help center is where your customers go to get information and raise requests. From there, they can view the portal for each service project they have access to, search for request forms and knowledge base articles, and see the requests they have raised over time.

When searching the help center, Jira Service Management provides a powerful smarts-enabled search bar that enables advanced search across your entire portfolio using data-driven algorithms and machine learning techniques.
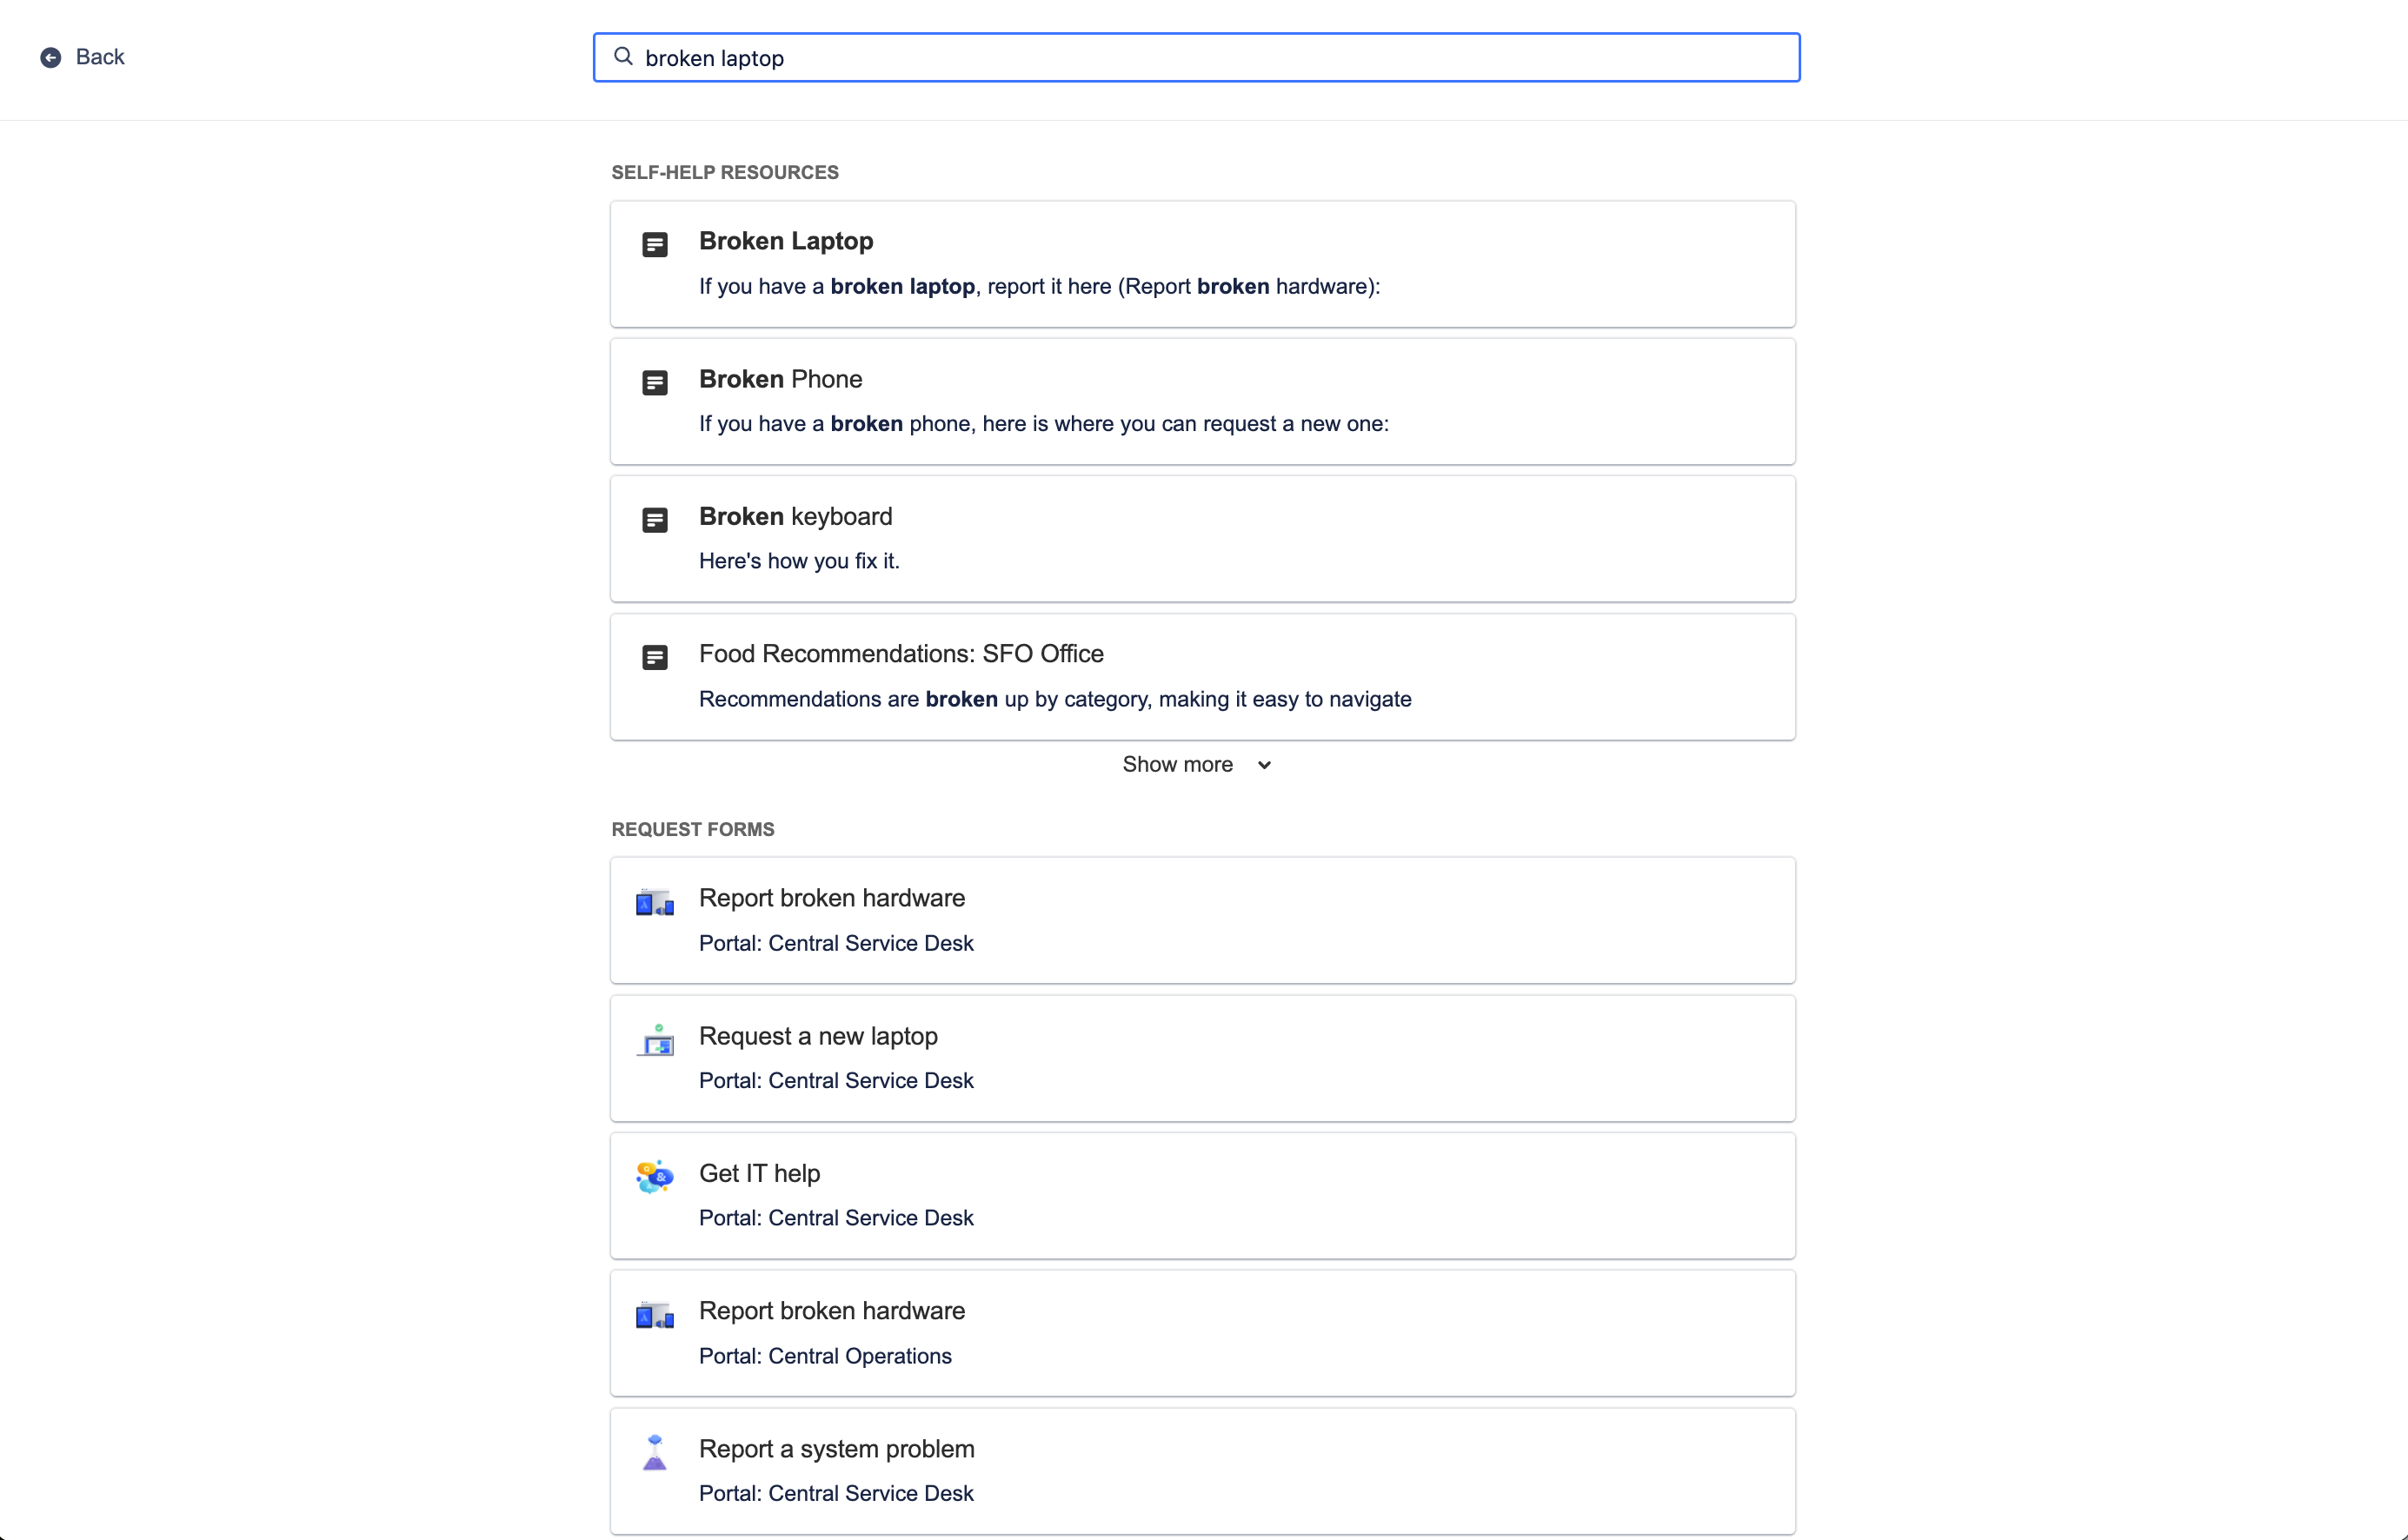
The help center search provides relevant self-help resources from your knowledge base and request forms across your service portals by identifying a user's recent behavior along with their search context, sharing the most relevant options specifically for them. Best of all, smarts learns over time to improve these predictive results for your customers so they can be more productive and get help faster.
To customize the help center:
- From your service project, go to Project settings.
- Select Portal settings.
- Select the link in the Customize your help center section.
Relevant knowledge articles
Beyond the help center, smarts can also recommend knowledge base articles directly from the work item view for your agents to share with customers. Relevant knowledge articles are also based on work item context and user behavior, just like in the help center.

Knowledge articles related to the current work item will appear in the details section of the work item view and can be shared with customers with a single click. If a related article doesn't appear, you also have the option to manually search for an article or create a new article directly from the work item.
Predictive agent assignment and @mentions
Finally, collaboration is all about pulling in the right person at the right time to complete a project or move it forward. With predictive user pickers in Jira Service Management, smarts recommends a list of people to bring into a work item by knowing who you regularly work with and what you’re currently working on. Quickly assign an agent to a work item by selecting the assignee field, or use @ to display a list of users who can potentially help with resolving a work item.
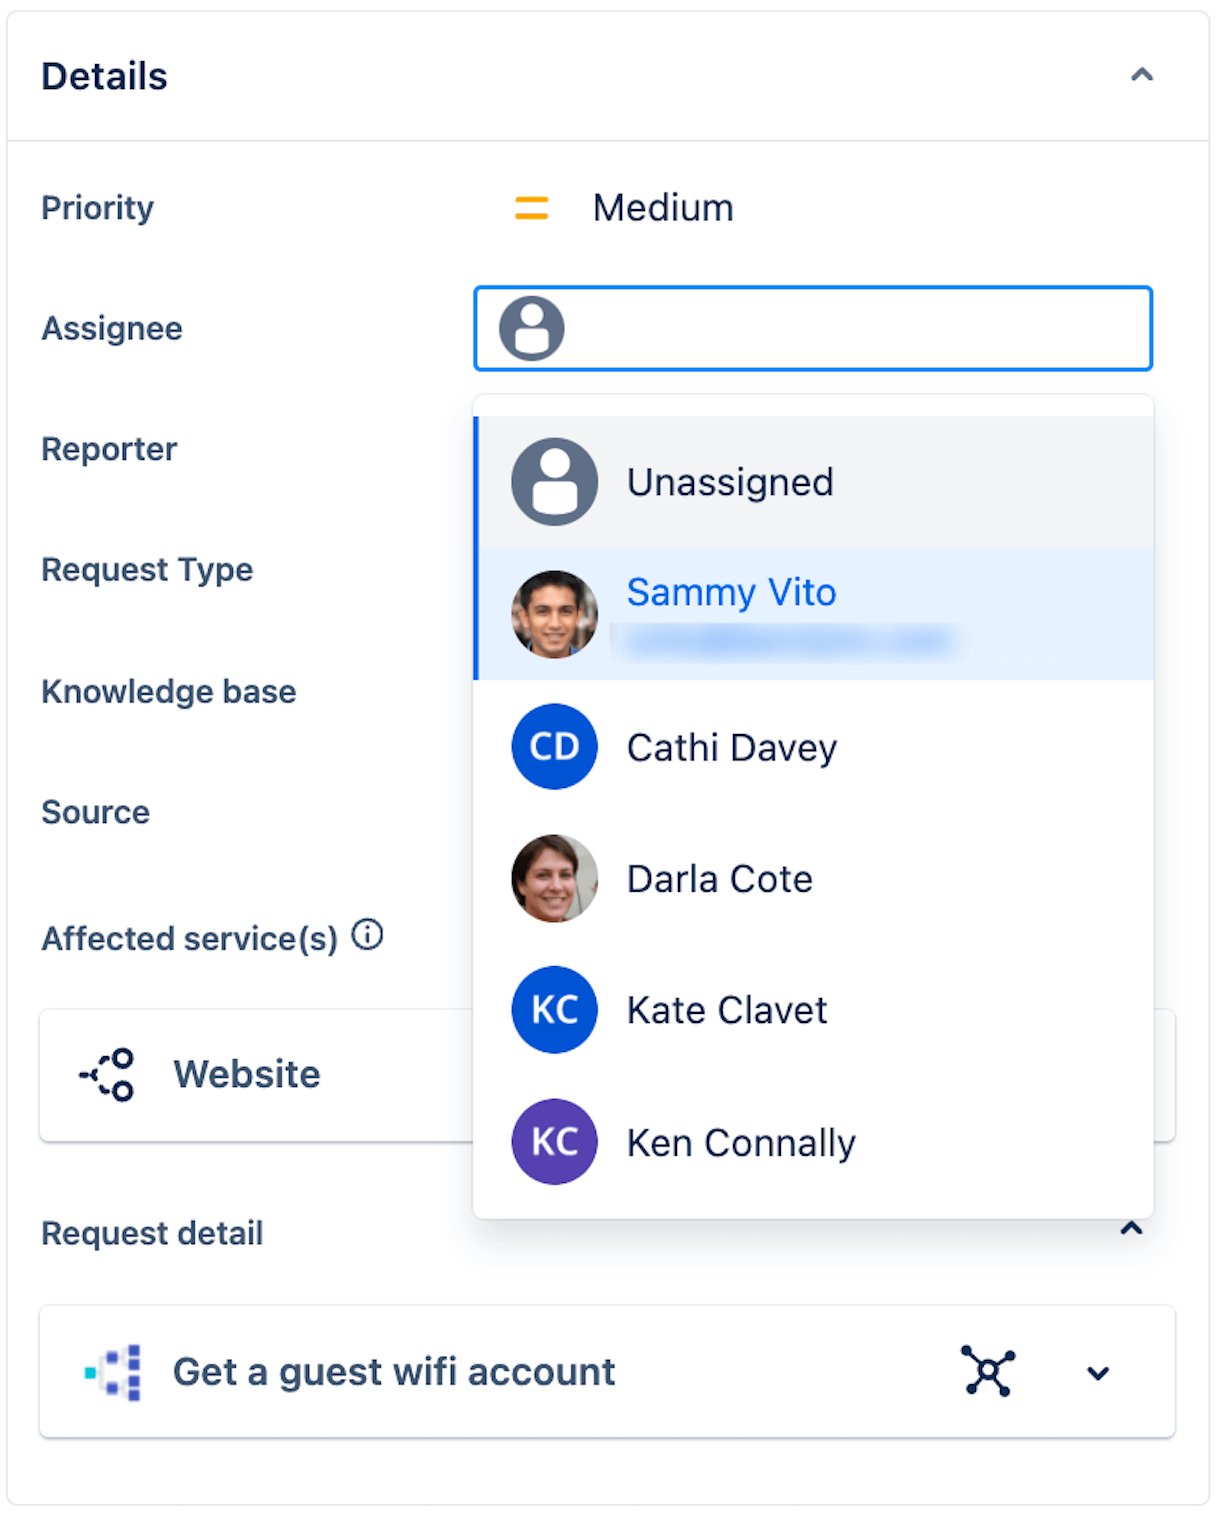
By learning from past behavior, smarts can predict the top five most likely assignees with an accuracy of 86 percent.