How incident management works in Jira Service Management
Overview
Incident management is the practice of responding to an unplanned event or service interruption and restoring the service to its operational state.
- Incident: An unplanned interruption to a service or reduction in the service quality.
- Major incident: An incident with significant business impact, requiring an immediate coordinated resolution.
A problem is the not-yet-known root cause behind one or more incidents.
Atlassian’s platform for incident management brings all of the context and data you need to resolve an incident quickly and efficiently.
- Within Jira Service Management, agents can easily manage issues and user-reported incidents.
- Agents can quickly escalate major incidents as an alert to the on-call team. Jira Service Management empowers IT and DevOps teams to stay in control during an incident by centralizing alerts, notifying the right people, and enabling them to collaborate and take rapid action.
- Jira Service Management’s native asset and configuration management capabilities (included in Premium and Enterprise plans) help agents to understand dependencies within their IT infrastructure to locate potential causes of the incident.
- Finally, shared workspaces capture incident practices, processes, and procedures in one place — from runbooks, knowledge bases, and PIRs.
This seamless end-to-end incident management solution helps teams escalate, bring in the right responders, swarm, and ultimately minimize downtime.
The incident management process
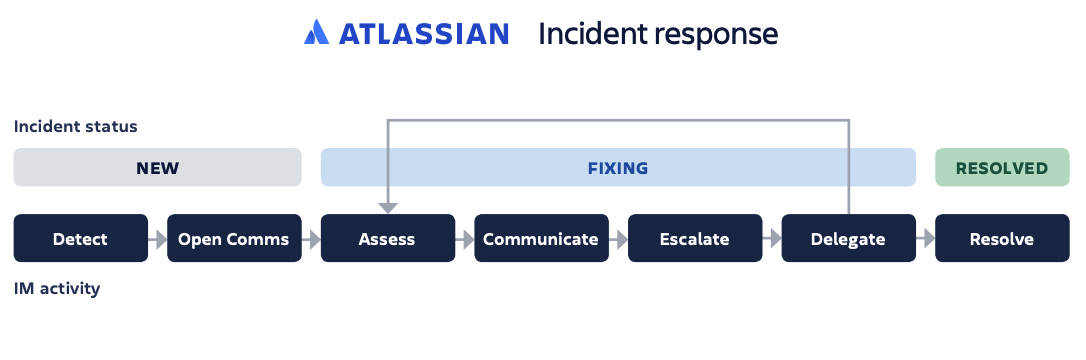
The key to incident management is having a good process and sticking to it. Incident response is a pretty broad term, so let’s break it down a bit further into the most likely steps you'll perform once you’ve identified, categorized, and prioritized an incident:
- Initial diagnosis: DevOps style teams typically own an incident from diagnosis to resolution, while multi-tier service desks have a front-line team that attempts the same but when needed they can escalate to 2nd or 3rd level support teams.
- Escalate: If necessary, the next team takes the logged data and continues with the diagnosis process, and, if this next team can’t diagnose the incident, it escalates to the next team.
- Communicate: The team regularly shares updates with impacted internal and external stakeholders.
- Investigation and diagnosis: This continues on until the nature of the incident is identified. Sometimes teams bring in outside resources or other department members in to consult and assist with the resolution.
- Resolution and recovery: In this step, the team arrives at a diagnosis and performs the necessary steps to resolve the incident. Recovery simply implies the effort it may take for service to be fully restored, since some fixes (like bug patches, etc.) may require testing and deployment even after the proper resolution has been identified.
- Closure: If the incident was escalated, it is finally passed back to the front-line to be closed. To maintain quality and ensure a smooth process, only service desk employees are allowed to close incidents, and the incident owner should check with the person who reported the incident to confirm that the resolution is satisfactory and the incident can, in fact, be closed.

For more information, check out our Incident Management page.
How to get started with incident management in Jira Service Management
How to get started with incident management
Jira Service Management provides an Information Technology Infrastructure Library (ITIL) compliant incident management workflow called: Incident Management workflow for Jira Service Management. We recommend that you start with this workflow and adapt it to your specific business needs over time. Read more about editing workflows.
By default, the following fields are in your agent’s view of an incident. If you require additional fields, you can also add custom fields.
How to create service level agreements (SLAs) for incident records
Jira Service Management provides powerful built-in SLAs, so teams can track how well they're meeting the level of service expected by their customers. Project admins can create SLA goals that specify the types of requests you want to track and the time it should take to resolve them. From there, you can define the conditions and calendars that impact when SLA measurements start, pause, or stop.
To create a new SLA:
- From your service project, go to Project settings > SLAs. All existing SLAs are displayed here.
- Select Add SLA.
- In the field next to the clock icon, enter a new name for the SLA or choose an existing name.
- (You won't be able to change the name of your SLA once it is created, so choose one that clearly explains what it measures.)
- Set goals and conditions for the SLA. Learn more about setting up SLA goals and setting up SLA time metrics.
- Select Save.
How to mark incidents as major incidents in Jira Service Management
When critical services experience an outage, Jira Service Management Cloud provides the necessary tools to help agents resolve incidents quickly. Marking an incident as major will increase its visibility among other incidents. Also, these incidents are grouped under their own JQL-powered ‘Major incident’ queue.
To mark an incident as a major incident:
- Navigate to the incident you want to mark as a major incident.
- Turn on the major incident toggle in the details section of the issue.
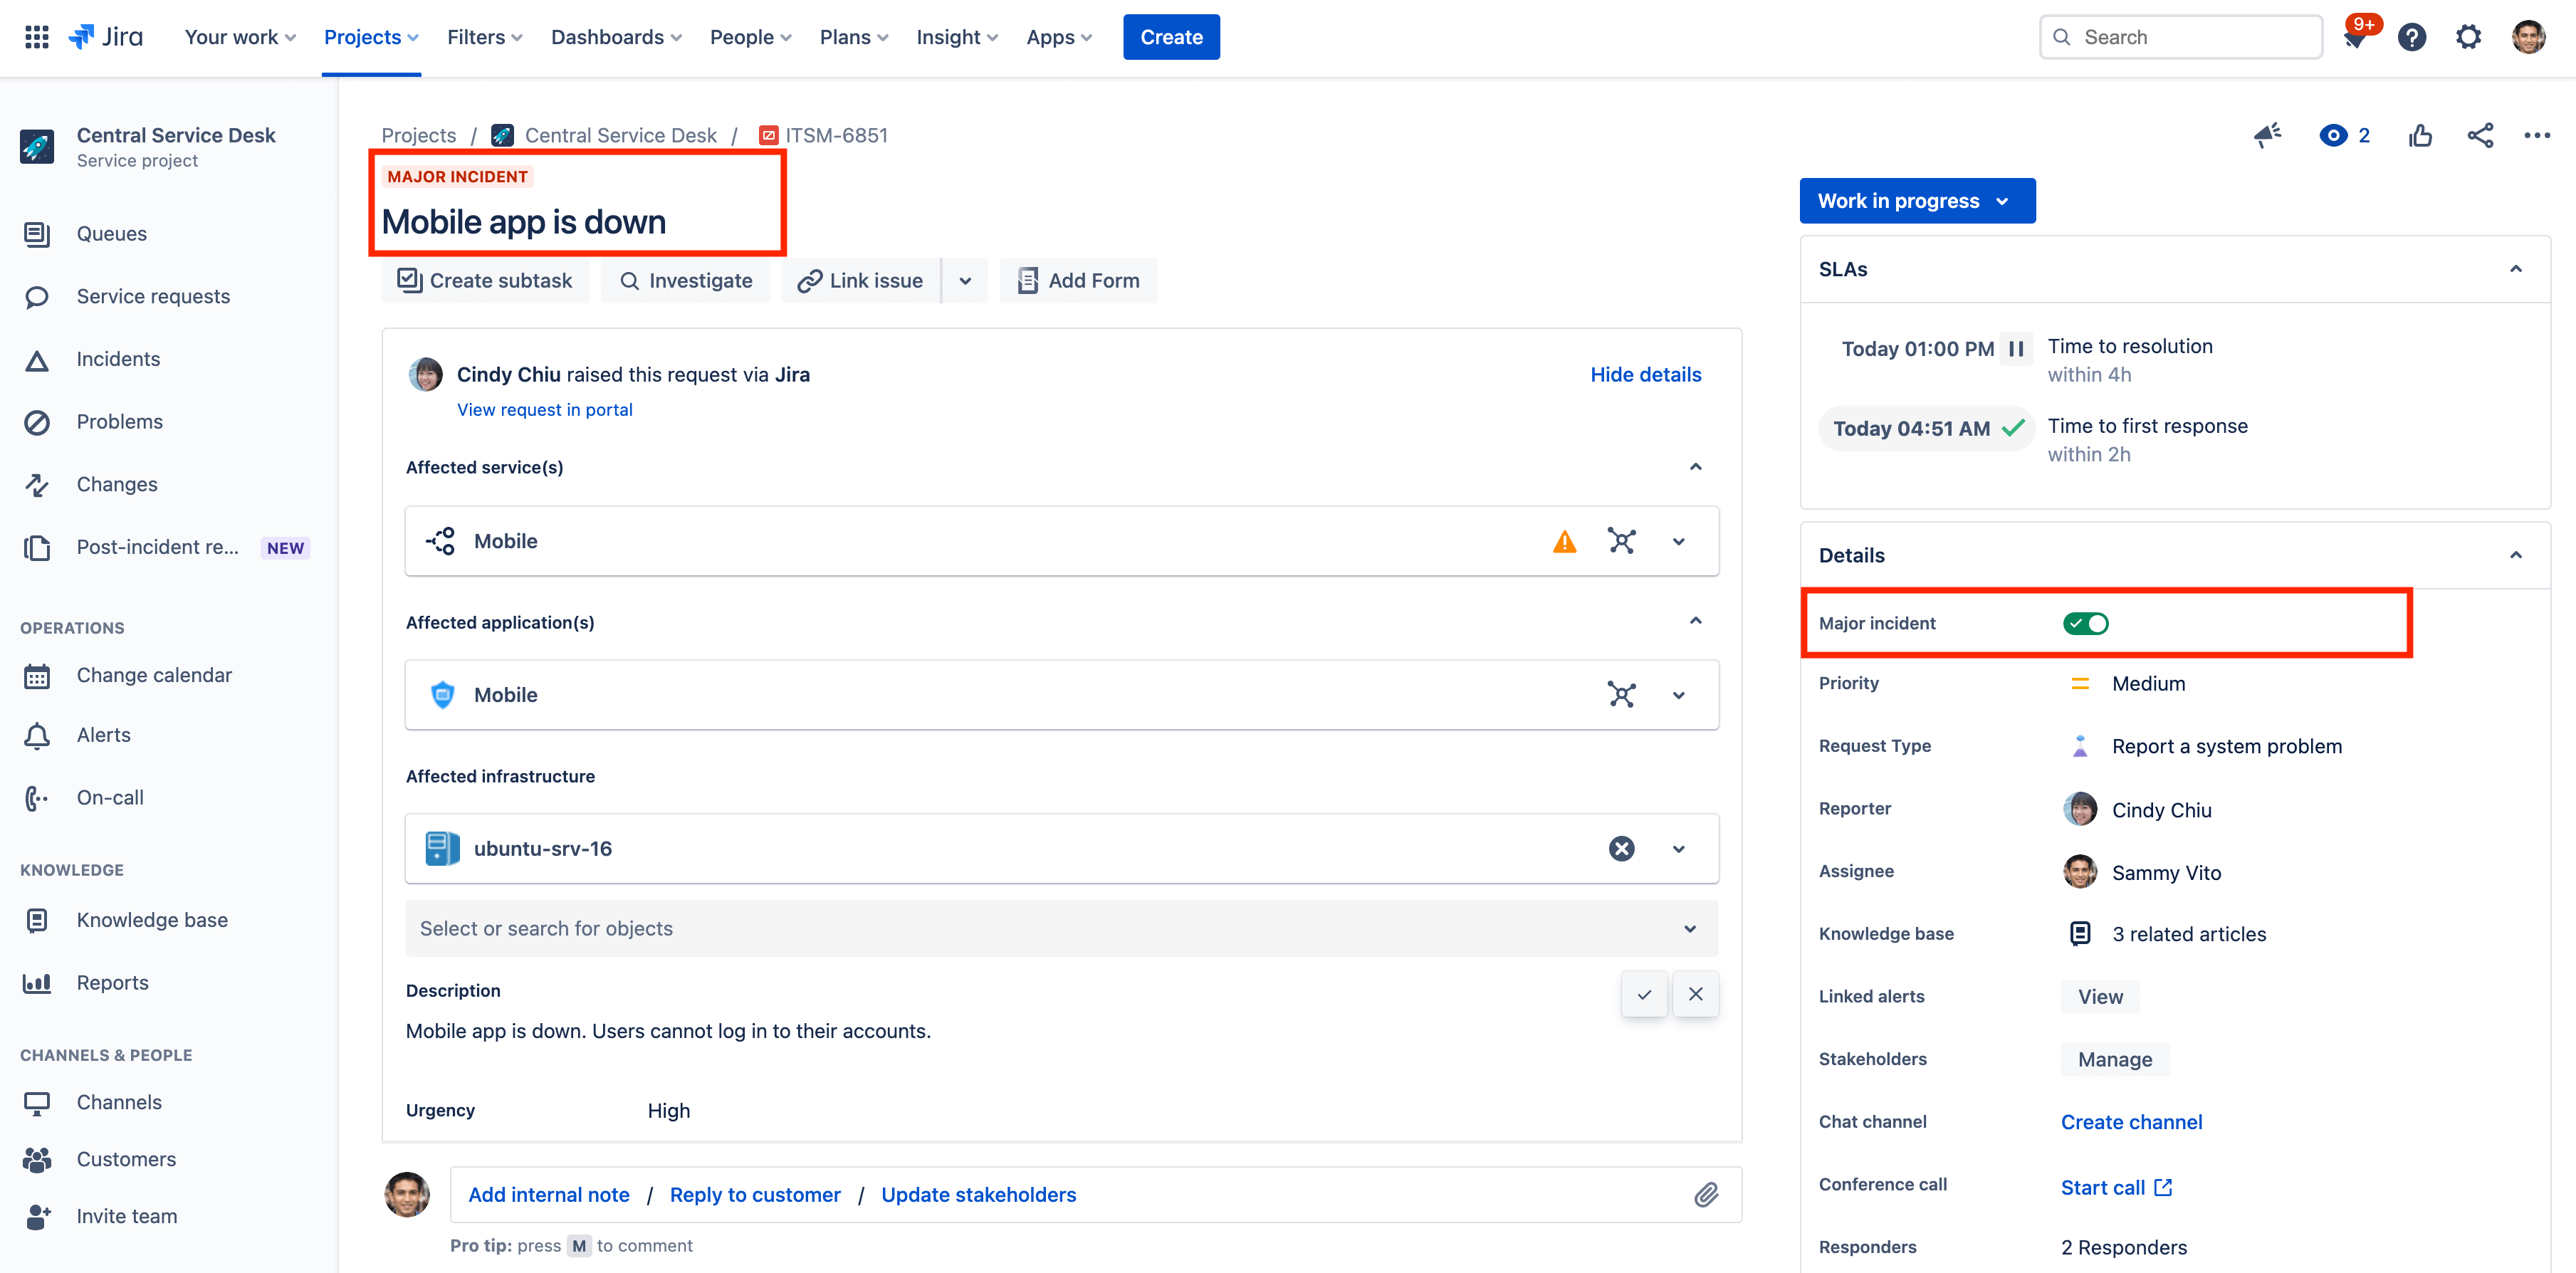
Note: If the Major incident field doesn’t show up for your incidents, make sure you’ve added the field in your issue view. You need to be a Jira admin to add fields to an issue type.
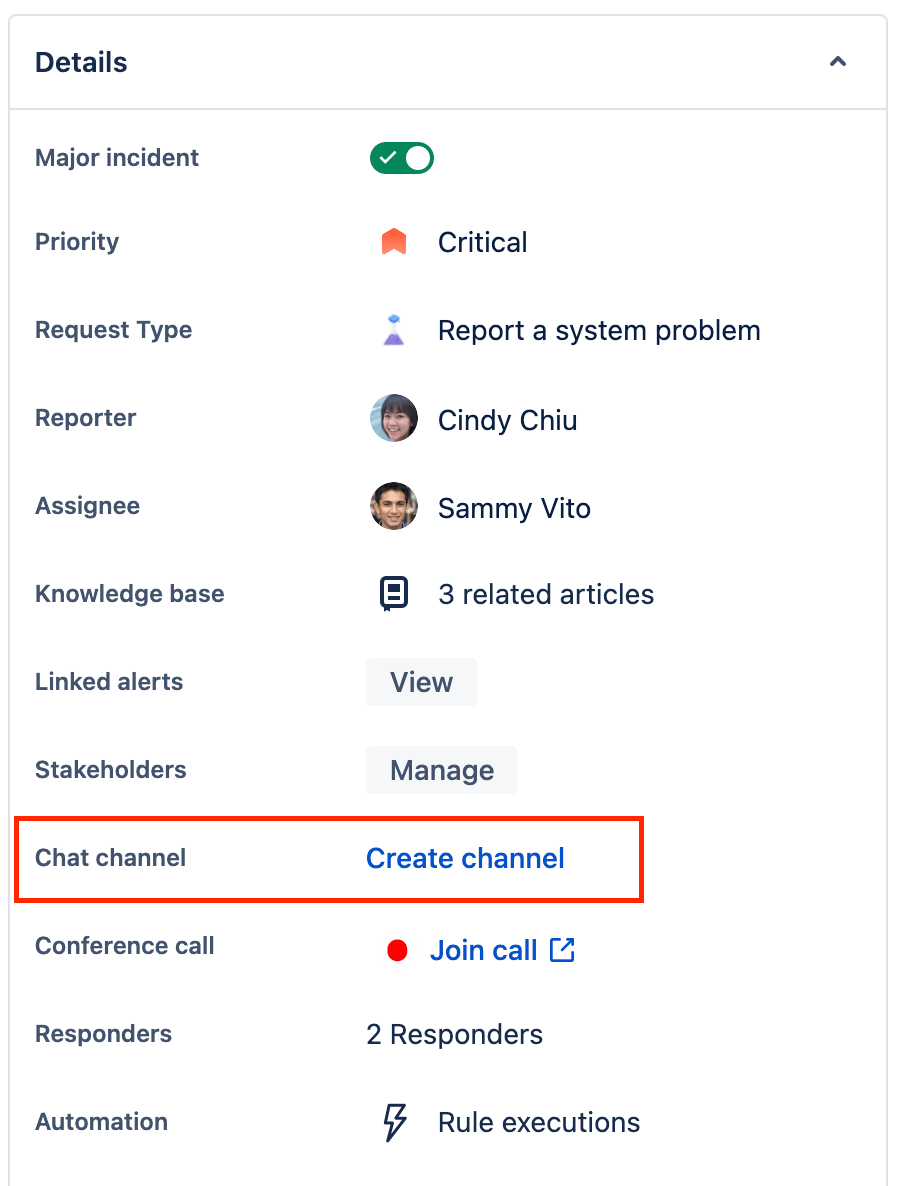
How to create and send updates to a Slack channel directly from an incident
Jira Service Management allows you to connect your workspace and create a dedicated Slack channel for each incident. By connecting Slack workspaces to your service project you can create Slack channels for your incidents, add incident responders to your Slack channels, update incident priorities, take incident actions, and help your team step in faster during incidents.
To create an incident Slack channel:
- Navigate to the incident you want to create a Slack channel for.
- Select Create channel in the details section of the issue.
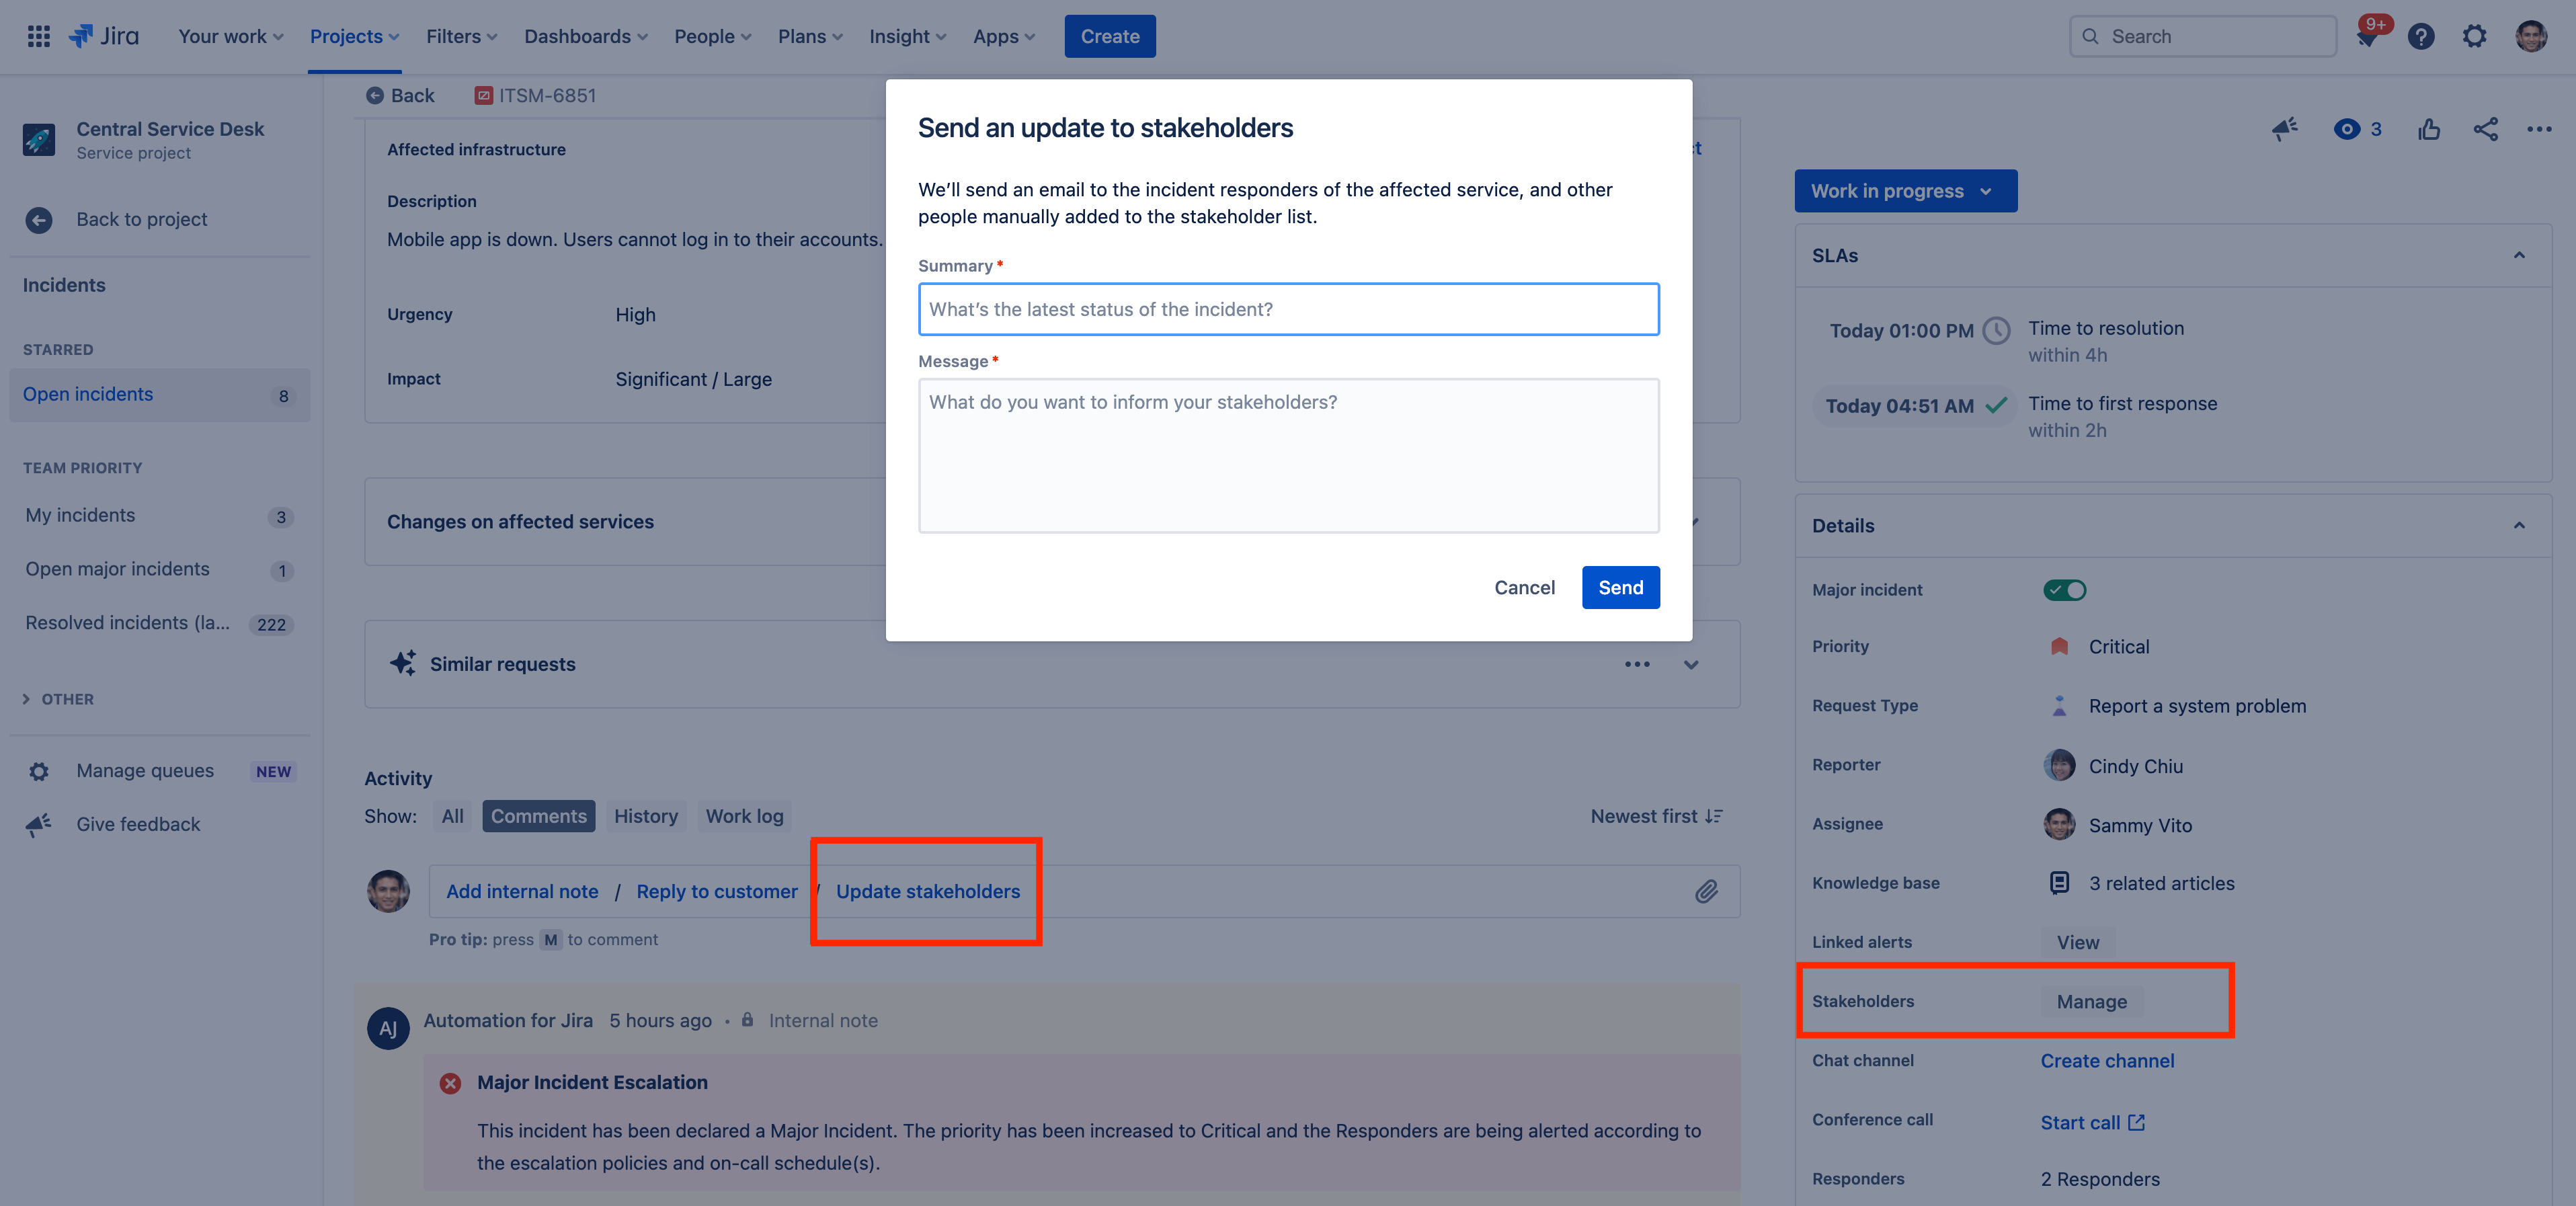
How to send incident updates to internal stakeholders
Internal stakeholders are people who are not responders but need to be updated about the incident’s progress to take precautions and actions. Jira Service Management gives you the ability to add people as stakeholders and update them by sending email messages.
To add/remove internal stakeholders:
- Navigate to the incident where you want to add internal stakeholders.
- Select Manage next to the stakeholder's field under details.
- Search for people you want to add as stakeholders.
To send an update to internal stakeholders:
- From the Activity section of the issue view, select Update stakeholders.
- Enter a summary and a message.
- Select Send.
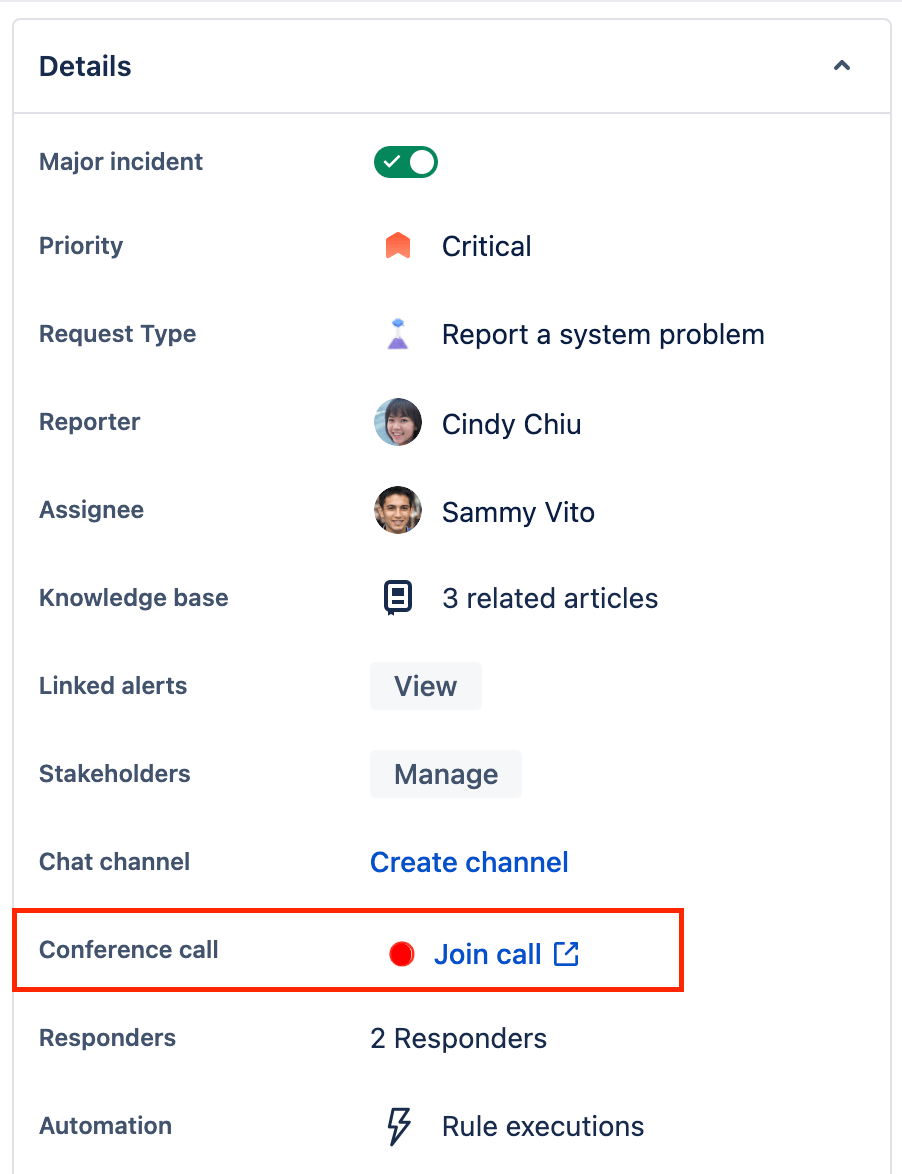
How to swarm incidents with your team through conference calls
Jira Service Management offers video/voice conference rooms to coordinate and manage incidents from a central place.
To start a conference call:
- Navigate to the incident where you want to start a conference call.
- Select Start call (or Join call for an existing call) next to the Conference call field under details.
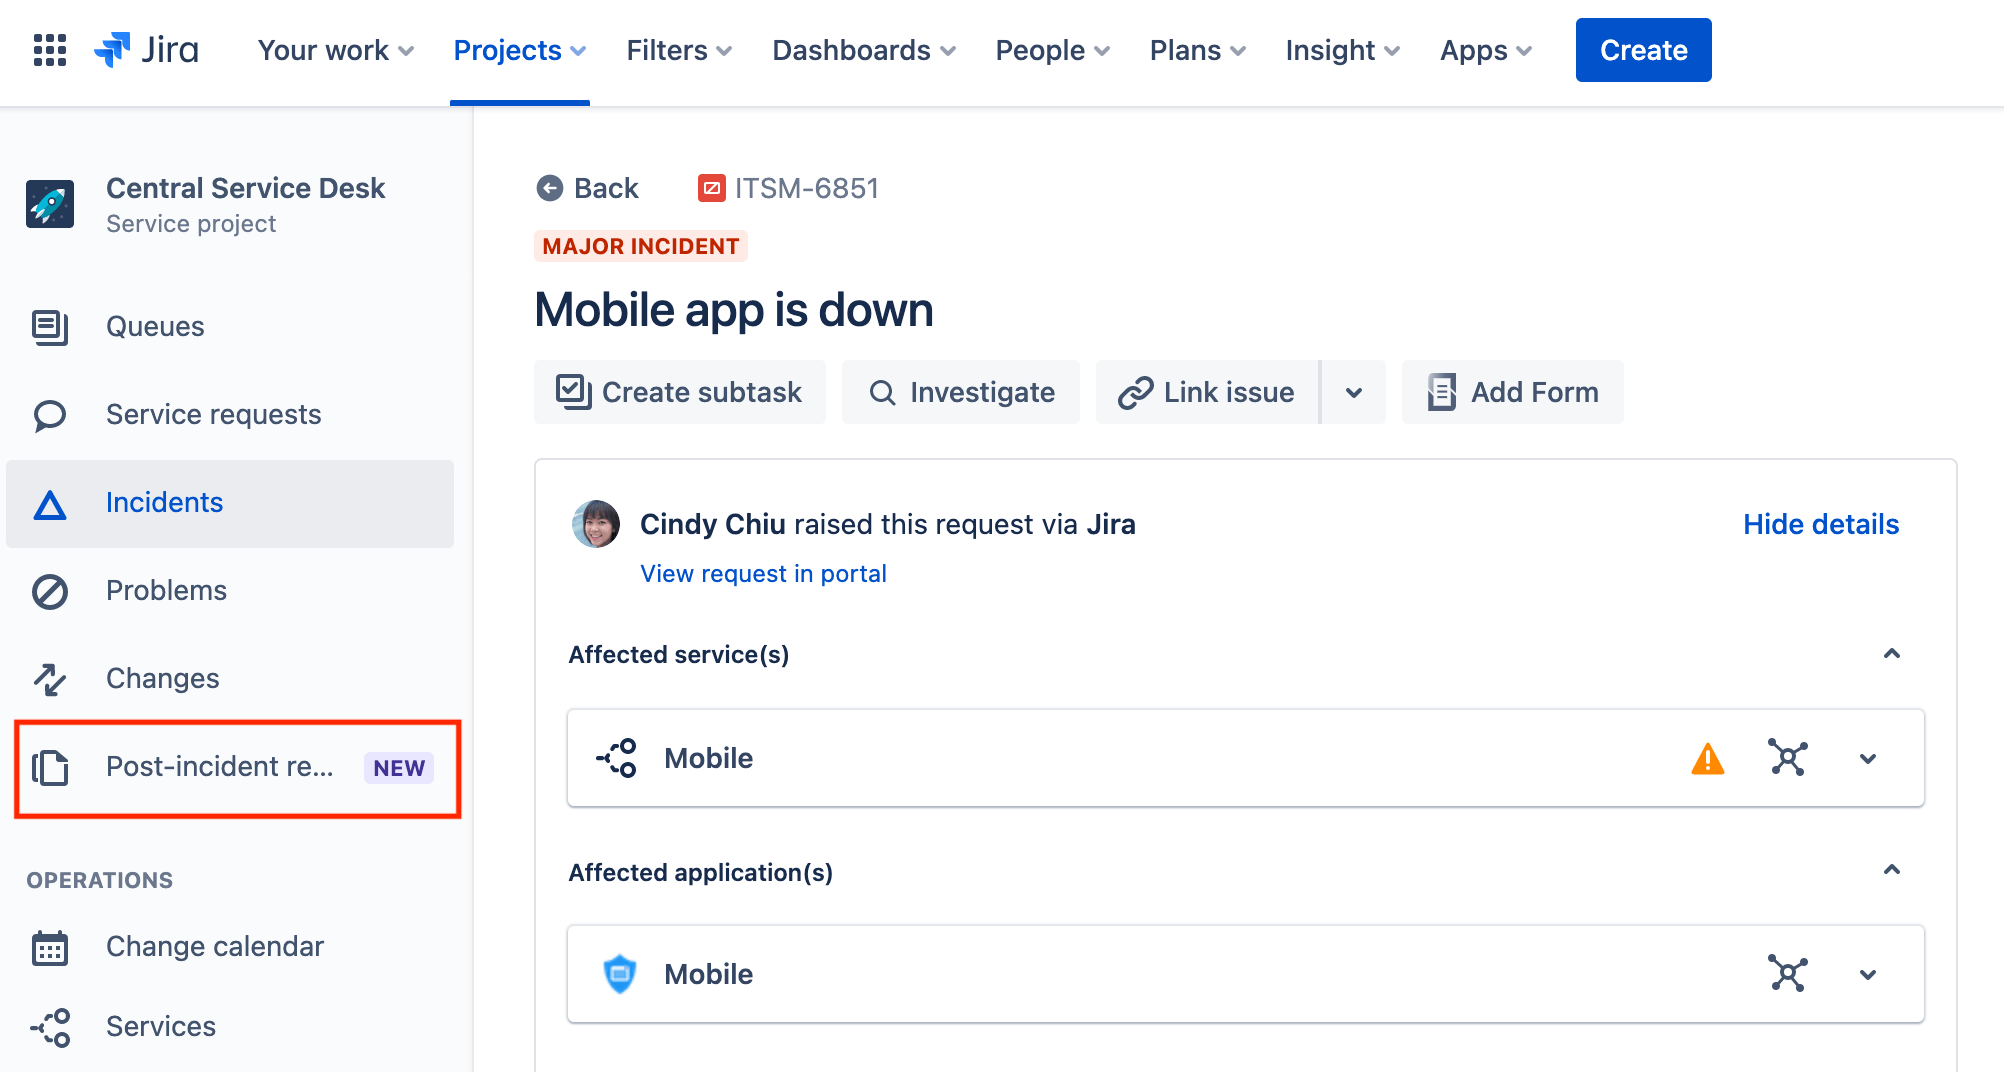
Learn how to access and create post-incident reviews (PIRs)
Post-incident reviews give you a chance to uncover vulnerabilities in your system, stop repeat incidents, and decrease time to incident resolution in the future, and are an important step in the lifecycle of an always-on service. The findings from your review should feed back into your planning process to ensure that critical fixes find a place in upcoming work. Documenting the incident and how the team resolved it can inform how future incidents are handled. Teams can create long-term solutions to problems leading up to an incident and link the post-incident review to the incident in Jira Service Management.
To turn on the post-incident review feature:
- Navigate to Project settings > Features.
- Turn on Post-incident reviews under ITSM categories.
Enabling this category allows you to access new features for your requests. You'll need to create new request types or assign your existing requests types to the post-incident reviews category to get started.
To access your post-incident reviews:
- Select Post-incident review in your project sidebar menu.
- Select the appropriate queue for post-incident reviews.
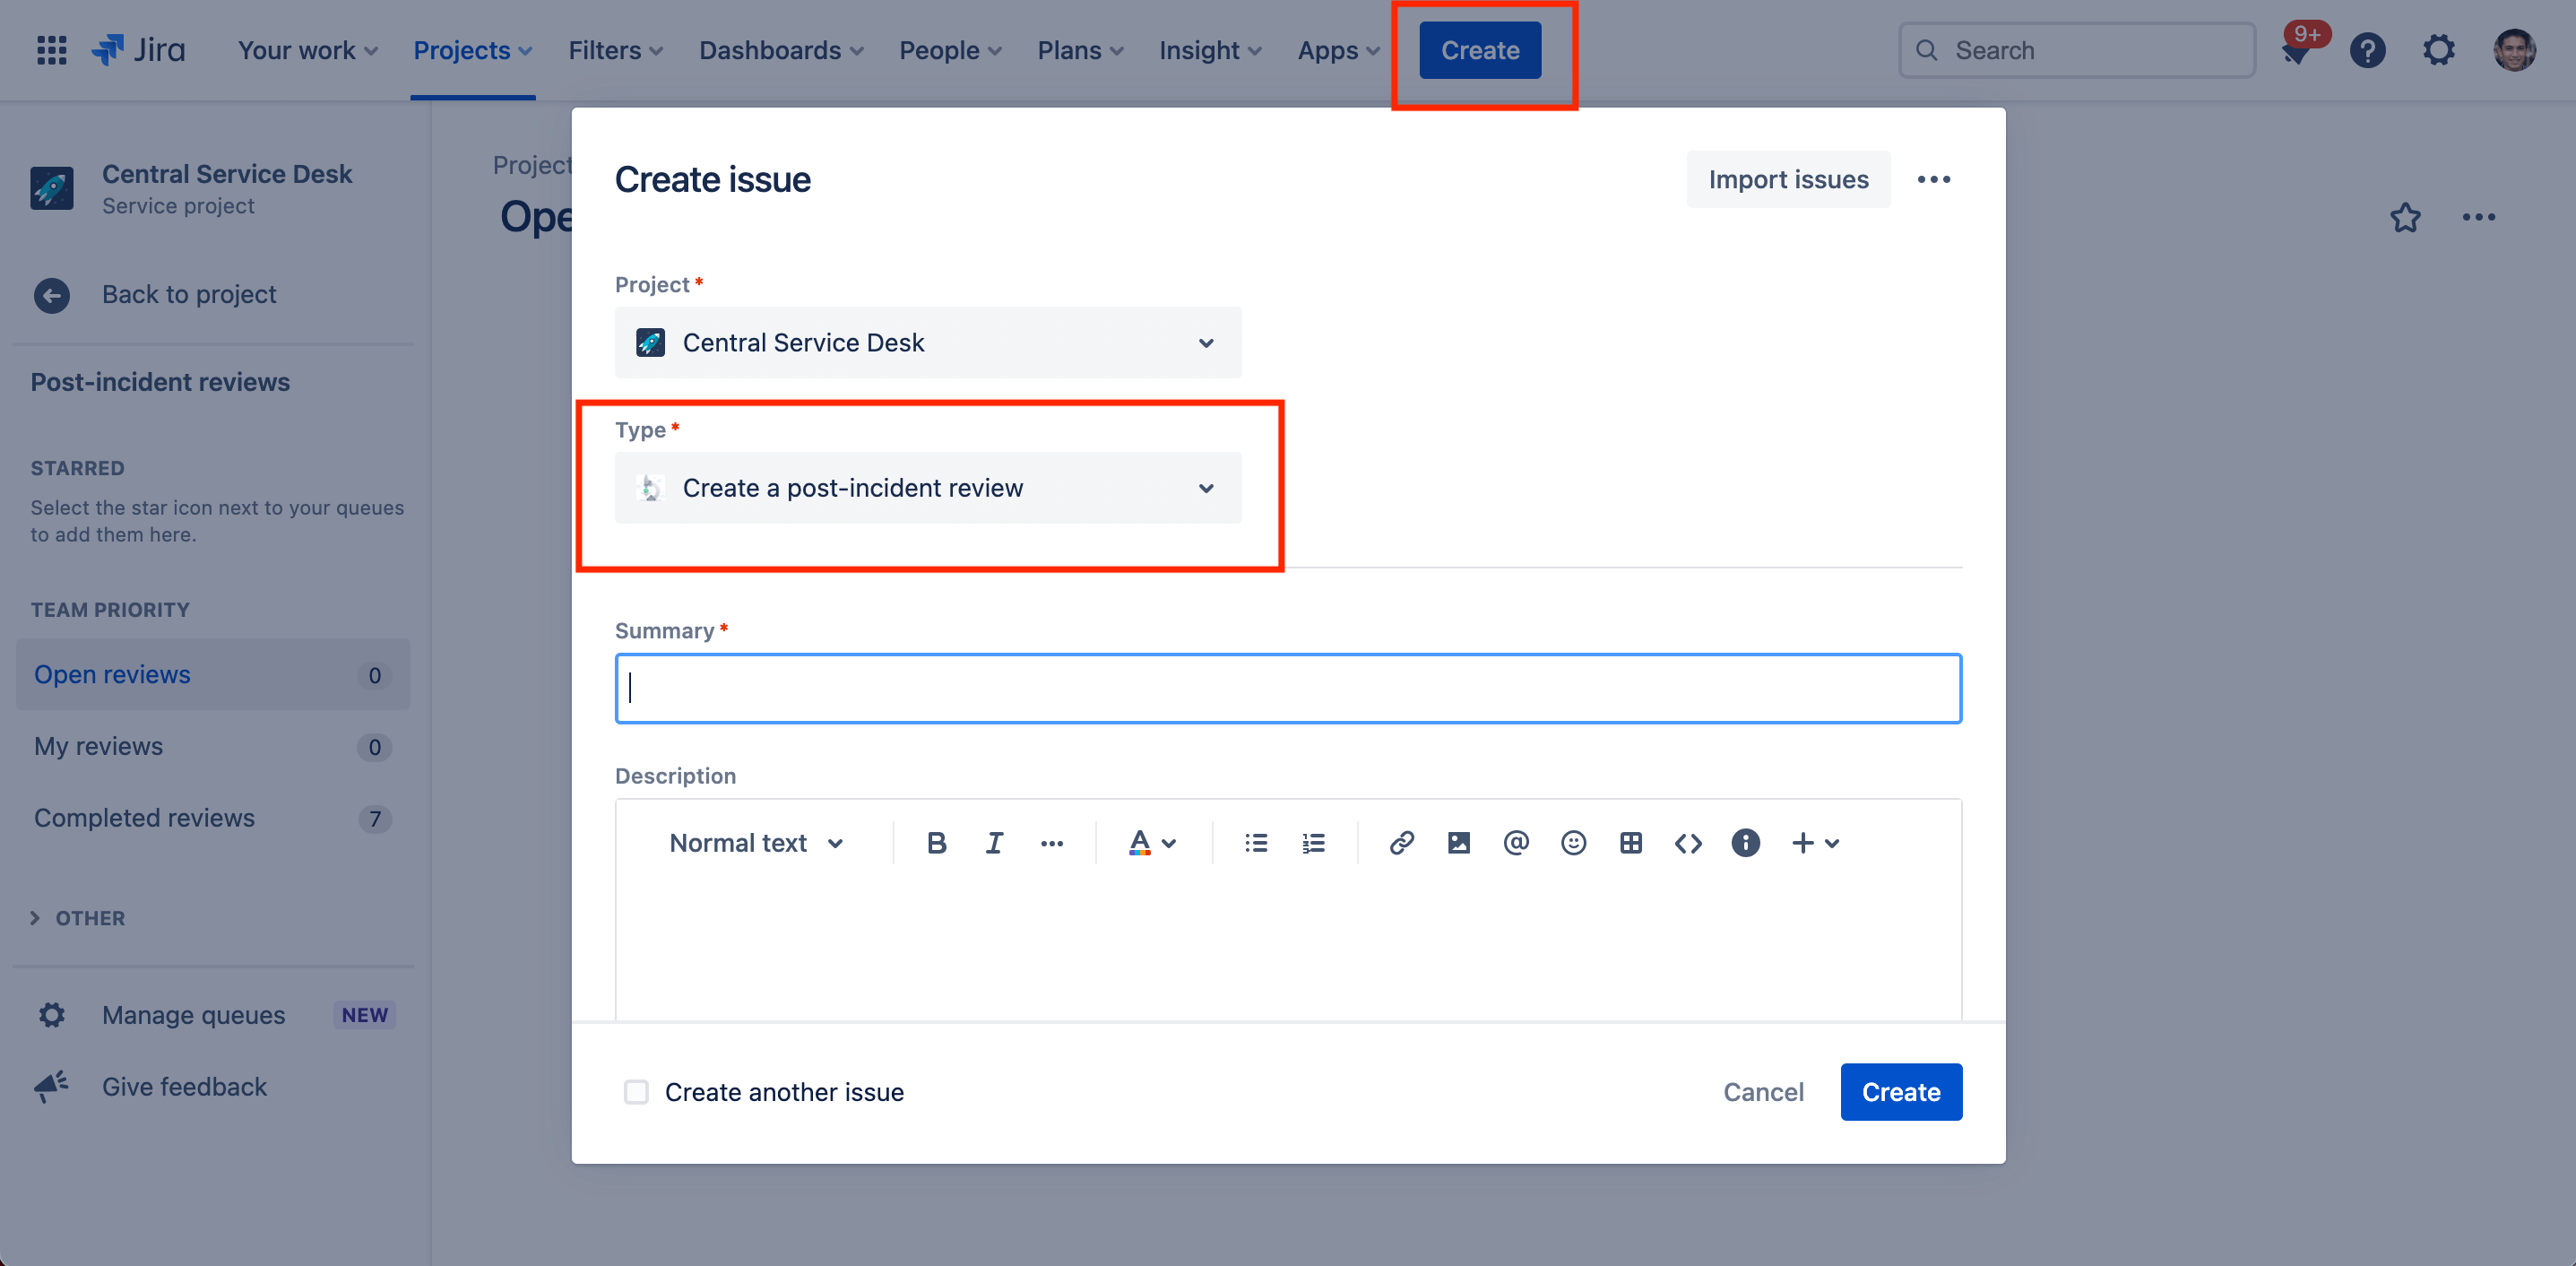
To create a new post-incident review:
- Select Create in the top menu bar.
- Select the post-incident review request type you established in the drop-down.
- Fill out the required information and link the appropriate incident to the PIR in the linked issues field.
- Select Create when finished.
Pro-tip: Post-incident reviews can also be created using Jira Service Management’s native automation engine. For example, you can set an automation rule to create a post-incident review each time a major or criticial priority incident is resolved by your team.
How to link multiple incidents into a problem report
Jira Service Management allows you to link multiple issues together. For example, you can link multiple incident records to a larger problem report.
To link multiple incidents to a problem report:
- View the incident record.
- Select Link Issue.
- In the linked issues field, select is caused by.
- Enter the issue (or select from the drop-down menu) for the issue you want to link to in the Issue field.
- Select Link.
Incident management best practices and tips
Make it easy to capture user and system-reported incidents
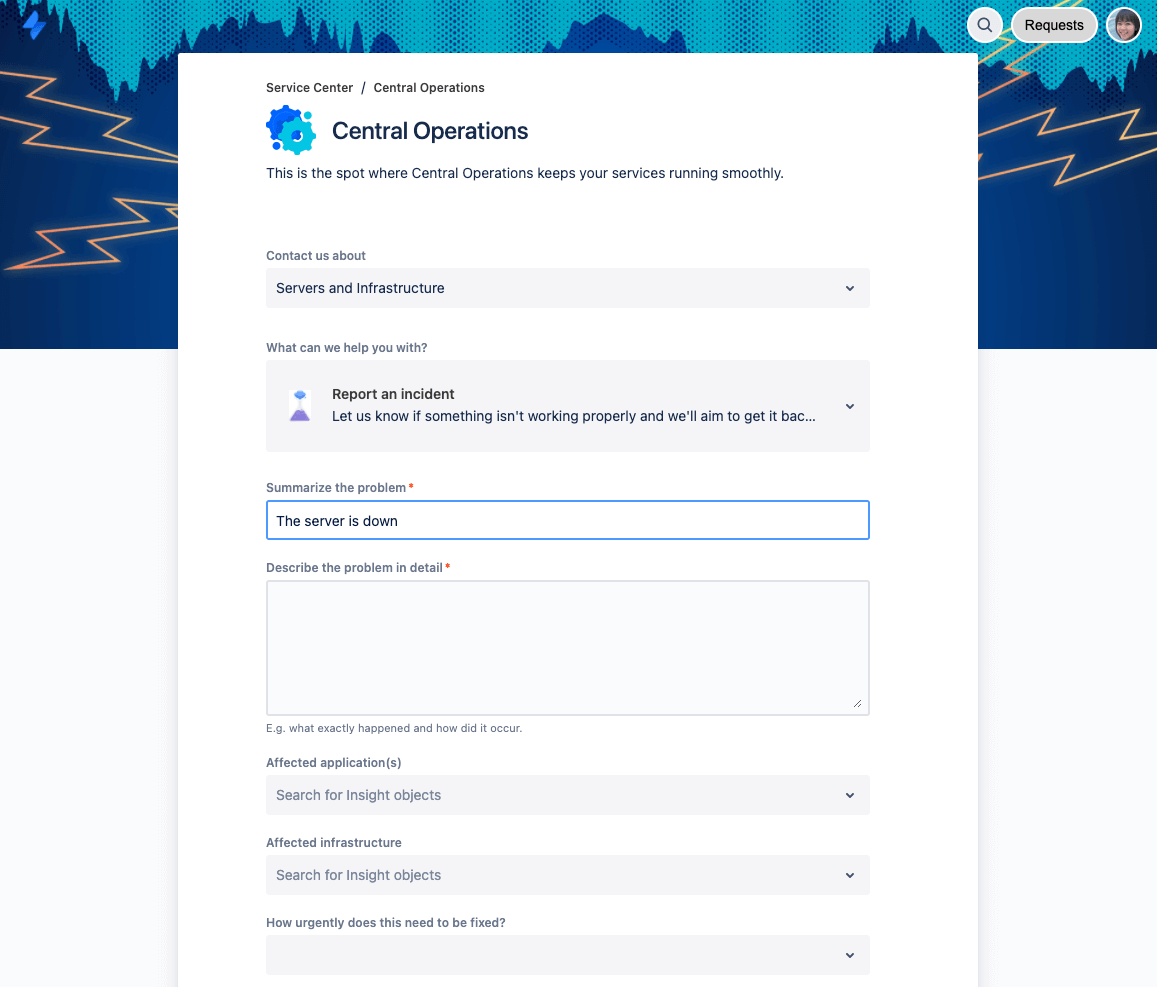
Jira Service Management is the source of truth for both minor and major incidents. The customer portal captures user-reported incidents in a complete and consistent manner, with all of the necessary information the support team needs to evaluate the incident. When employees or customers see an incident, they can report it in Jira Service Management. From there, incidents are routed to the right agent queues.
When it comes to detecting incidents and outages early, effective monitoring is the eyes and ears for IT Operations. For system-detected incidents, Jira Service Management easily integrates with over 200 app and web services, such as Slack, Datadog, Sumo Logic, and Nagios, to sync alert data and streamline your incident workflow.
Reduce alert fatigue with smart on-call scheduling
When on-call staff are inundated with irrelevant alerts, they start getting alert fatigue and miss important notifications. Jira Service Management’s built-in incident management capabilities ensure your team never misses a critical alert.
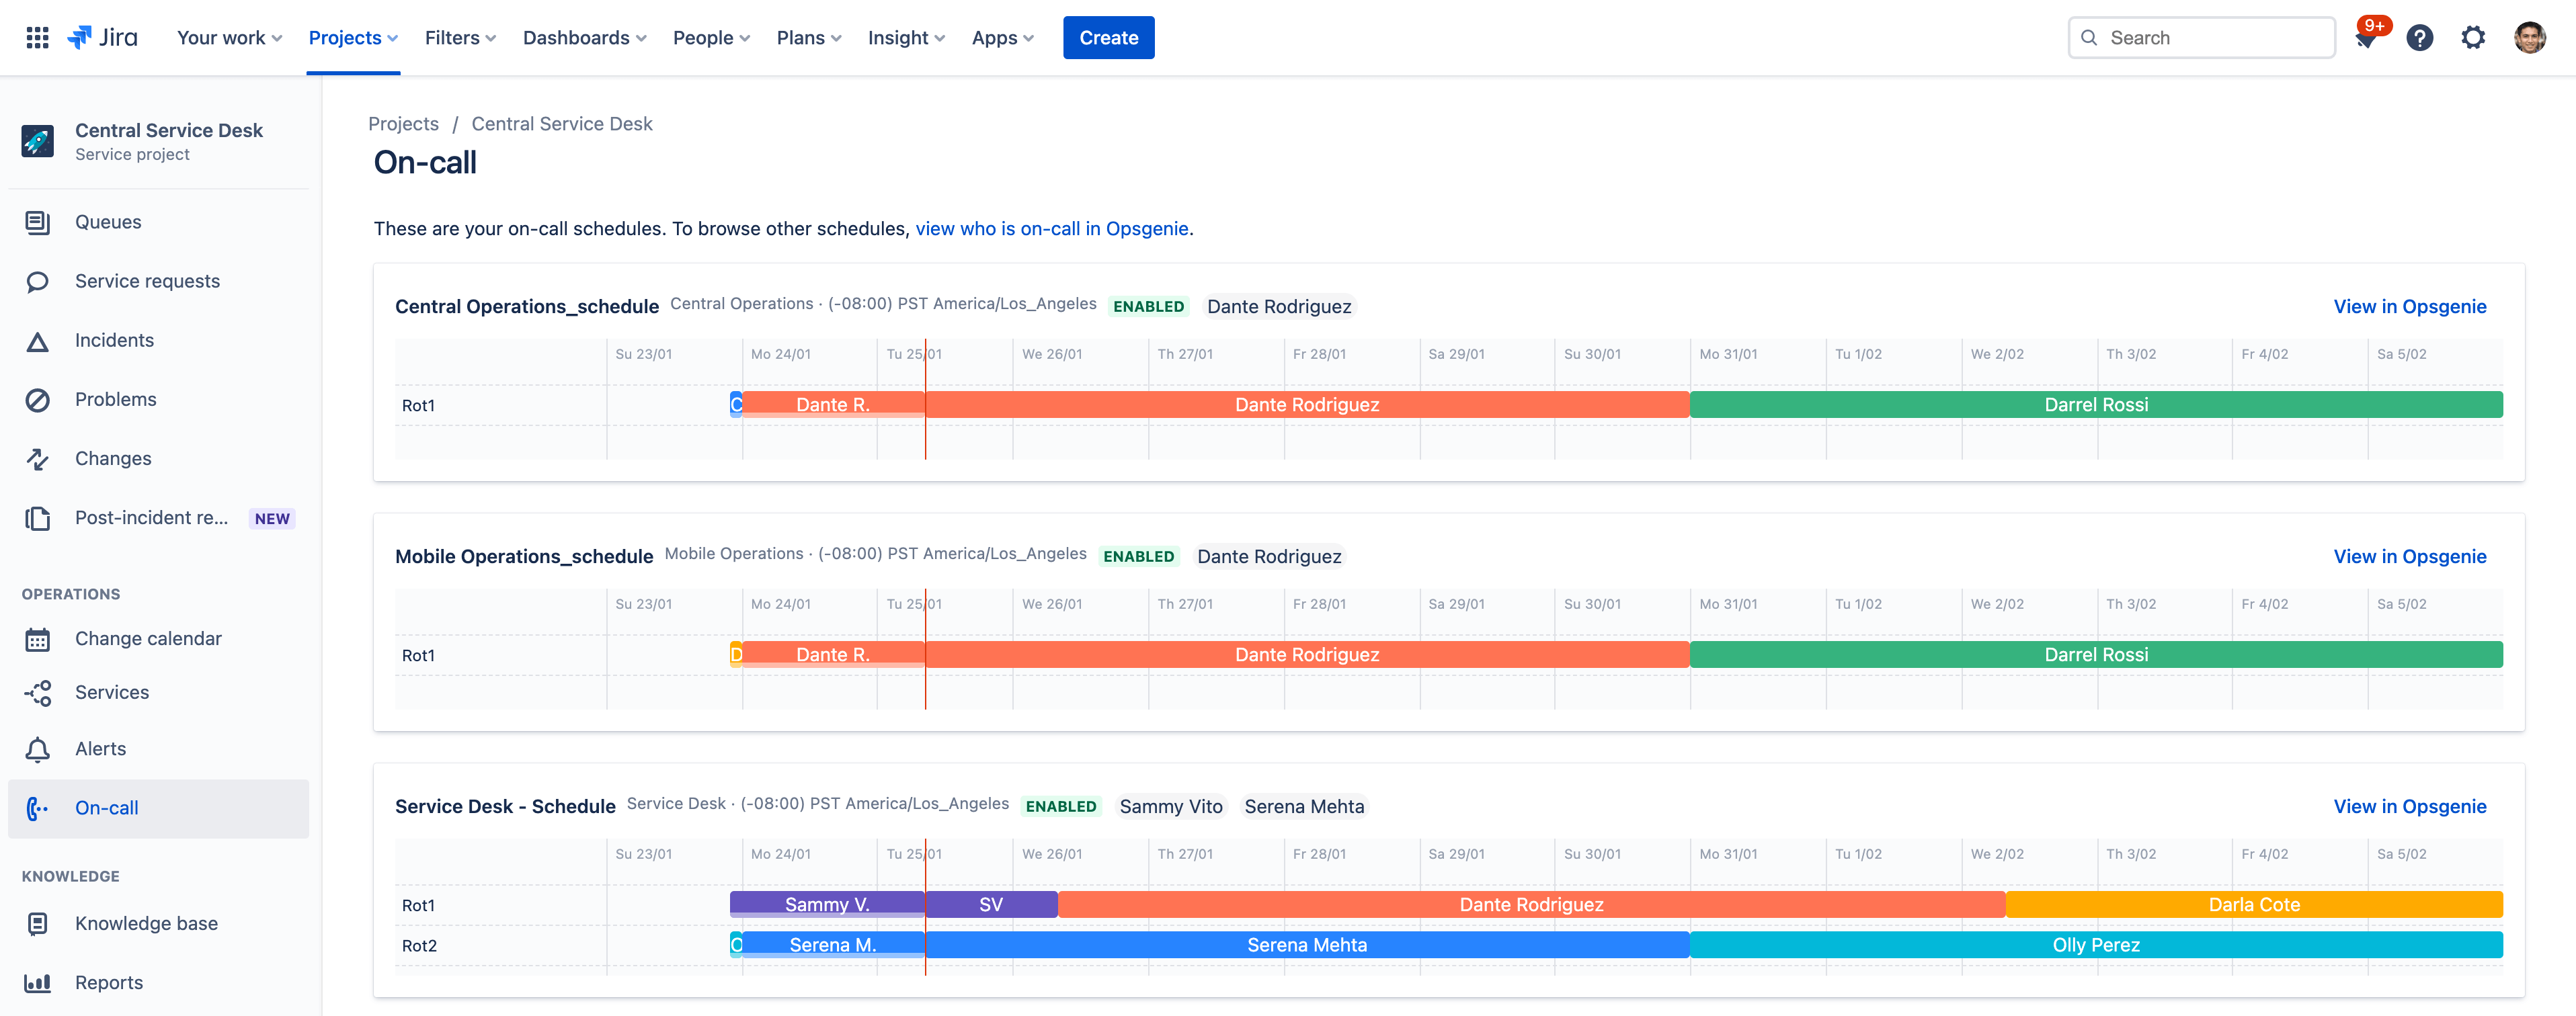
By building schedules and defining escalation rules within one interface, your team always knows who is on-call and accountable during incidents. The solution groups alerts, filters out the noise, and notifies team members using multiple channels, such as text, phone call, mobile push, or email, along with the relevant context needed to immediately begin resolution.
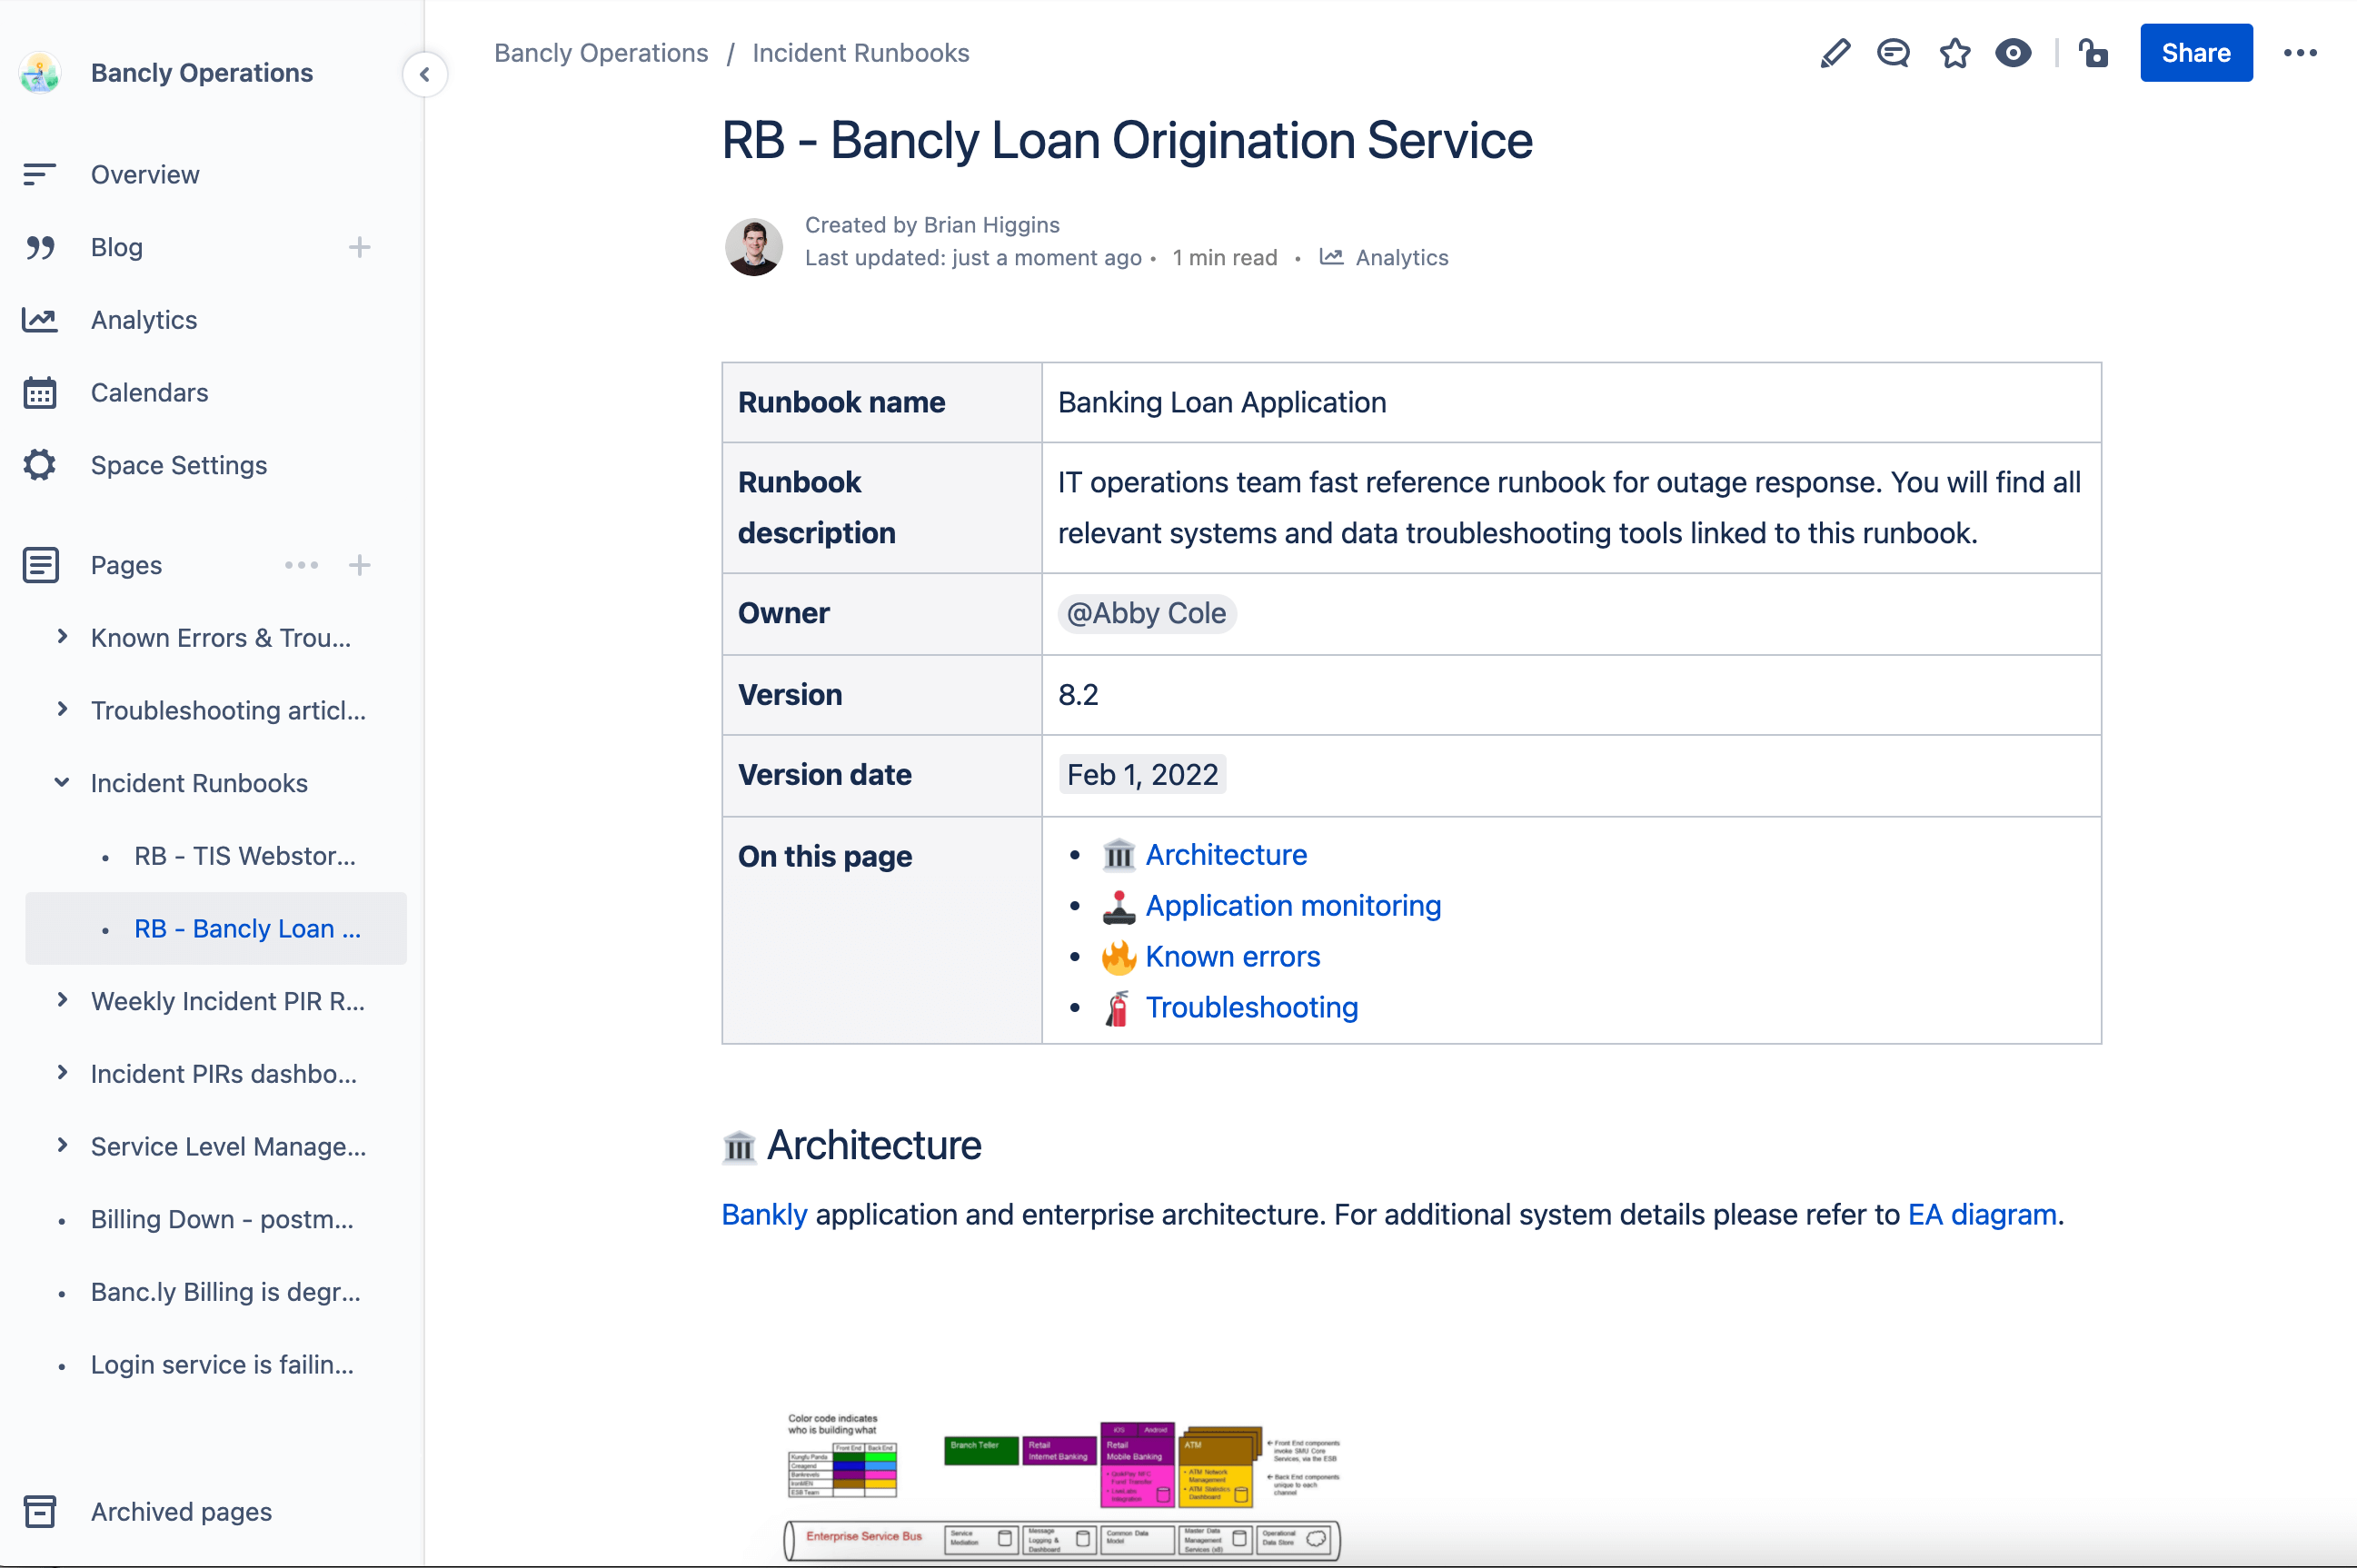
Use ChatOps and runbooks to improve team coordination
With Jira Service Management, teams have a centralized place to collaborate, share real-time information, and fast-track resolution with the incident command center. Instead of navigating fragmented one-on-one chat updates or scrolling through long conversation histories, pre-define a video conference room for teams to chat dynamically, assign roles, and even take decisive actions right in the interface. By attaching runbooks to alerts, teams can quickly launch standard remediation tasks, either automatically or on-demand.

Runbooks are also great for documenting common troubleshooting methods to address alerts and resolve outages. With runbooks, your staff has all the information they need to quickly triage an incident, right at their fingertips. In many cases, teams can reduce incident resolution times by 40%.
Establish a proactive incident management playbook
Plan your incident response strategy in advance. You’ll alleviate stress, keep your team focused during the incident, and shorten the time to resolution. Make sure to include both operational and team-based collaboration practices:
- Identify what your team values most during incident response and create a plan to live those values consistently. For example, values may be collaboration, communication, and “blameless” post-incident reviews.
- Clearly define what qualifies as a major incident.
- Document your major incident practices.
- Establish your incident response communications, such as response templates and communications for stakeholders (both external and internal).
- Determine the core team members on your incident response team-of-teams.
- Establish your PIR practices.
- Conduct blameless PIRs for all major incidents.
- Publish and share PIR learnings.
- Conduct major incident simulation drills.
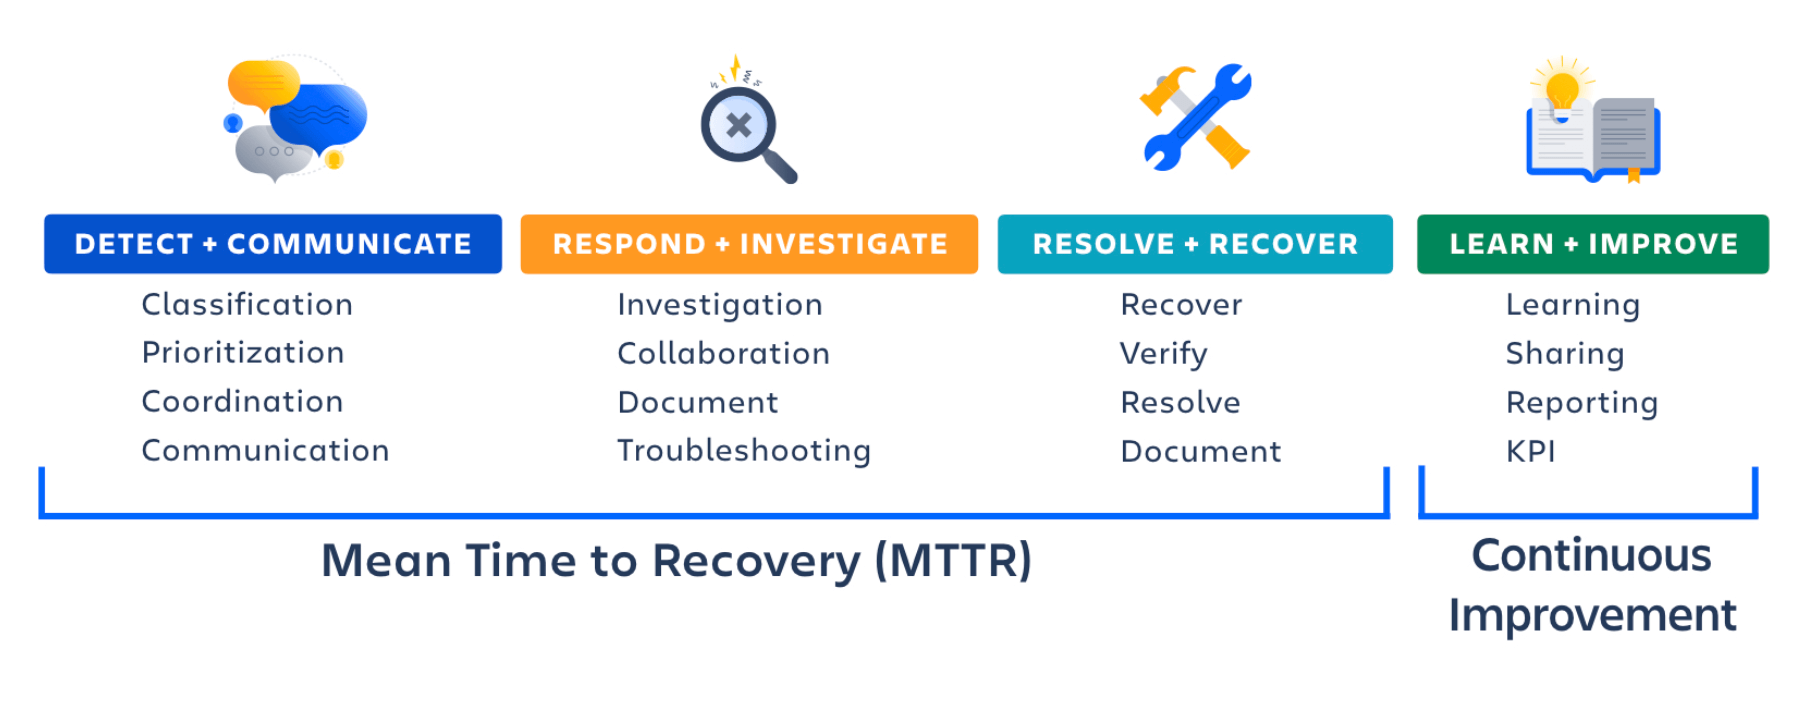
Focus on improving mean time to recovery (MTTR)
Establishing a strong incident management process is crucial to reducing the impact of the incident and restoring services quickly. The key to improving response is lowering mean time to recovery (MTTR) and streamlining root cause analysis to prevent future outages. In fact, Forrester has found that 70% of incident response time is spent within the Investigation and Diagnosis phase.
Build trust with centralized external communications
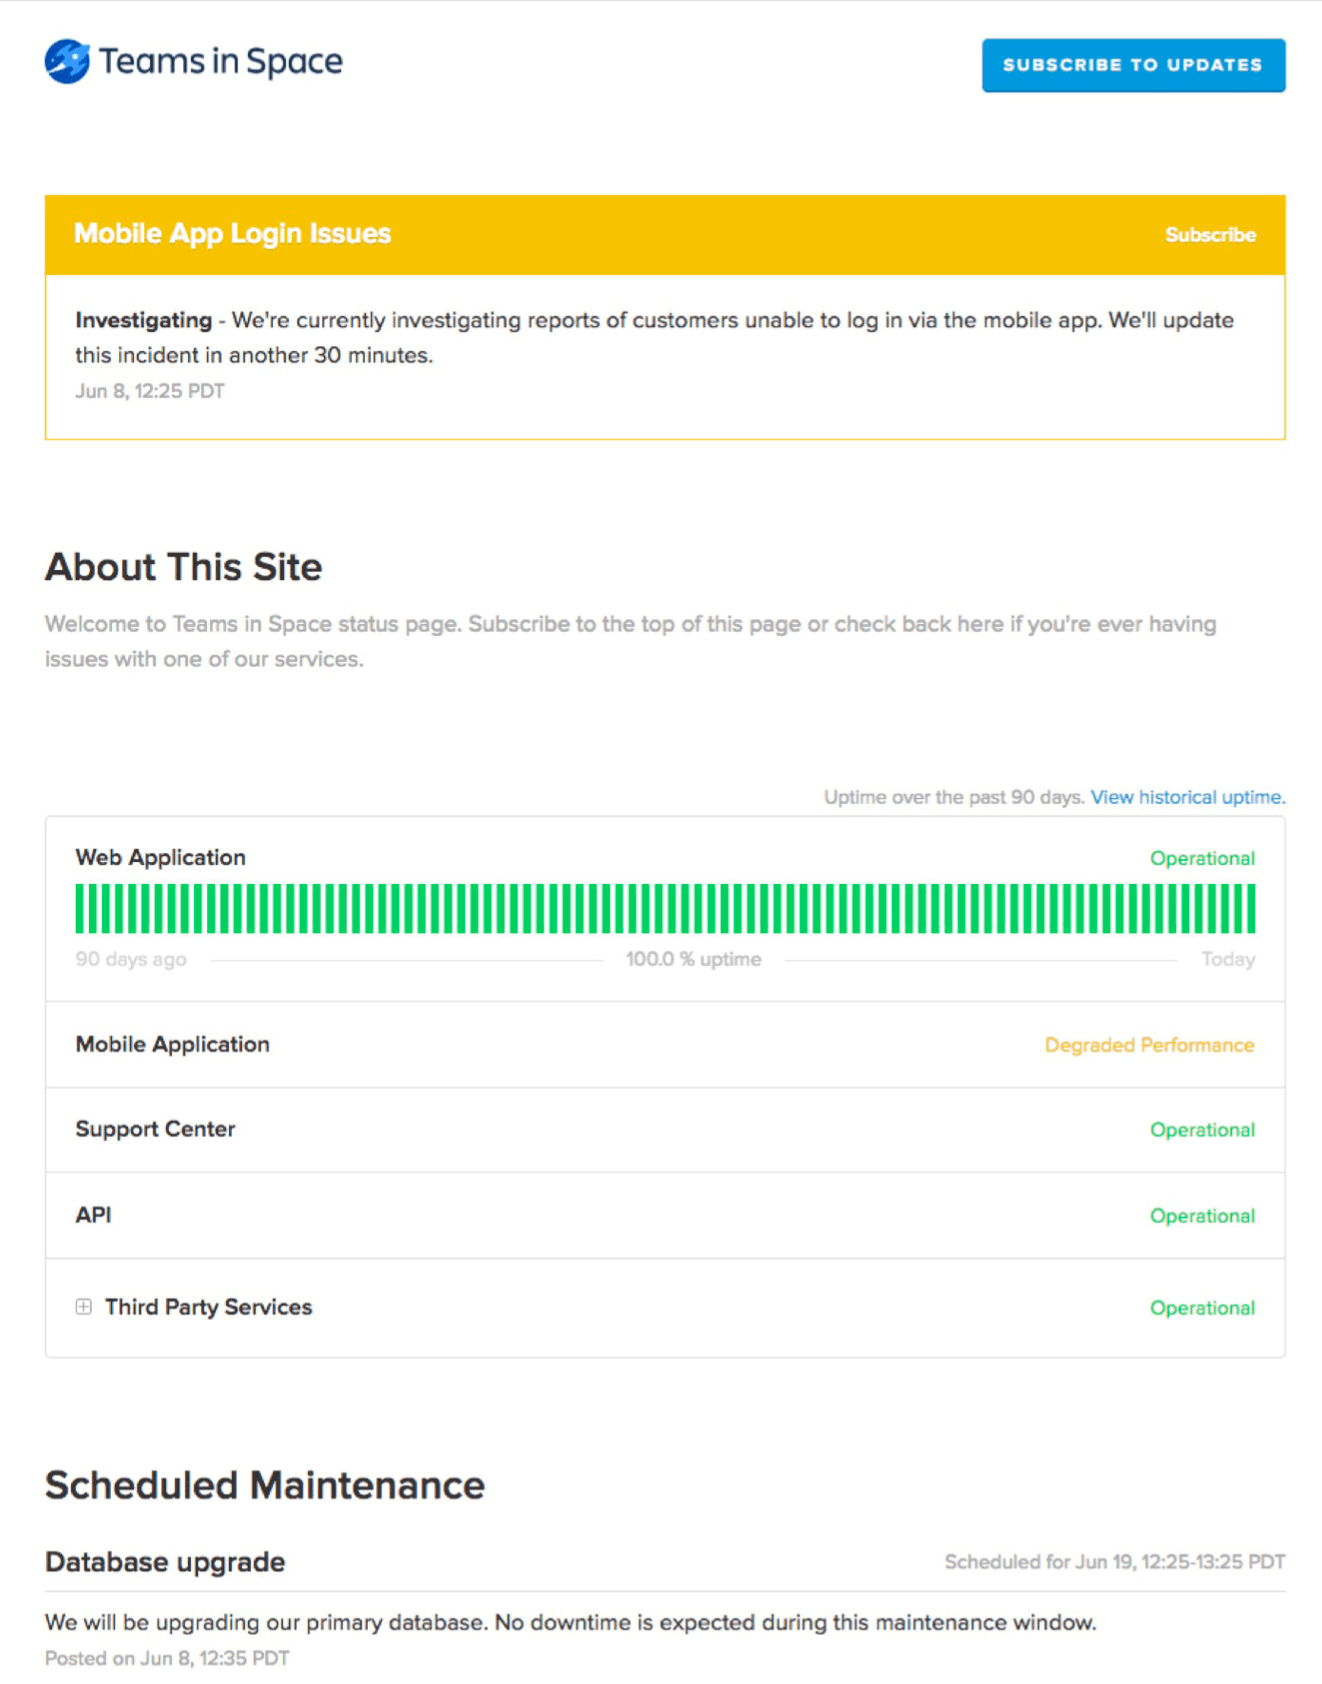
Many teams use a centralized dashboard, like Statuspage, to report on the status of critical services. Statuspage works as a single channel for clear and proactive mass communication to both internal and external users, along with automated notifications and updates.
Statuspage keeps internal teams informed of both scheduled and unplanned downtime as well. Customers and employees' can subscribe to updates, which promotes consistent communication and reduces manual updates.
For more information, check out our incident management best practices page
Getting Started
Service Request Management
Getting Started
Problem Management