Premium onboarding guide
Overview

This guide is intended to help admins on the Premium edition of Jira Service Management Cloud get onboarded with Premium features and make the most out of their Premium license.
Jira Service Management Premium is designed to help you confidently scale Jira Service Management in the cloud with advanced functionality. For some Premium feature highlights, check out this video:

In this guide, we’ll walk through advanced Premium capabilities – for incident management, asset and configuration management, change management, and Premium platform features-- and how you can utilize them!
Incident management at scale
Jira Service Management Premium includes robust incident management capabilities that allow you to reduce manual work and swarm incidents faster.
Note: All Premium Jira Service Management plans include Opsgenie. To access some of this functionality, you’ll need to navigate to the Opsgenie UI, accessed by using the product menu in the upper left corner.
Automated incident creation and orchestration
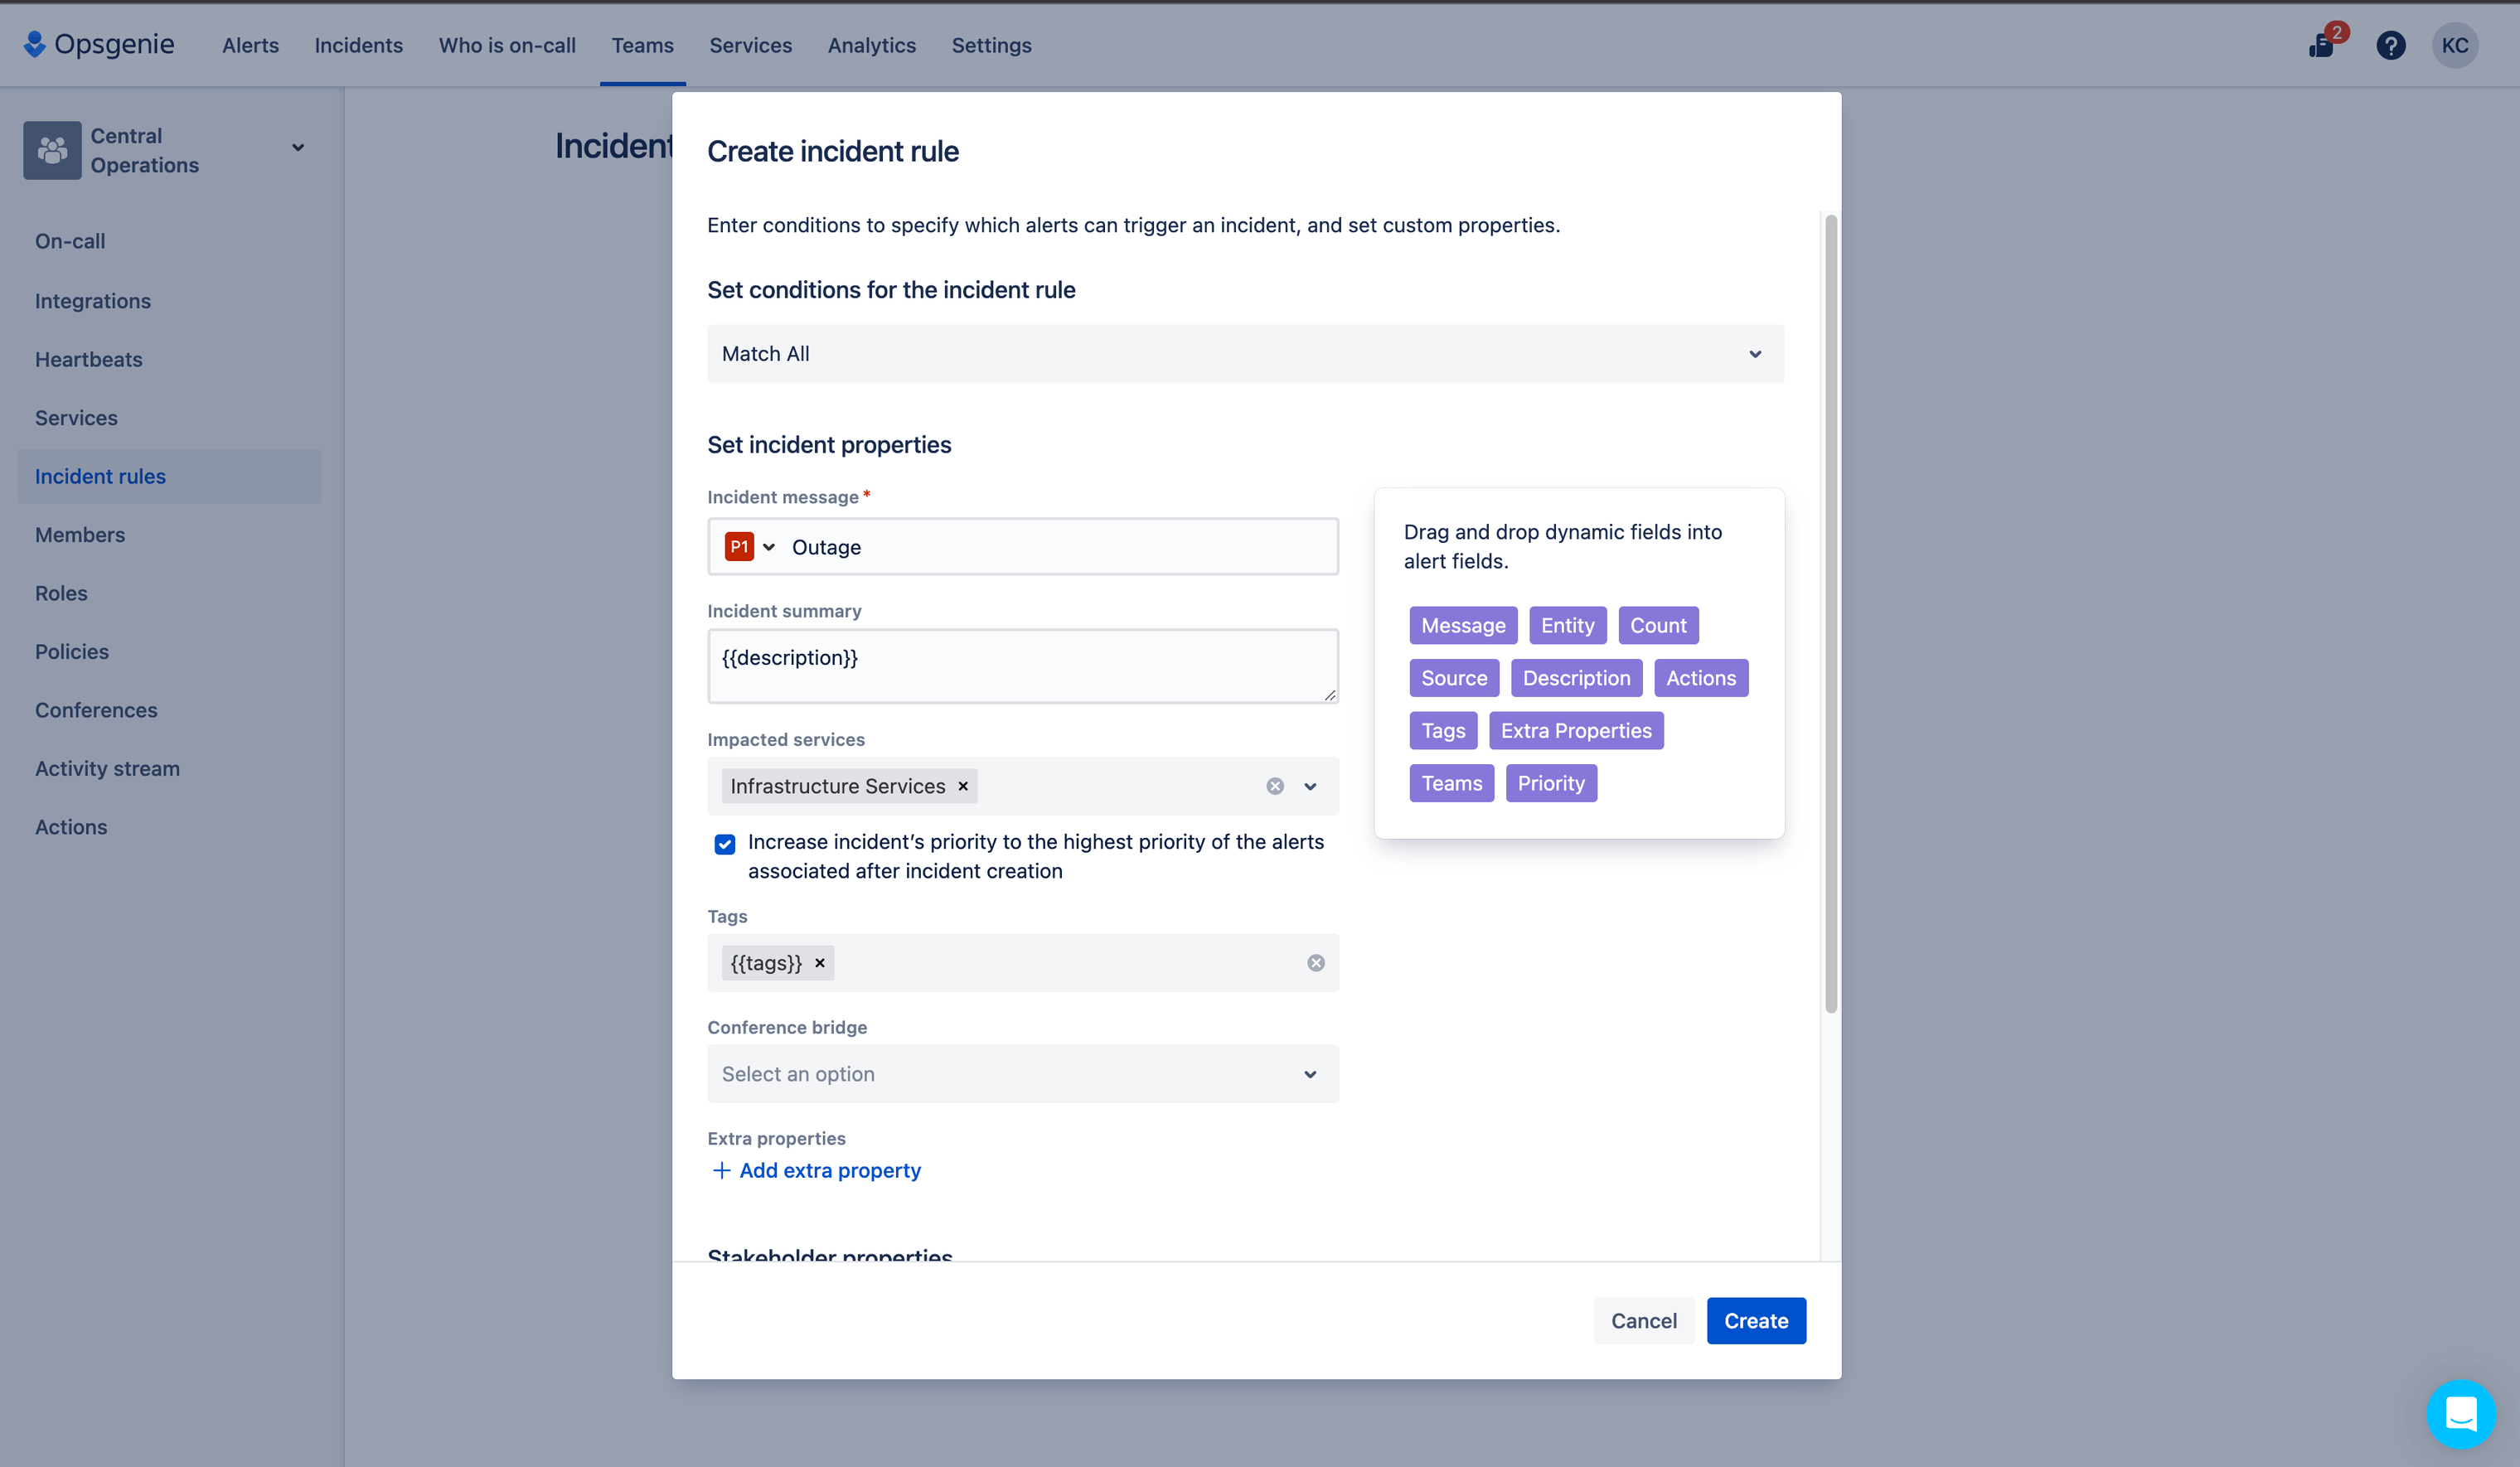
In Jira Service Management Premium, you can resolve every major incident by automating major incident creation, notifying key stakeholders quickly, and orchestrating the incident response. Incident rules let you customize how incidents are created and operate on If/Then statements and matching conditions. If alert data matches specified conditions (incident rules), an incident is automatically created and the raw alert is associated with the incident.
Incident conference calls
With the incident conference calls, you can command, control, and coordinate incident response, and effectively collaborate through video bridge and other integrated communication tools. Video and voice calls are vital tools that allow you and your team to swarm on major incidents, helping you to communicate easily and directly with relevant teams so that you can resolve major incidents as soon as possible.
The main components of incident conference calls in Jira Service Management include video tools, live chat with an activity stream updated in real-time, and incident actions such as adding responders.
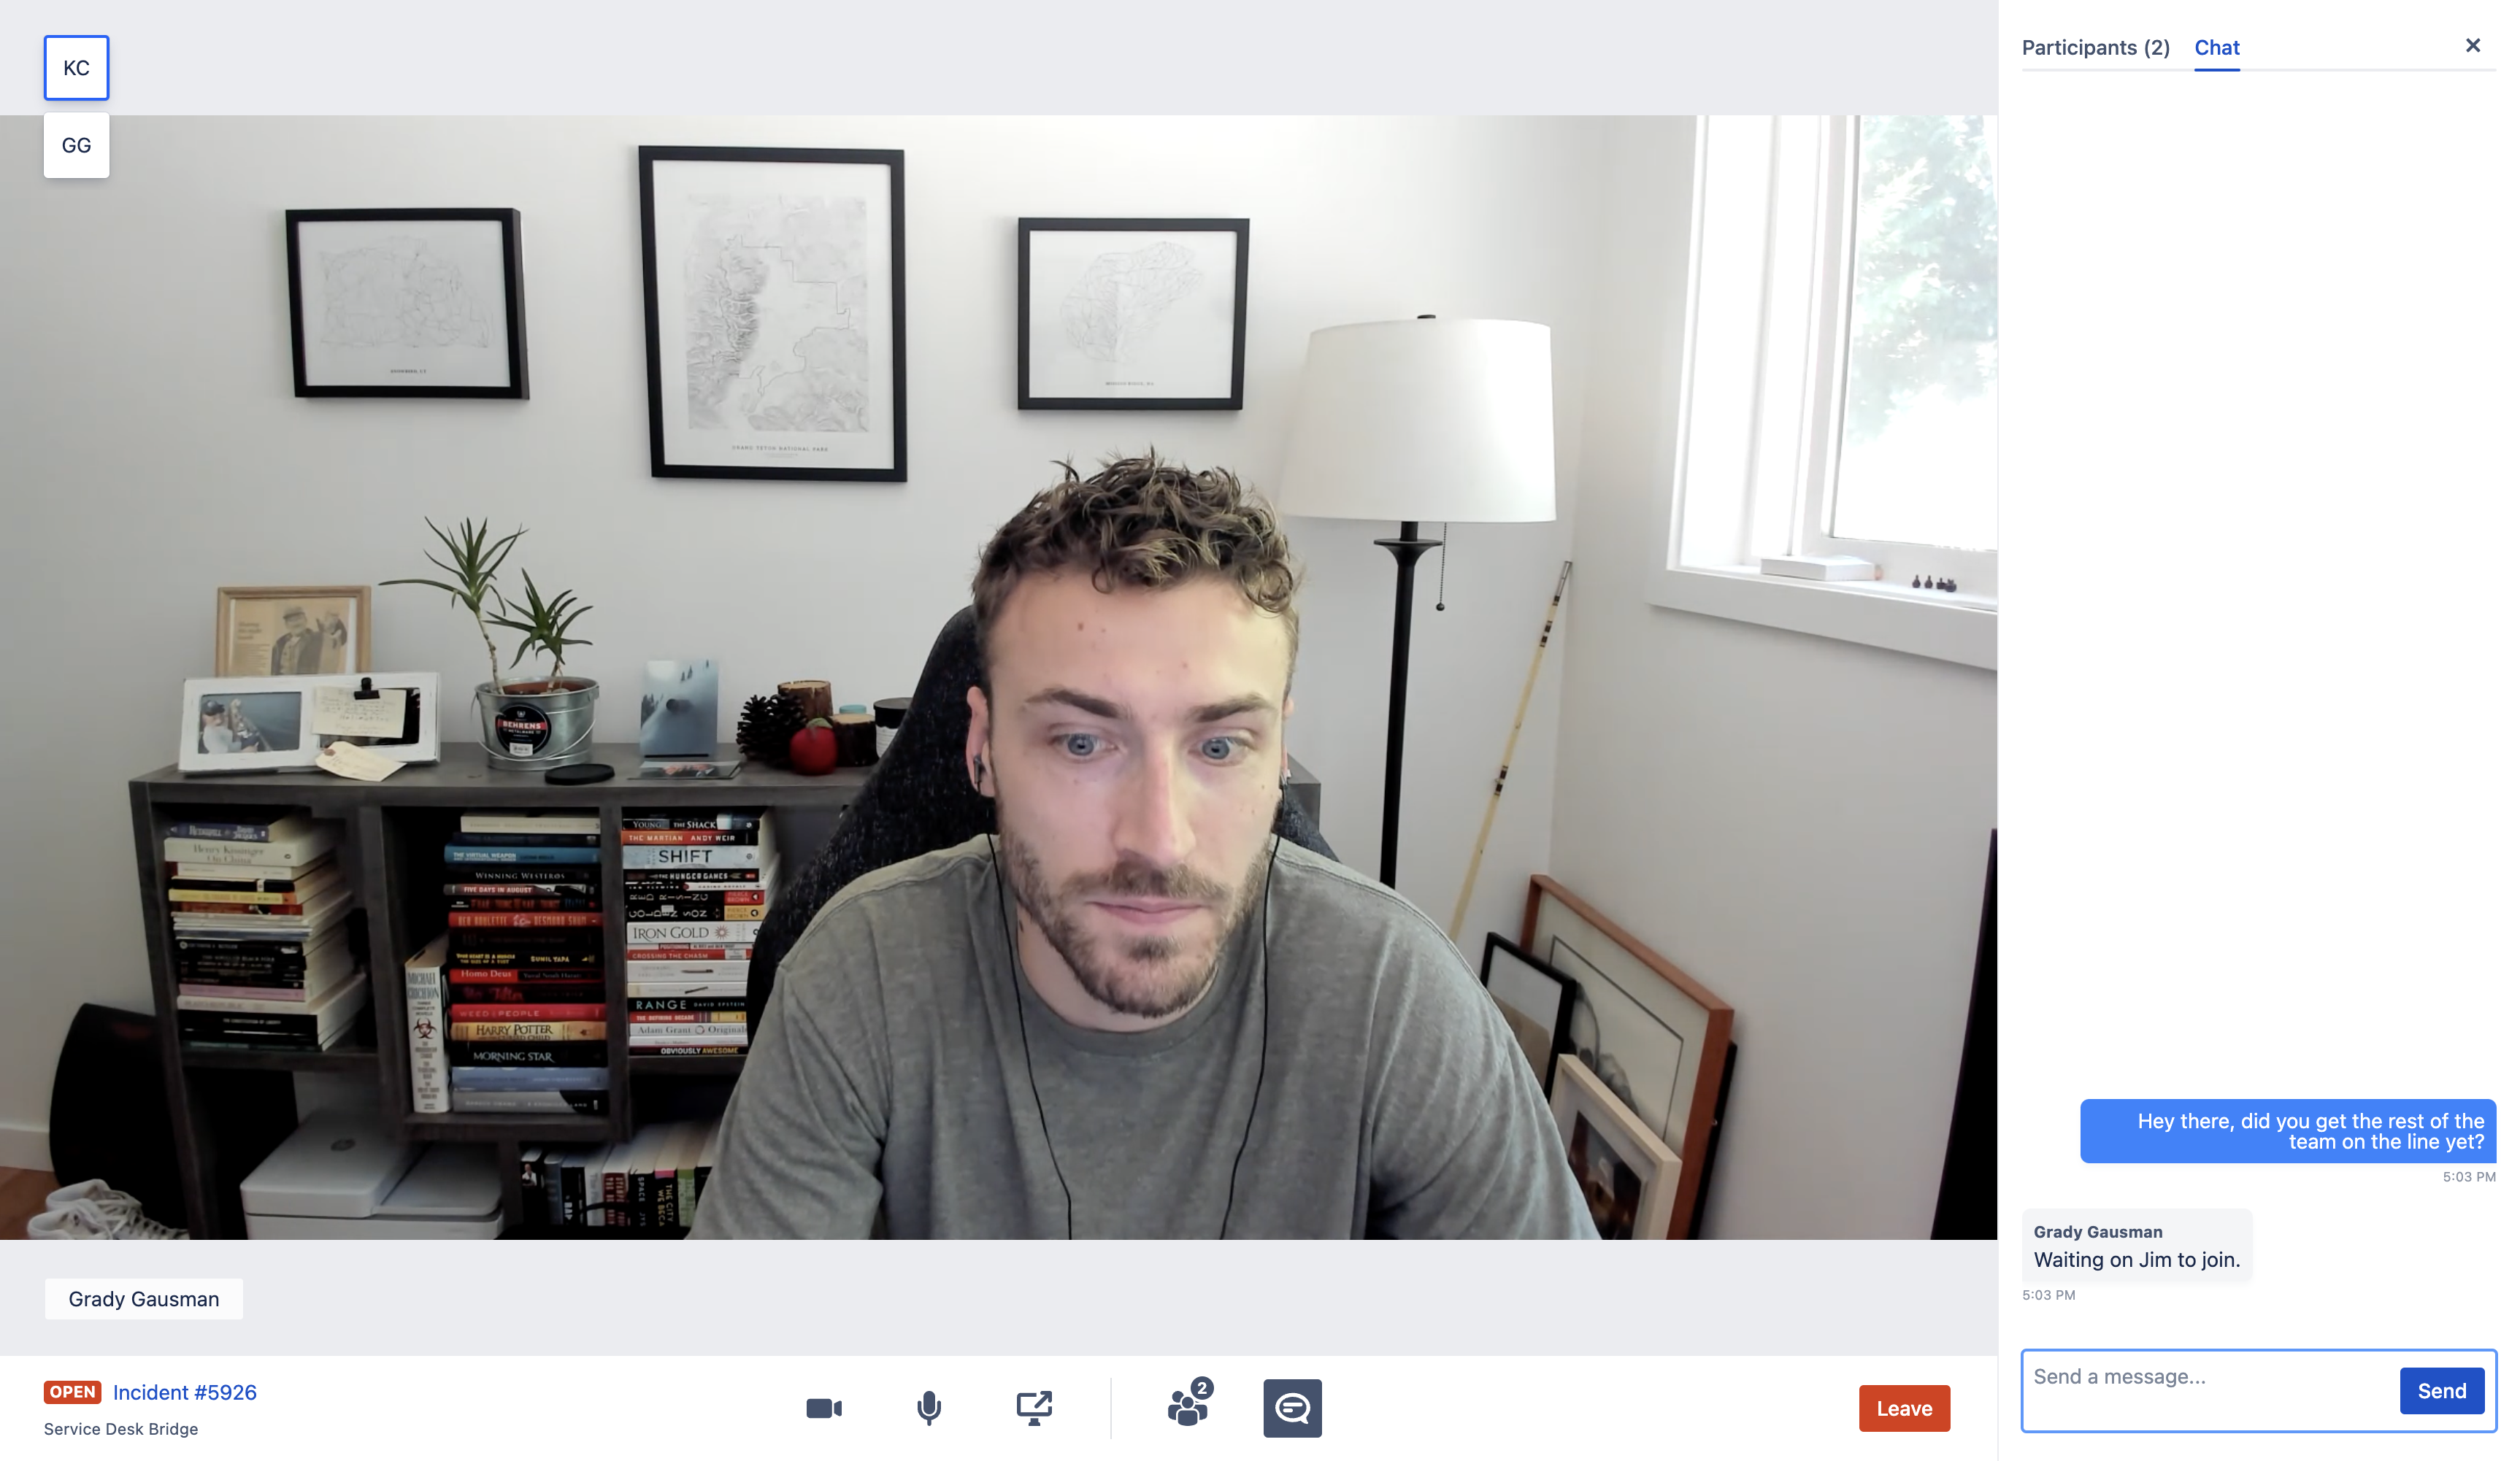
Built-in chat
Use the chat panel to send messages to other users in the call, and view the activity of participants. To open the Chat panel, select the ![]() icon underneath your video. If the Chat panel is closed when a new message is sent, a notification will appear on the left-hand side of the page.
icon underneath your video. If the Chat panel is closed when a new message is sent, a notification will appear on the left-hand side of the page.
Screen sharing
Screen sharing helps you to collaborate faster during an incident. To share a screen in a session, select the  icon underneath your video.
Adding responders
If you have permission, you can add responders while you’re in a conference call. Select Add Responders under the participants tab in the chat, and enter the team/responder name to add a new responder to the incident. The participant limit for a call is 50 users. Learn how to set permissions for the Incident Command Center.
To access incident conference calls, you can select ‘Join call’ or ‘Start call’ using the Conference call field in the Details section to the right of the issue view.
Heartbeat monitoring
In Jira Service Management Premium, heartbeats ensure that your monitoring tools are fully connected and working correctly so that you’re always aware of any connectivity issues. Heartbeats provide true end-to-end alerting by ensuring not only that monitoring tools are connected, but by monitoring job completion and alerting teams when ad-hoc tasks are incomplete.
From the Opsgenie UI (accessed through the product menu in the upper left corner), go to the global settings menu. Then select heartbeats from the left panel. Here you can add as many heartbeats as needed to monitor systems and tasks.
Alerting
Advanced alert integrations
With advanced alert integrations in Jira Service Management Premium, you can connect more than 200 third-party tools to Jira Service Management with:
- Global integrations that let you route alerts to different teams
- Outbound integrations like outgoing webhooks to send alerts to another tool or endpoint
- Bi-directional integrations that sync back and forth
- Alerts from integrations via filters in the advanced view
Voice notifications
In addition to giving you more granular control over integrations, Jira Service Management Premium also allows you to take alert notifications beyond SMS and mobile push notifications with voice notifications, ensuring that your agents never miss an alert.
To set up your alert notifications:
- In your service project, open Alerts in your sidebar navigation. This will take you to Opsgenie.
- From Opsgenie, navigate to Settings > Notifications.
- Update your contact methods by adding an email or phone number.
- Set up any notification rules.
Incoming call routing
Jira Service Management Premium allows you to opt-in to distribute and connect incoming calls to the right teams at the right time. Incoming call routing manages the process of distributing and connecting incoming calls based on your on-call preferences. This means that you can:
- Ensure customer calls are always answered, no matter how many people are on call, already engaged, or available.
- Set up your on-call schedules to make sure that the right people are available when a customers call.
- Localize your support and route calls to the right regions (incoming call language support can read messages in eight (8) different languages.
- Answer calls in your browser with browser-based call answering.
On-call schedules
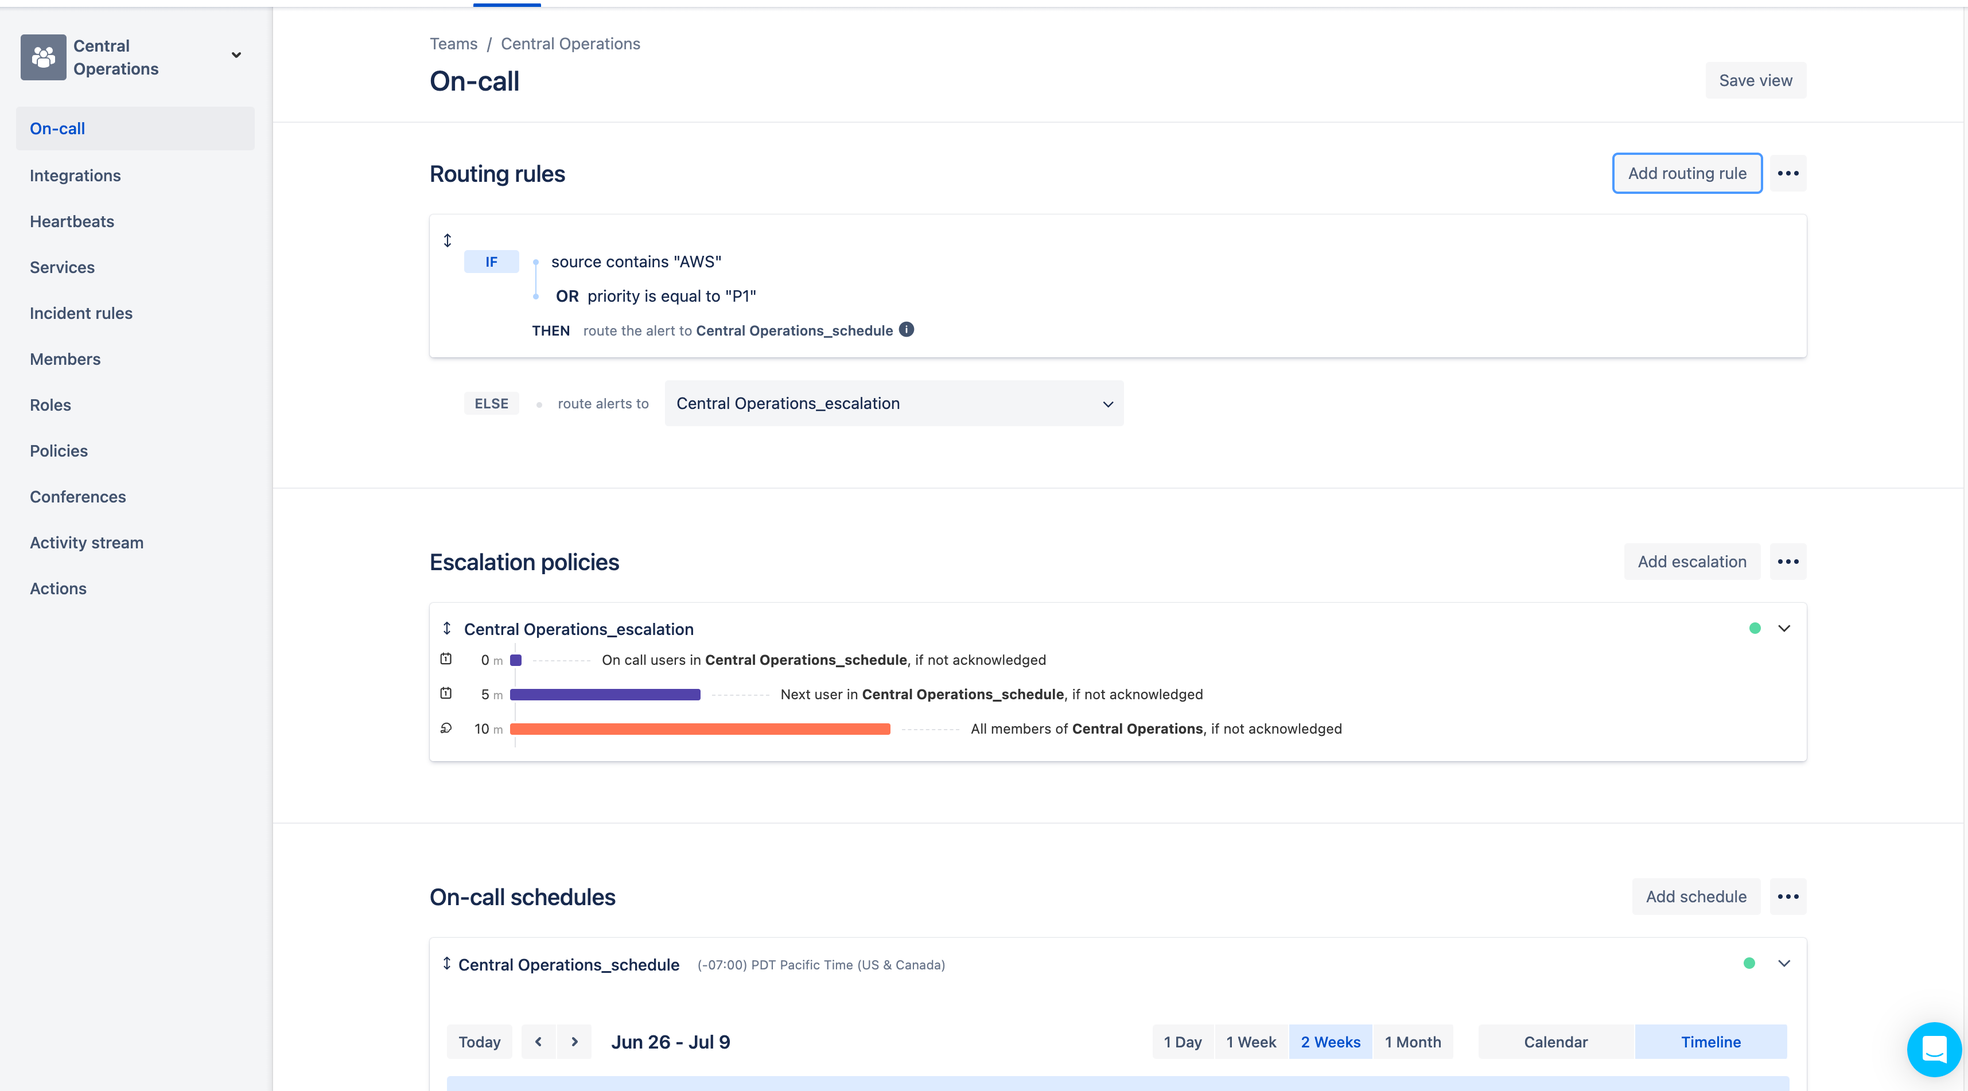
An on-call schedule is used to determine who is on-call at a given time. On-call schedules are available in all Jira Service Management plans but are set up from the Opsgenie UI from the Teams tab > On-call. However, in Jira Service Management Premium, you can take this to the next level with multiple routing rules per team and advanced escalation steps (like notifying the next user in a schedule).
Incident investigation view
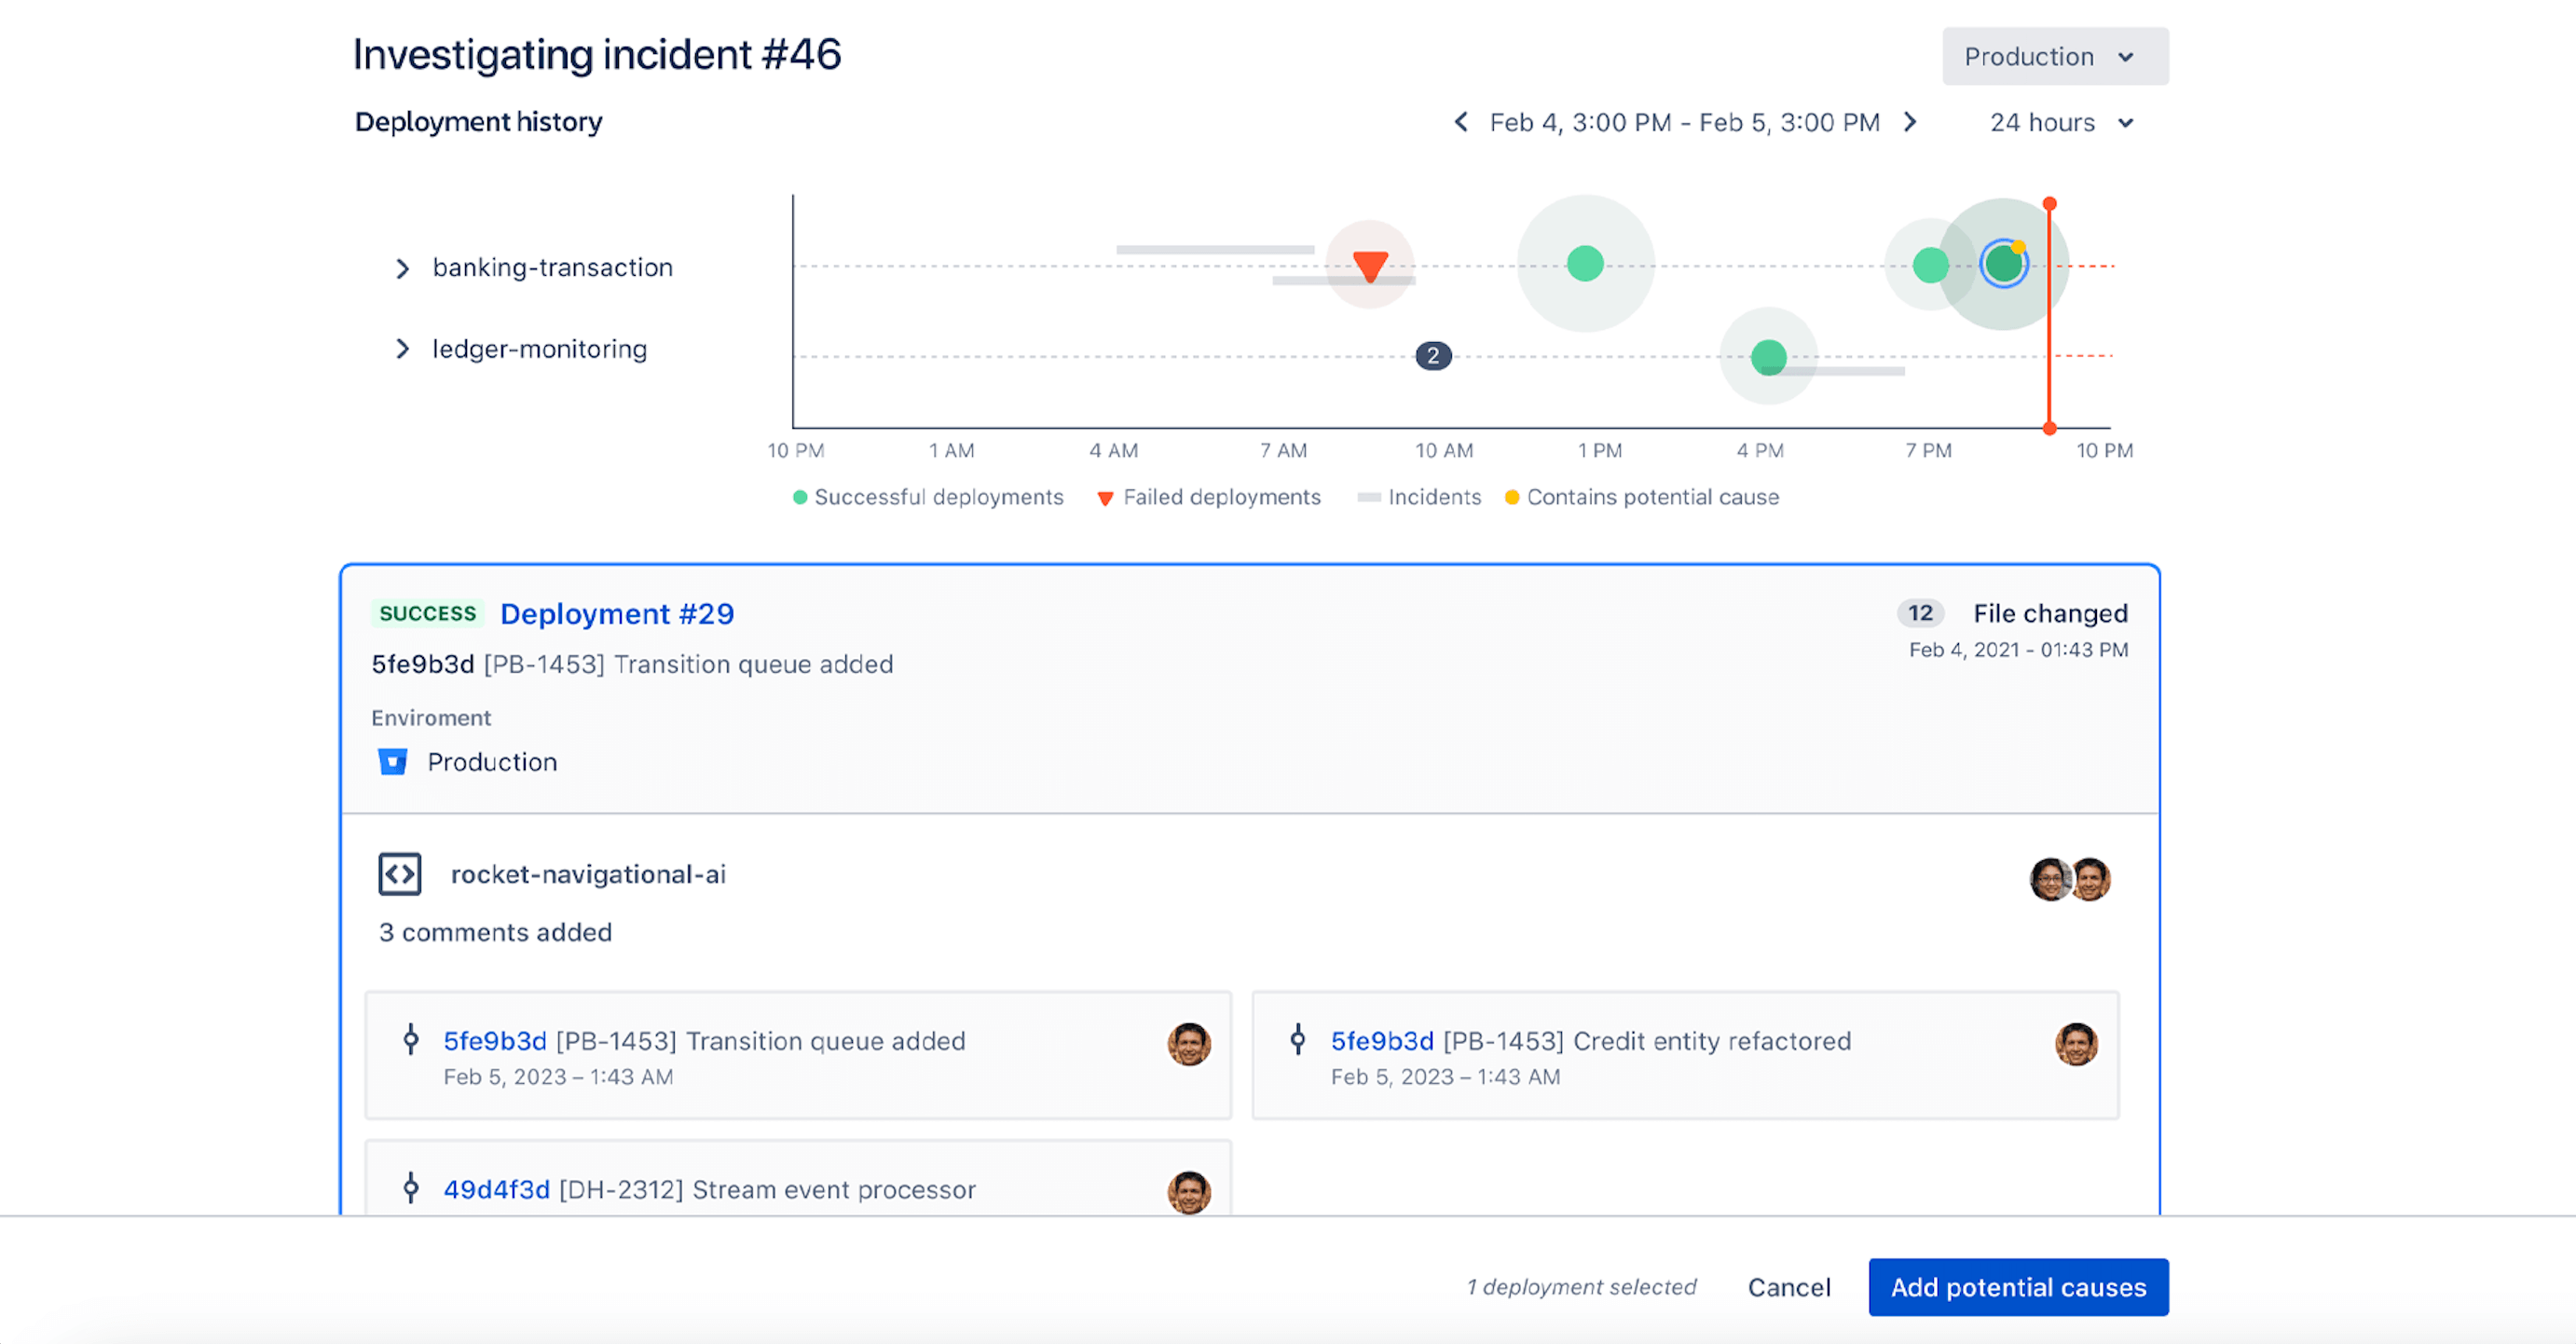
Identifying the cause of the incident helps agents better understand what steps are required to resolve the incident, reducing the MTTR (mean time to resolve) of an incident and helping agents respond to incidents better.
With the incident investigation view you can see all deployments and commits leading up to an incident, helping agents investigate an incident, identify the root cause, and mark the problematic code change as a potential cause of the incident. It also acts as a single source of truth for all changes between the last stable state of the system and the current disrupted state. These changes can be code deployments, infrastructural changes, configuration changes, feature flag changes, or manual change requests created during change management processes.
To access the incident investigation view, you’ll select a button that says “  investigate” when you’re viewing the issue during a major incident.
Flexible asset and configuration management
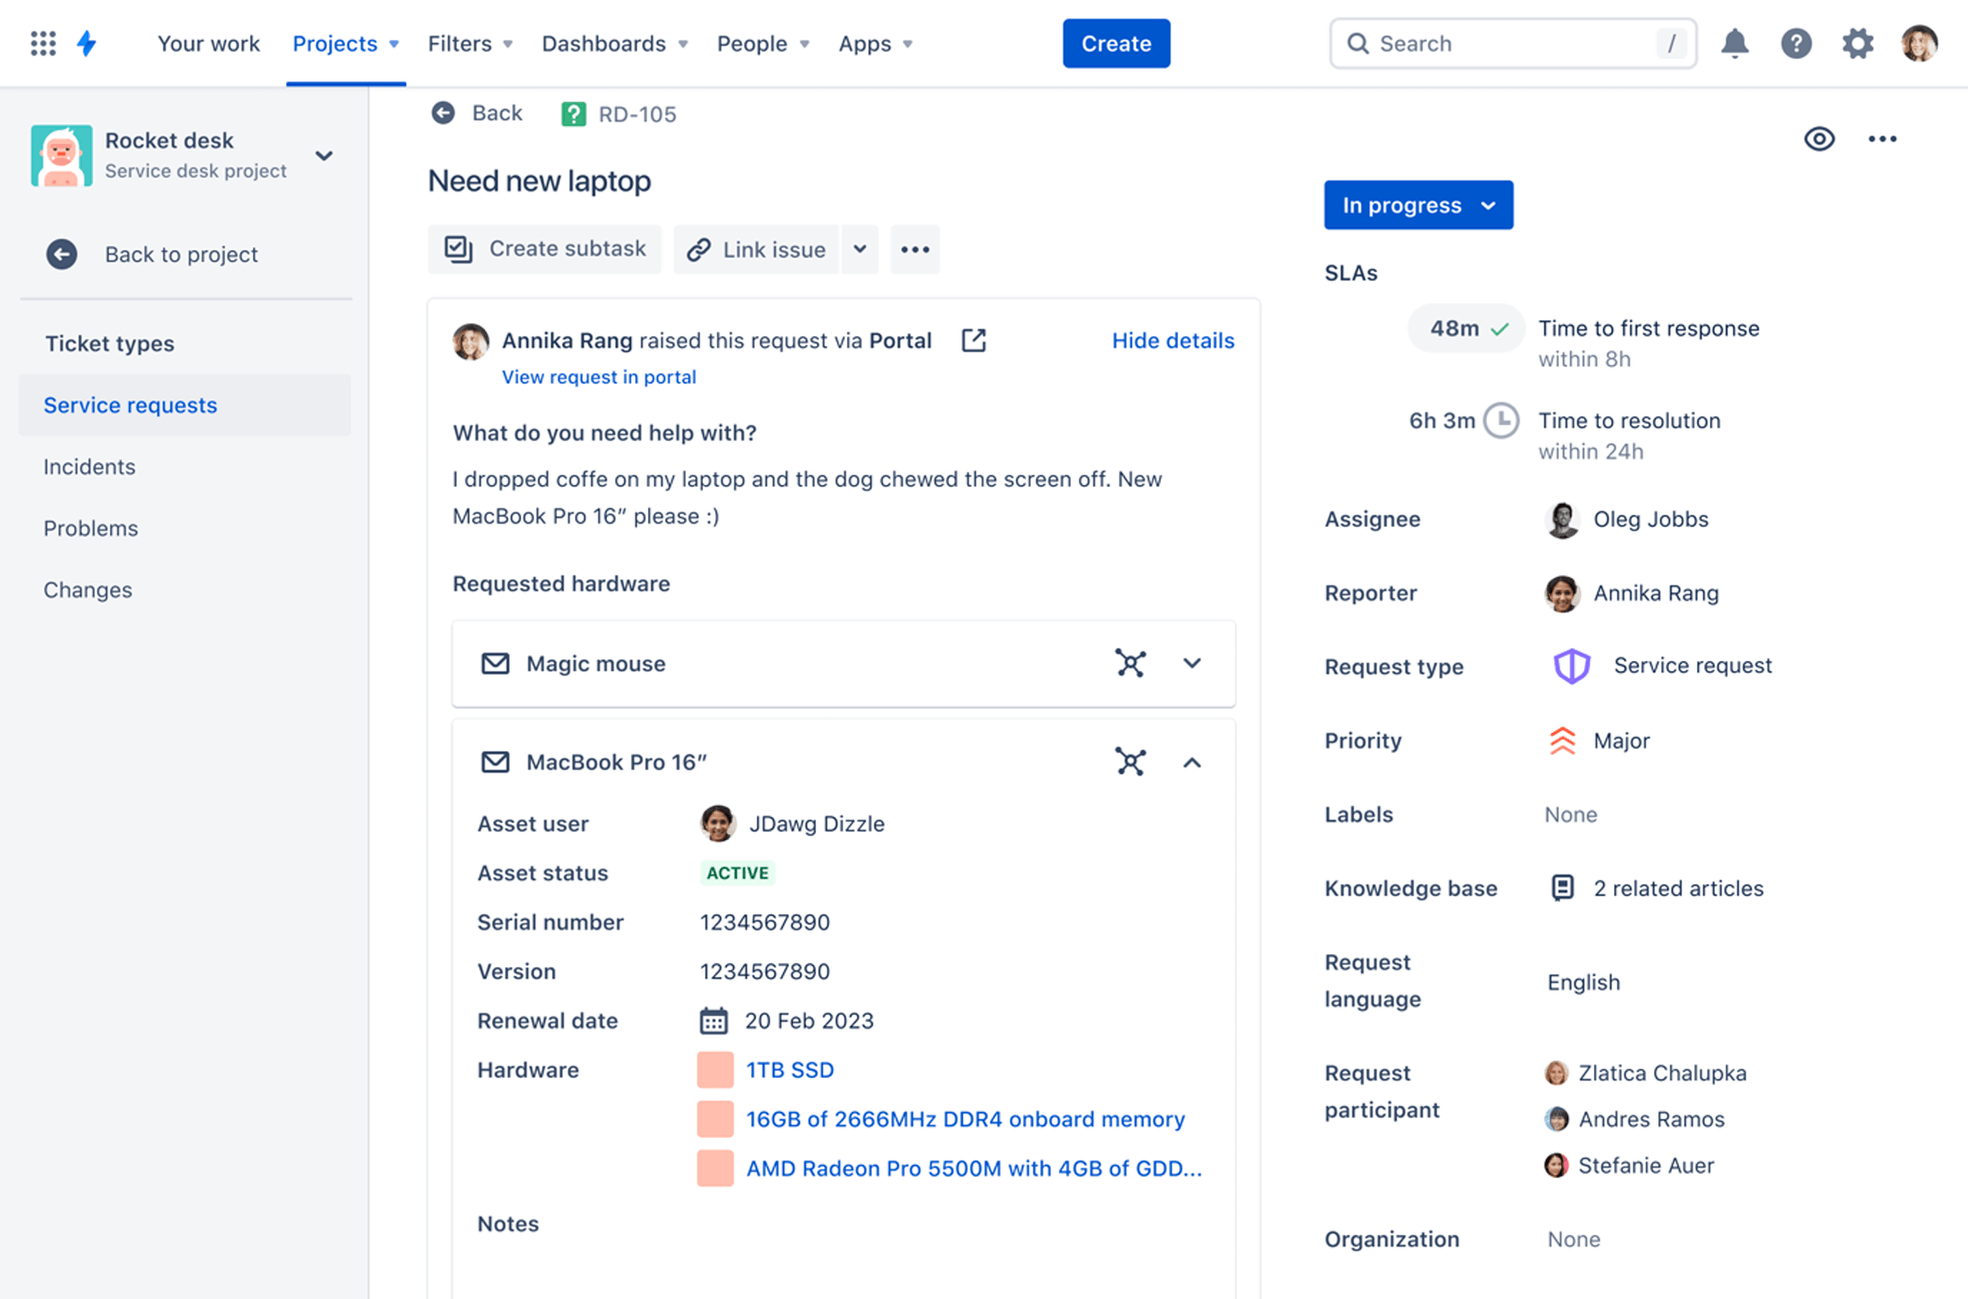
In Jira Service Management Premium, you also have access to Assets that helps teams track their assets, configuration items, and resources to gain visibility into critical relationships between applications, services, the underlying infrastructure, and other key assets. Assets is built on Jira, giving teams a simple and quick way to tie assets and configuration items to service requests, incidents, problems, changes, and other issues to gain valuable context.
To get started with Assets, check out this onboarding guide.
Change management automation
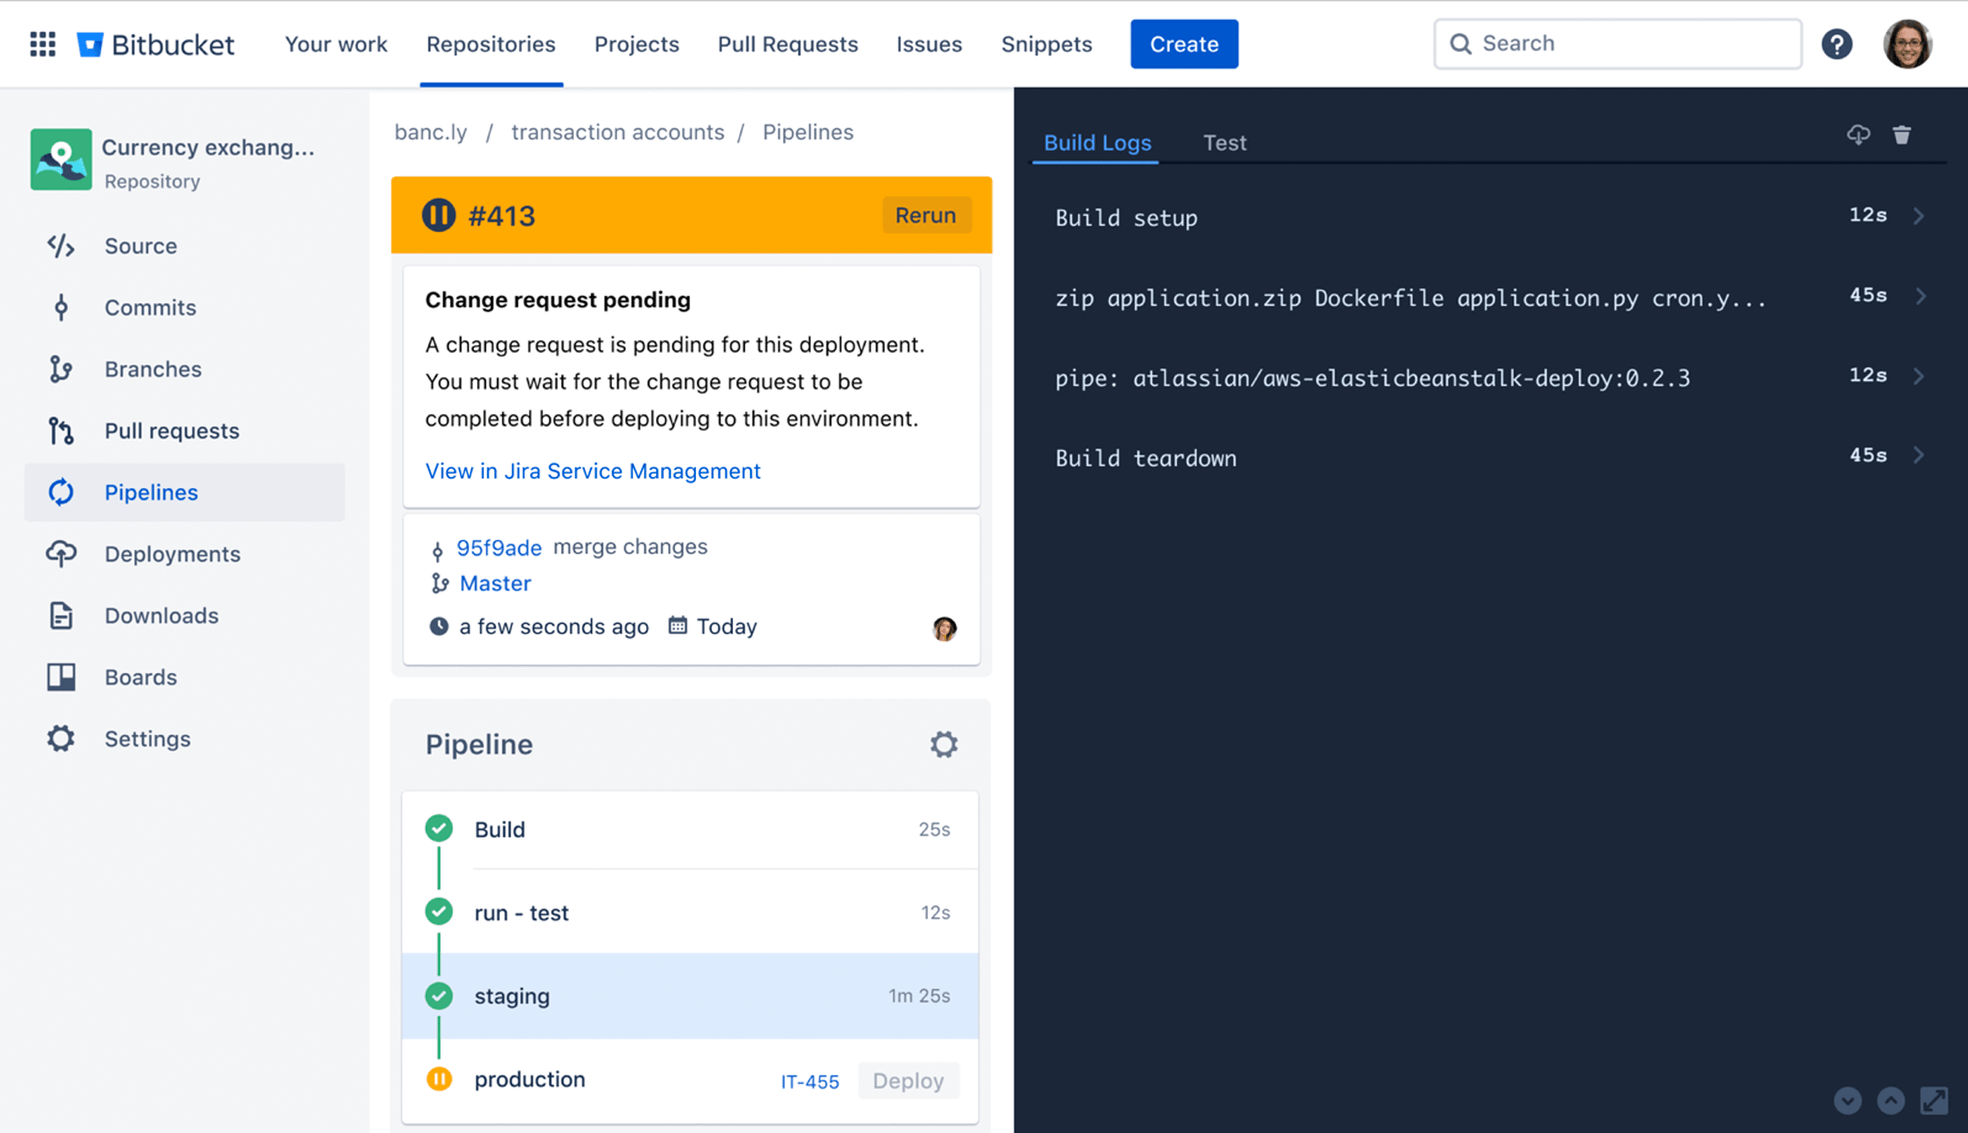
In Jira Service Management Premium, you can add deployment gating to automatically gate deployments based on change risk. Deployment gating lets you allow or prevent deployments at specific points in the change management process using a CI/CD tool that you’ve connected to Jira Service Management. This means low-risk changes can be approved automatically, while higher-risk changes will pause the deployment and notify approvers that their review is needed.
Simply adding a Jira Software issue key to the commit message creates a change record, automatically approves it, and moves the deployment to production in seconds. To use deployment gating, you’ll need to set it up in Jira Service Management first and then in your CI/CD tool.
Premium platform features
There are also features that span across Premium edition Atlassian products. In this guide, we’ll call out some that are most beneficial to Jira Service Management.
Admin insights
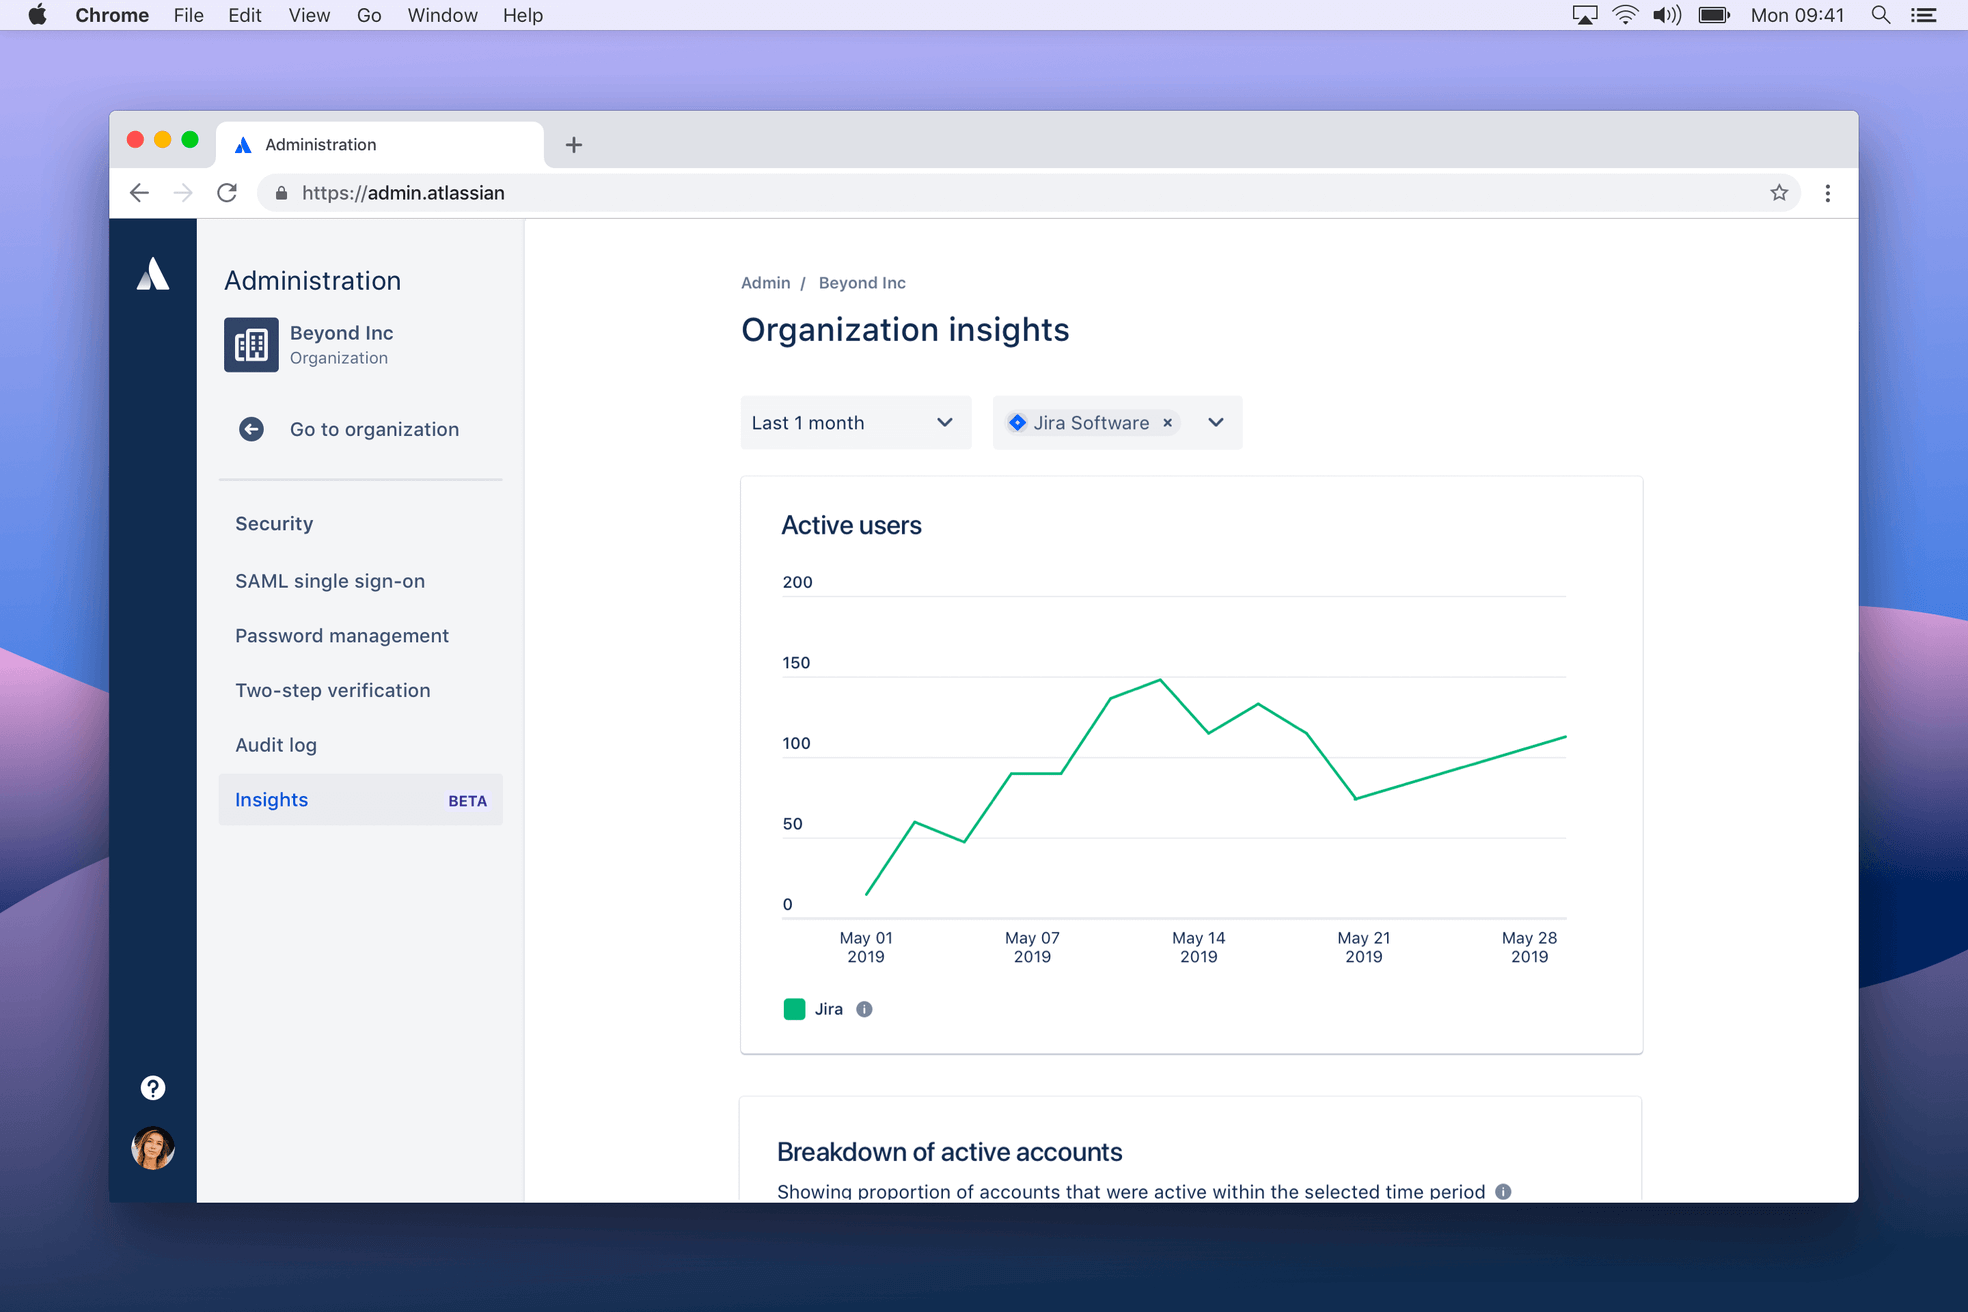
Gain insights into product usage and security practices with a set of analytics that occur across Premium plans for Jira Service Management, Jira Software, and Confluence. You can use these analytics to track the adoption of these products, make data-driven decisions about who needs product access, and evaluate the security of your organization.
To access your organization’s insights:
- Go to admin.atlassian.com. Select your organization if you have more than one.
- Select Security > Insights.
Sandbox
A sandbox is an isolated environment where you can test and experiment with before making changes to production. A sandbox allows you test and control the rollout of updates and new apps in a sandbox copy of your environment before rolling it out company-wide. While a sandbox is primarily used to test changes, you can also create a sandbox to test a migration from server to cloud.
To create a sandbox:
- Go to admin.atlassian.com. Select your organization if you have more than one.
- Select Products > Sandbox.
- Select Create sandbox.
- Choose product.
- Select Create.
We’ll notify you through email and your Sandbox page when your sandbox is ready (in some cases it could take up to 30 minutes to create your sandbox.
You must be have organization admin permissions to create sandbox. Learn more about sandbox setup.
Release tracks
Release tracks help you control when and who changes are released to end users. With options to control Atlassian cloud releases, your day-to-day management of our cloud apps becomes more predictable, helping you plan, prepare, and ensure success for upcoming product changes.
There are two different release track options:
Continuous
Products receive changes and features as soon as they become available. Products are on the continuous release track by default.
Bundled
Products receive changes as a group on the second Tuesday of each month. Changes start rolling out from 22:00 UTFC. You can’t choose the time your products receive changes.
To change release tracks:
- Go to admin.atlassian.com. Select your organization if you have more than one.
- Select Products > Release tracks.
- Find your product in the table, select Change track.
- Choose the track and select Next.
- Select Confirm.
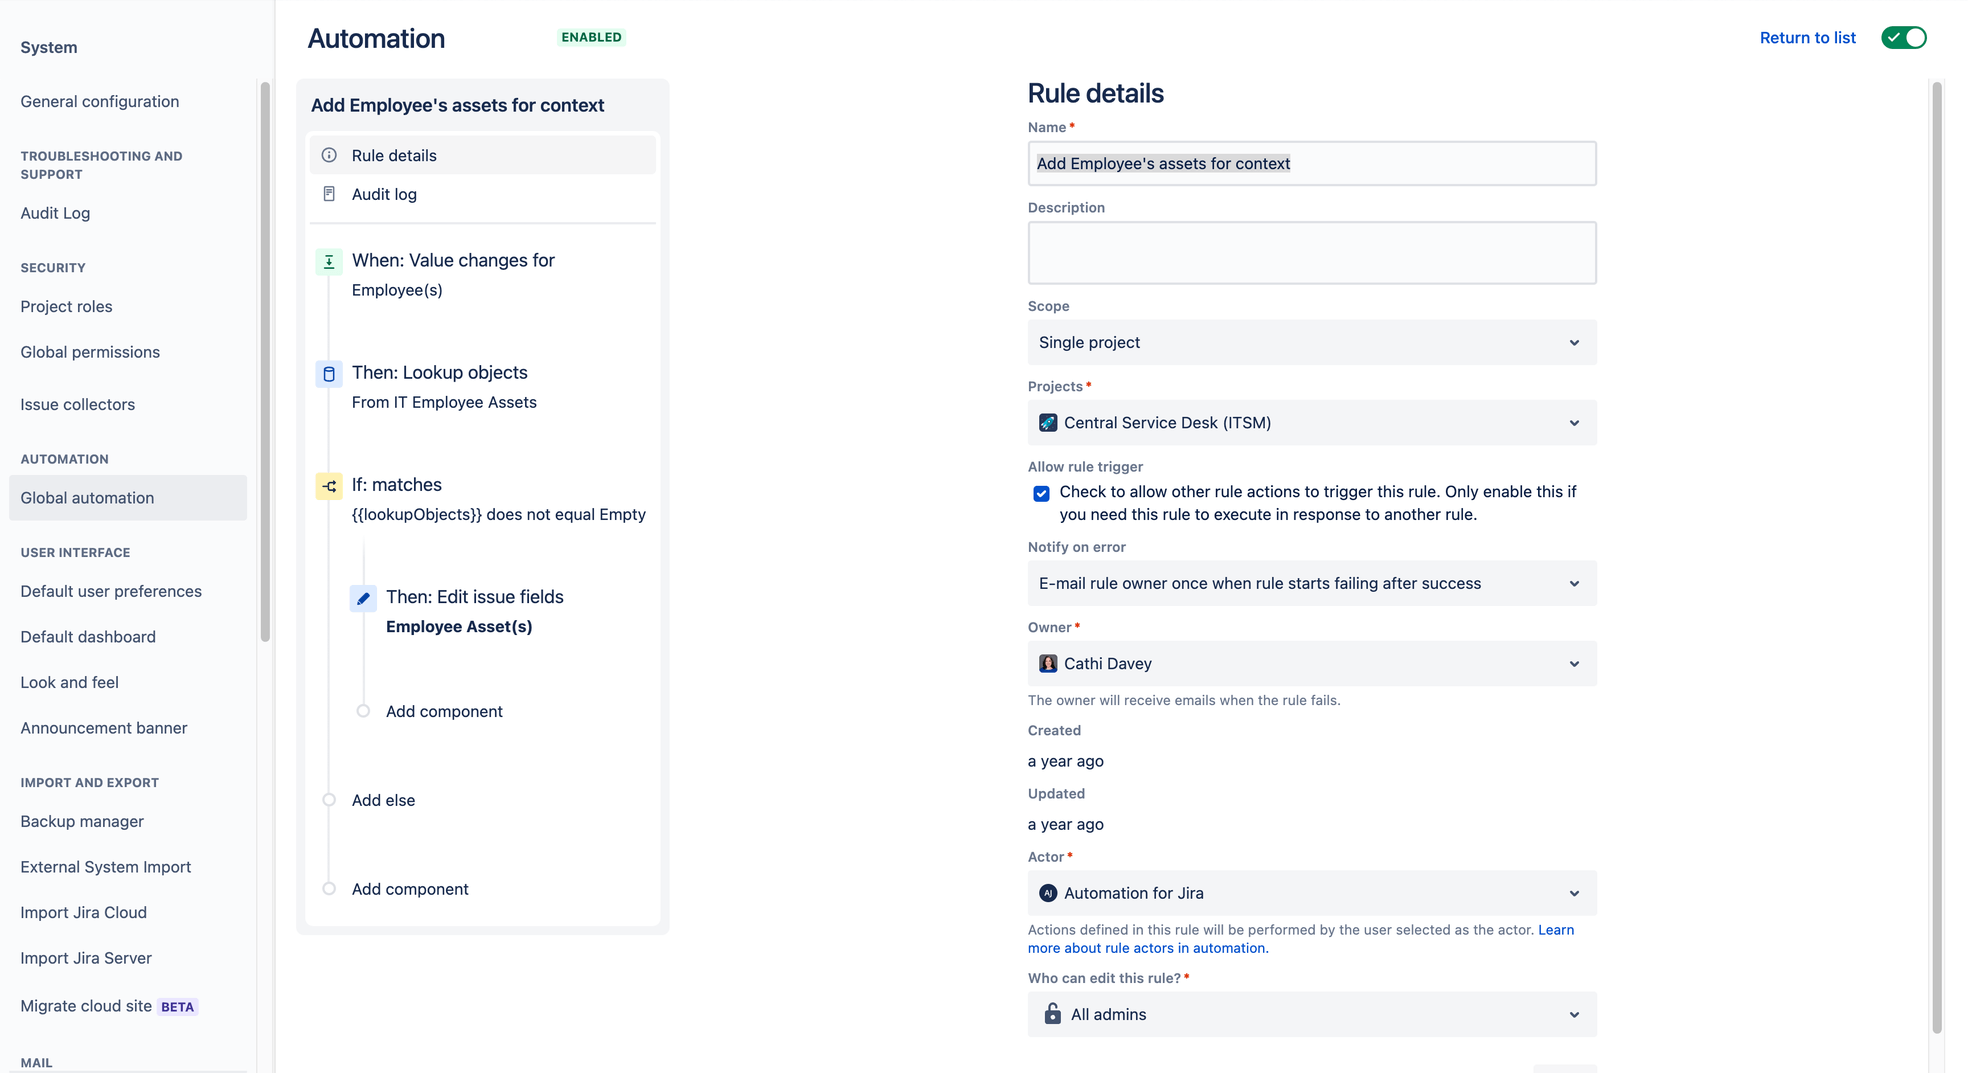
Global/multi-use automation
Global and multi-project rules help admins unlock scale with automation. Rather than needing to create and edit rules based on a project-by-project basis, this feature allows admins to create a single rule that can run across multiple or all projects in your instance.
With Jira Service Management Premium, you have access to 1,000 global and multi-project rules per month, allowing you to save time and keep your team focused with Jira’s no-code automation engine.
Pro tip- with Jira Service Management Premium, you can automate your objects in Assets to further save time and increase efficiency.
Check out our automation guide to learn more.
Conclusion
In addition to the features discussed in this guide, Jira Service Management Premium includes 24/7 Atlassian Cloud support with a one-hour response time for critical issues, unlimited storage meaning your team and customers can upload attachments and files of any size, and a 99.9% uptime SLA so you never have to worry about downtime.
You can try Premium for free! If you don’t already have Jira Service Management, you can sign up here. If you have another edition of Jira Service Management, you can try Premium by logging into your cloud site, choose Settings( ) > Billing > Manage subscriptions, and choose Change next to your plan name.
Tips and tricks
Assets onboarding