Formatting and editing a page
After creating a page, format it to give your work its due attention. In seconds, add delightful imagery or a navigational element or macro for your evolving needs.
With all teammates working on the same page, you’ll make better decisions faster. And you can always undo changes with a few easy clicks.
Edit mode, headline style & text formatting
There are endless ways to customize your Confluence page, and each one starts with our easy-to-use toolbar. And keyboard shortcuts (in parentheses below) save you valuable time when creating in Confluence.
Follow along
Edit (e) - Click the pencil icon or press the “e” key to enter “edit” mode.
In edit mode, the Confluence editor toolbar appears at the top of your page.
Learn the editor toolbar basics from left to right.
- Undo (command + Z) and redo (command + Y) are seen as arrow options on the left side.
- Headline and text style - Choose your text size, from normal (command + option + 0) to the largest option, heading 1 (command + option + 1).
- Text formatting - See options in the editor toolbar at the top to bold, italicize, or otherwise customize text using the three dots icon.
- Lists, alignment, and color - Make your page more scannable with lists and alignment, color-code certain sections, and indent or outdent.
- Action items ([ ])
- Add a link, image, or video.
- Mentions to tag users (@)
- Emojis (:)
- Tables (Shift + Option + T)
- Section layouts - Once inserted, more formatting options appear on the page beneath the columns (see 10a in image above.)
- Macros (/)
- Page width options - Default, medium, or full width
- Find and replace (control + F)
- Permissions
- Publish right away or Close without publishing
- More actions for editing and publishing
Having second thoughts? Discard changes by clicking “•••”, then “Revert to last published version.”
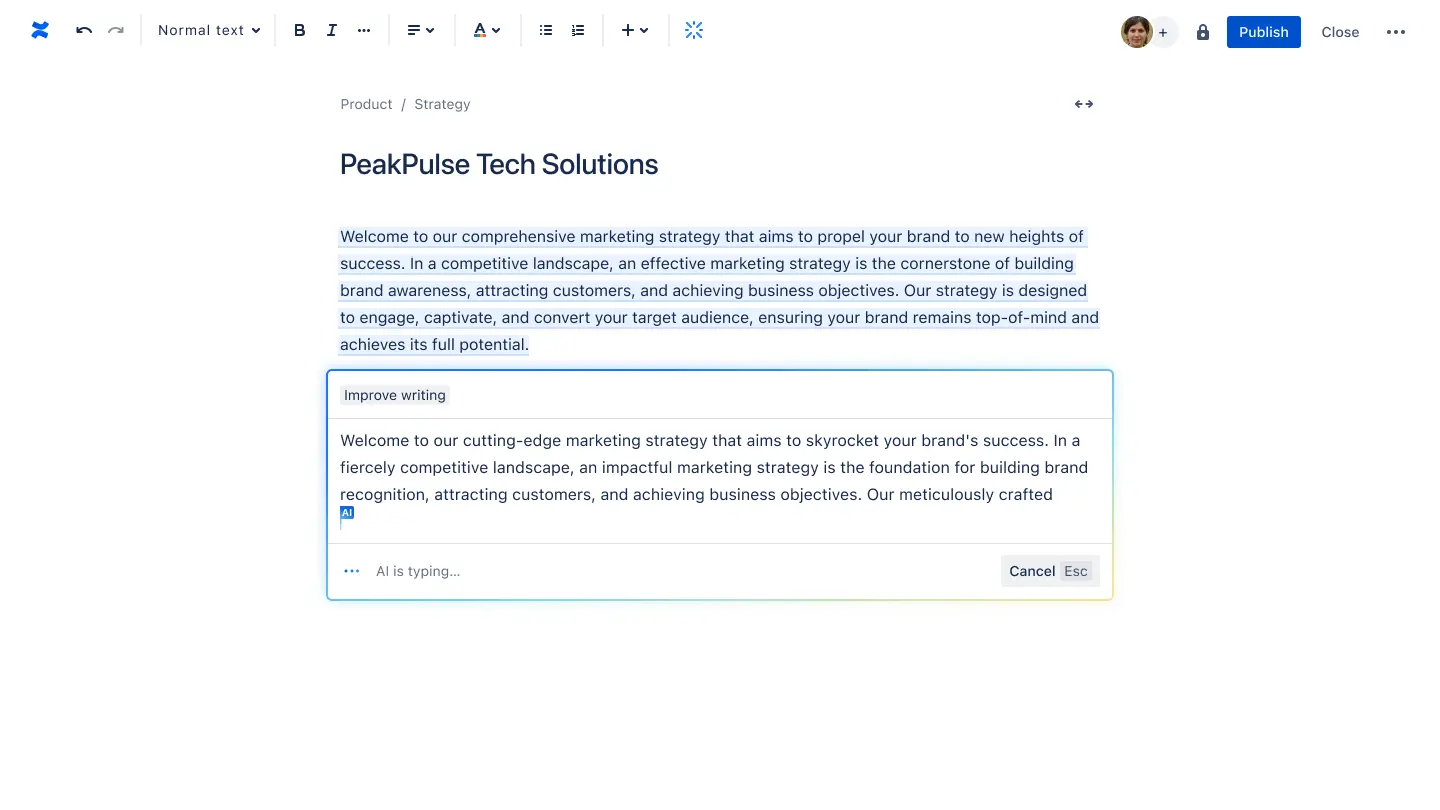
Using Atlassian Intelligence in Confluence
Have a writer’s block or need fine tuning? Atlassian Intelligence can help! If you’re on Premium or Enterprise edition of Confluence, Atlassian Intelligence can generate new content, come up with an outline, or highlight existing text to refine, and more.
Simply click the AI button or type /AI and write your prompt to get started.
Here are some pre-defined prompts on Atlassian Intelligence that’s available for you:
- Improve writing to make your writing better overall. It focuses on making things more straightforward and improving the structure and tone.
- Fix spelling & grammar to sure your writing is error-free and sounds professional.
- Make shorter to streamline your writing by condensing and refining your text.
- Change tone to tailor the emotional and stylistic impact of your words, ensuring your communication resonates with your audience. You can choose from 5 tones – casual, educational, empathic, neutral, and professional.
- Translate to easily translate your Confluence content into multiple languages when collaborating with international teams or sharing information with a global audience.
Want to refine further? You can retry the prompt, or tell AI what to do next.

Edit mode, headline style & text formatting
There are endless ways to customize your Confluence page, and each one starts with our easy-to-use toolbar. And keyboard shortcuts (in parentheses below) save you valuable time when creating in Confluence.
Follow along
Edit (e) - Click the pencil icon or press the “e” key to enter “edit” mode.
In edit mode, the Confluence editor toolbar appears at the top of your page.
Learn the editor toolbar basics from left to right.
- Undo (command + Z) and redo (command + Y) are seen as arrow options on the left side.
- Headline and text style - Choose your text size, from normal (command + option + 0) to the largest option, heading 1 (command + option + 1).
- Text formatting - See options in the editor toolbar at the top to bold, italicize, or otherwise customize text using the three dots icon.
- Lists, alignment, and color - Make your page more scannable with lists and alignment, color-code certain sections, and indent or outdent.
- Action items ([ ])
- Add a link, image, or video.
- Mentions to tag users (@)
- Emojis (:)
- Tables (Shift + Option + T)
- Section layouts - Once inserted, more formatting options appear on the page beneath the columns (see 10a in image above.)
- Macros (/)
- Page width options - Default, medium, or full width
- Find and replace (control + F)
- Permissions
- Publish right away or Close without publishing
- More actions for editing and publishing
Having second thoughts? Discard changes by clicking “•••”, then “Revert to last published version.”
